Search

Fuzzing vhosts with SNI(tch)

June 10, 2026

Fuzzing Host Headers is Outdated: Fuzzing the SNI Field with SNItch

TL;DR

Traditional host header enumeration is a well-known technique for discovering additional web services hosted on a domain. But it operates entirely at the HTTP layer, after the TLS handshake has already completed. SNItch takes a different approach than established vhost and subdomain enumeration tools by fuzzing the Server Name Indication (SNI) field during TLS handshakes, catching services that reject unknown hostnames before the HTTP layer is even reached. It combines several techniques:

  • SNI vhost enumeration: Identifies potential web services by injecting candidate hostnames into the TLS ClientHello SNI extension.
  • Built-in DNS logic: Structures FQDNs and collected certificates just like the DNS system to properly handle wildcard domains.
  • Certificate-based reconnaissance: Extracts hostnames from CommonName and SubjectAltName (SAN) fields of observed certificates and feeds them back into the scan loop.
  • Certificate transparency log-based subdomain gathering: Queries certificate transparency logs and PTR records to enrich discovery.

From a defensive perspective, SNItch also serves as a hardening validation tool: if it fails to extract any hostnames from a server accessed by IP address alone, the server is properly configured against IP address-based reconnaissance.

Install SNItch and check out the SNItch source code on GitHub.

Status quo: fuzzing host headers

How it works

Typical vhost enumeration tools discover additional web services by iterating over candidate hostnames in the HTTP Host header. The core mechanism is straightforward: send an HTTP request with a candidate hostname and observe the response:

GET / HTTP/1.1
Host: %FQDN%
Accept: */*

The server’s virtual hosting configuration routes the request based on the value of the Host header. If the candidate resolves to a configured virtual host, the server returns a distinct response (different status code, body size or content). If not, it typically returns a default page or a generic error.

Several established tools operate in this space, but they serve different purposes:

ffuf is a general-purpose web fuzzer written in Go. It can fuzz virtually any part of an HTTP request, including URL paths, query parameters, POST bodies and headers (including Host). It is not a specialized vhost or subdomain enumeration tool, but its flexibility makes it a common choice for host header fuzzing by placing the FUZZ keyword in the Host header: ffuf -u http://target -H “Host: FUZZ.example.com” -w wordlist.txt.

gobuster is a Go-based brute-forcing tool with a dedicated vhost mode specifically designed for virtual host enumeration. Unlike ffuf, gobuster’s vhost mode is purpose-built: it takes a domain, a wordlist and iterates candidate subdomains against the target, comparing response characteristics to identify valid virtual hosts.

In practice, a penetration tester uses a wordlist with candidate hostnames and sends an HTTP request for each hostname to the server. Depending on the response, the tool decides whether the response is noteworthy (e.g., a valid virtual host with a distinct response) and displays that information:

Figure 1: Screenshot of gobuster with some example domains from cirosec
Category
Date
Navigation

The blind spot

This approach works well for HTTP, and it mostly works for HTTPS as well, but it has a fundamental blind spot. All of these tools operate at the HTTP layer, after the TLS handshake has already completed. They have no visibility into what happens during connection establishment.

Some servers are specifically configured to reject unknown or unset hostnames by terminating the TLS connection at a very early stage, before an HTTP request is ever processed:

Figure 2: Screenshot of connection reset due to an unset hostname

In such cases curl will show a connection reset or TLS error depending on the server’s connection abort method. The connection reset occurs because the server inspects the SNI field in the client’s TLS ClientHello message, which does not exist, if you try to access the service by its IP address instead of by its DNS hostname.

Connection pooling and domain fronting

There is a second, more subtle problem. Tools like ffuf and gobuster use HTTP connection pooling for performance reasons: they establish a TLS connection once and then reuse it for many subsequent HTTP requests. This is standard behavior (HTTP keep-alive, HTTP/2 multiplexing) and can also speed up enumerations.

However, the SNI value is set once during the TLS handshake and remains fixed for the lifetime of that connection. When the tool iterates over candidate hostnames, it changes the Host header on each request, but the SNI field remains unchanged (typically still set to the original target domain). The result is a mismatch: the TLS layer identifies the connection as target.example.com (via SNI), while the HTTP layer claims to be requesting candidate.example.com (via Host header).

Successfully abusing this mismatch is known as domain fronting. Domain fronting was originally used as a censorship circumvention technique: a client would set the SNI to a permissible domain (e.g., allowed.cdn.com) to pass TLS inspection, then send an HTTP Host header for the actual blocked destination. Major CDN providers like Google and Amazon have since mitigated domain fronting on their infrastructure.

For vhost enumeration, this matters because servers that enforce SNI-Host consistency will reject or misroute requests where the two values diverge. A reverse proxy configured to verify that the HTTP Host header matches the SNI from the handshake will return errors or default responses for every candidate, regardless of whether the hostname is actually valid. The tool sees uniform responses and concludes nothing was found, when in reality the server simply refused to serve content over a domain-fronted connection.

Beyond connection pooling, existing tools simply do not support fuzzing the SNI field at all. From ffuf’s own README:

-sni    Target TLS SNI, does not support FUZZ keyword

ffuf explicitly acknowledges the SNI field but does not allow fuzzing it. gobuster’s vhost mode operates purely at the HTTP layer (related GitHub issue). Neither tool can discover services that are hardened at the TLS level.

SNItch avoids these problems entirely by (painfully) establishing a new TLS connection for each candidate hostname, setting the SNI field to match the hostname, effectively bypassing the connection pooling issues.

SNI on the TLS layer

What exactly is SNI?

SNI is an extension to TLS defined in RFC 6066. It allows the client to indicate which hostname it is trying to reach in the initial ClientHello message, before the TLS handshake completes. This enables a single IP address and port to serve multiple TLS-protected websites, each with its own certificate.

Without SNI, a server receiving a TLS connection on a shared IP address would have no way to know which certificate to present until after the encrypted channel was established (at which point the HTTP Host header would reveal the target). SNI solves this by transmitting the hostname in cleartext during the handshake.

By intercepting the TLS handshake in Wireshark, the SNI field may reveal the hostname, in this case cirosec.de:

Figure 3: Wireshark screenshot of TLS SNI header

Testing SNI manually

Before reaching for specialized tools, it is useful to understand how to probe SNI behavior with standard command-line utilities.

The openssl s_client command lets you set the SNI field explicitly with -servername:

# Connect without sending any SNI extension
openssl s_client -connect X.X.X.X:443 -noservername

# Test with a different hostname to see if the server response changes
openssl s_client -connect X.X.X.X:443 -servername other.example.com

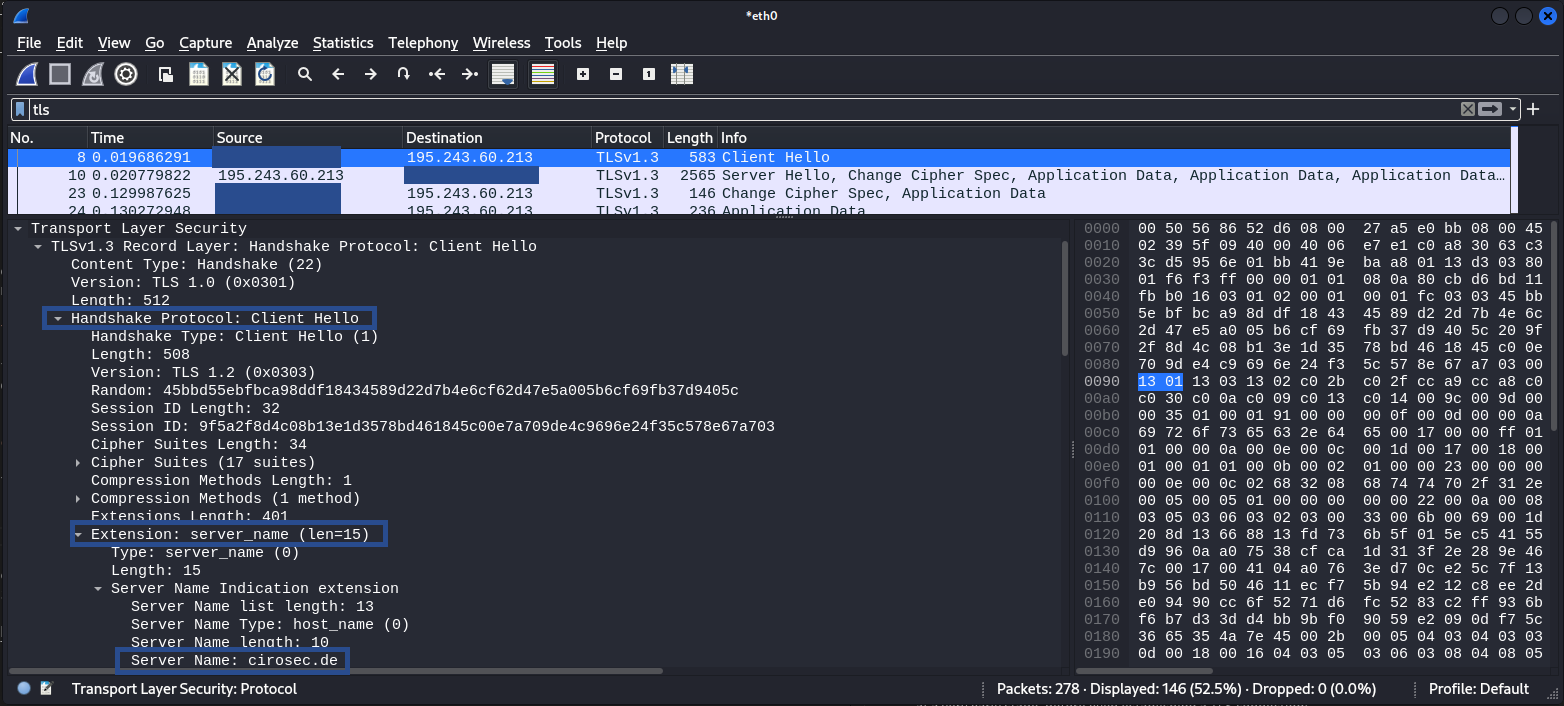
Comparing the TLS certificates returned (or whether the connection is accepted at all) reveals how the server handles SNI routing.

Similarly, curl sets the SNI field automatically based on the URL hostname. To decouple the SNI-Host value from the actual IP address you connect to, use –resolve:

# Force resolution: connect to a specific IP address but send SNI for candidate.example.com
curl -v --resolve candidate.example.com:443:X.X.X.X https://candidate.example.com/

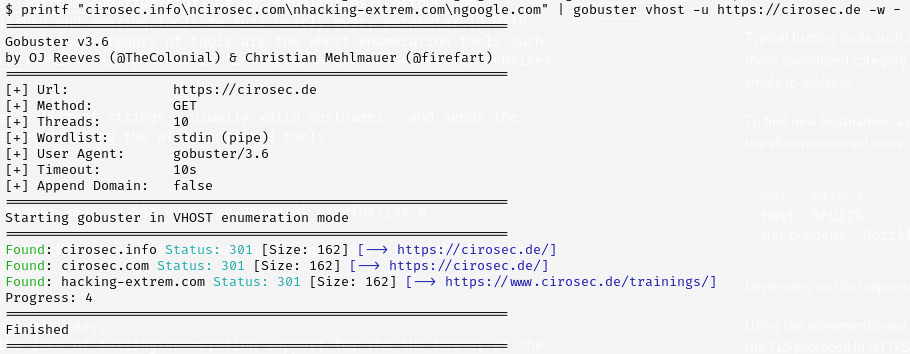
This is essentially manual vhost enumeration at the TLS and HTTP layer, which is exactly what SNItch automates at scale.

SNItch

Fuzzing the TLS handshake

SNItch addresses this gap by operating directly at the TLS layer. It uses the uTLS library to craft custom TLS ClientHello messages with full control over the SNI extension.

In the background a tree of the DNS layers is constructed which helps keep track of wildcard domains, test results to later filter out false positive results and already scanned domains.

SNItch’s scan loop is iterative. Each scan epoch is as follows:

  1. Probe all unscanned hostnames via SNI and HTTP.
    • Check for new potential branches or leafs in the DNS layer tree and test them.
  2. Lookup PTR records
  3. Discover new hostnames:
    • Extract from certificate CN/SAN fields.
    • Query crt.sh and PTR records (optional).
    • Extract from response headers (optional).
  4. Add all new hostnames to the DNS label tree for the next epoch.

This feedback loop means a single initial target can expand into a comprehensive map of related services, without relying solely on wordlists.

Hostname validation across IP address ranges

The real power of SNItch emerges when scanning multiple IP addresses that belong together, for example an entire ASN (Autonomous System Number) of a company or a cloud provider’s IP address range allocated to a single product. SNItch validates every discovered hostname against every target IP address. If one server in the range leaks a hostname through a certificate or a fallback response, SNItch will probe that hostname against all other IP addresses in the scan. This means, a single misconfigured server can reveal hostnames that are then confirmed on otherwise hardened machines across the same range.

Getting started with SNItch

Installation

SNItch is written in Go and builds as a single static binary:

git clone https://github.com/cirosec/SNItch.git
cd SNItch
go build -o SNItch .

Basic usage

The simplest invocation takes a domain name. SNItch resolves its DNS records automatically and scans port 443:

SNItch example.com

This single command already triggers the full iterative discovery loop: SNItch connects to the resolved IP addresses, extracts hostnames from returned certificates, queries crt.sh for additional subdomains, performs PTR lookups and feeds everything back into the scan queue for subsequent epochs.

To scan specific IP addresses or CIDR ranges against a set of known hostnames, use the -t (target) and -d (domains/hosts) flags:

# Scan a /24 range with two candidate hostnames
SNItch -t 10.11.10.0/24:443 -d api.example.com,mail.example.com

For larger engagements, load targets and hostnames from files:

SNItch --target-list targets.txt --host-list hostnames.txt

Controlling the discovery loop

By default, SNItch runs two scan epochs (-e 2), meaning it performs one initial scan and then one follow-up round with any newly discovered hostnames. For a deep crawl of a large range, increase the epoch count:

SNItch -t 10.0.0.0/24:443 -d example.com -e 5

Conversely, to skip all automated reconnaissance (crt.sh, PTR, certificate extraction) and only test the hostnames you supply, use –no-recon:

SNItch -t 10.0.0.1:443 -d admin.example.com,staging.example.com --no-recon

This is useful when you already have a target list and want a fast, focused scan without any external queries.

Filtering and scoping

In practice, certificate SANs and CT (certificate transparency) logs often return hostnames outside the scope of an engagement. SNItch provides two mechanisms to keep the scan narrow:

  • -i (ignore): Exclude specific FQDNs or wildcard patterns from scanning. For example, -i cdn.example.com prevents SNItch from probing CDN endpoints that would clutter results. Ignoring example.com will cause SNItch to also ignore all subdomains of example.com.
  • -r (require): Only scan hostnames matching a regex. For instance, -r “.*\.example\.com$” restricts the scan to subdomains of example.com, even if certificates or CT logs reveal hostnames on unrelated domains.

The following example allows all and only subdomains of example.com (including the domain) to be scanned excluding the subdomain cdn.example.com:

SNItch -t 10.0.0.0/24:443 -d example.com -i cdn.example.com -r ".*\.example\.com$"

Tuning for the environment

For rate-limited or sensitive environments, concurrency and timeouts can be adjusted:

# Reduce to 10 threads, increase timeout to 30 seconds
SNItch -t 10.0.0.0/24:443 -d example.com -p 10 --timeout 30

Some targets behind Cloudflare or similar CDNs will temporarily block IP addresses when a source repeatedly sends the IP address as SNI value (which violates RFC 6066). Disable this probe type with –no-ip-sni:

SNItch example.com --no-ip-sni

Hardening validation

To use SNItch as a defensive tool, you can scan your own infrastructure by IP addresses alone, without supplying any hostnames or enabling reconnaissance:

SNItch -t 203.0.113.42:443 --no-recon

If SNItch fails to extract any hostnames, certificates or meaningful HTTP responses, the target is properly hardened against IP address-based reconnaissance. Any discovered hostname indicates information leakage.

Defending against SNItch

Server hardening

A common reconnaissance approach for attackers is to scan IP address ranges and access servers directly by IP address, without supplying any hostname. If the server responds with a certificate or default page, the attacker learns the hostnames from the certificate’s CommonName or SubjectAltName fields and can potentially use them to map out the infrastructure.

A well-configured server should reveal nothing in this scenario. Specifically:

  • No SNI, no handshake: The server should reject TLS connections that omit the SNI extension or provide an unknown hostname, without returning a certificate.
  • No fallback certificate: A default or wildcard certificate served to unknown SNI values leaks domain information to anyone probing the IP address or random hostnames.
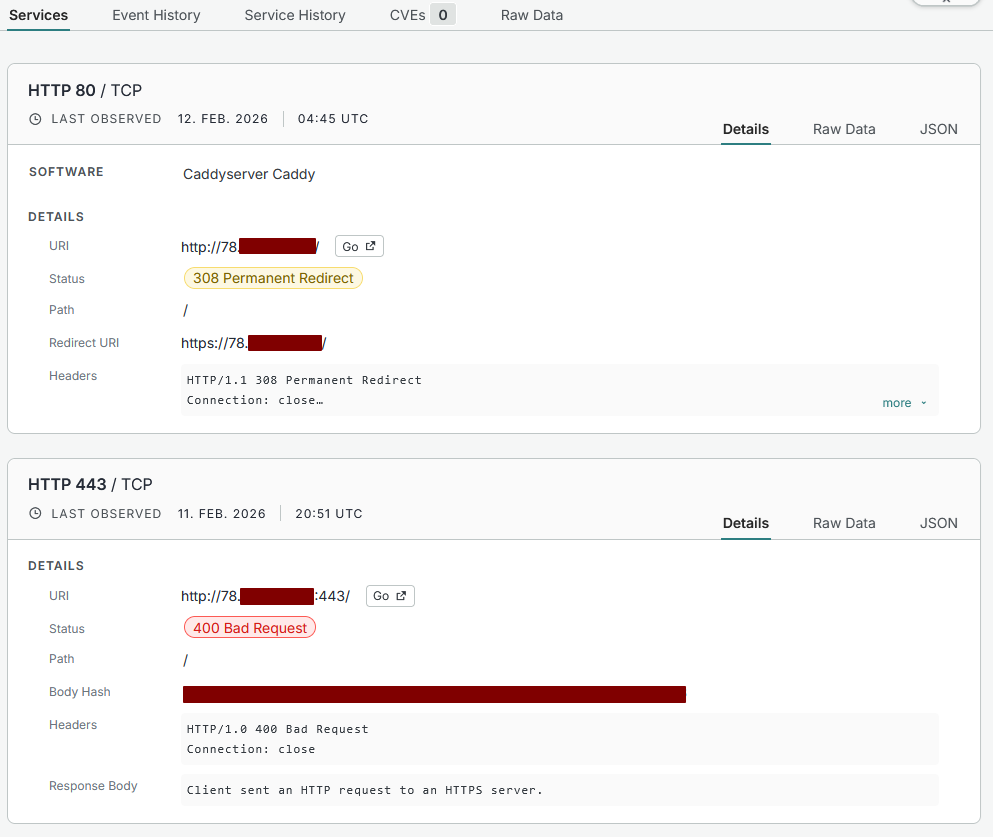
  • Port 80 hardened: Hardening HTTPS on port 443 is not sufficient. The HTTP port (80) must also be configured to reject or redirect requests with unknown or missing Host A server that strictly validates SNI on 443 but serves a default page on port 80 still leaks its hostname to anyone who connects over plaintext HTTP.

It is worth noting that this type of hardening is a defence against mass scans and automated web crawlers that enumerate IP address ranges without prior knowledge of hostnames. A determined attacker who resolves all known forward DNS entries pointing to the server’s IP address will still discover its hostnames. The goal is to avoid volunteering that information to unauthenticated, opportunistic probes. Furthermore, as described above, SNItch can circumvent per-server hardening by scanning correlated IP address ranges: if any single server in the range leaks a hostname, SNItch will test it against all other targets, potentially confirming services on otherwise hardened machines.

When SNItch is run against a properly hardened target and fails to extract any hostnames, certificates or meaningful HTTP responses, that is a positive result. It confirms that an attacker who only knows the IP address has no foothold to begin hostname enumeration. Conversely, if SNItch discovers hostnames from a cold start on an IP address alone, it exposes exactly the information leakage that the server configuration should prevent.

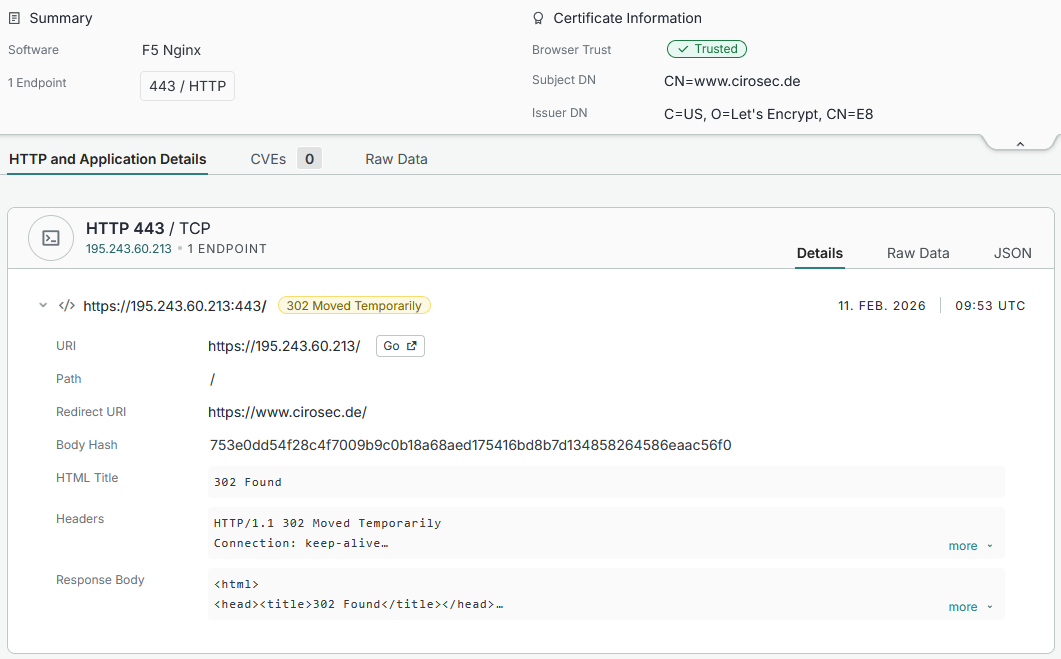
An unhardened HTTPS server in censys clearly shows at least the supported domain and certificate:

Figure 4: The (former) setup of the cirosec.de website as example of a unhardened host.

While a server with proper hardening will just reject the connection or serve an HTTP “Bad Request” response:

Figure 5: Censys.io screenshot from a hardened host

Logging and detection

From a defensive perspective, SNI-based enumeration is harder to detect than HTTP-level vhost fuzzing:

  • No HTTP logs: If the server rejects the TLS handshake (unknown SNI), no HTTP request is generated. In some cases, this is recorded in the error log of the web server.
  • TLS-level logging required: Detection requires TLS handshake logging, which is not enabled by default on most web servers.
  • Volume-based detection: A burst of TLS (potentially anomalous) handshakes from a single source with rapidly changing SNI values is anomalous and detectable through connection metadata, even without inspecting the SNI content.

So, if your monitoring stack only looks at HTTP logs, SNI-based enumeration is nearly invisible to you.

Recommended configurations (nginx, Caddy)

The following minimal configurations for the nginx and Caddy webservers demonstrate proper SNI hardening. Both follow the same principle: serve the real site only for the exact matching hostname, and for everything else (unknown SNI, direct IP access), use a self-signed certificate and immediately terminate the connection.

nginx:

# Real site: only served for the exact hostname
server {
    listen 443 ssl;
    server_name example.com;

    ssl_certificate     /etc/nginx/certs/fullchain.pem;
    ssl_certificate_key /etc/nginx/certs/privkey.pem;

    root /usr/share/nginx/html;
    index index.html;
}

# [...] Other real sites

# Catch-all: reject unknown SNI with a self-signed cert. Always the final block
server {
    listen 443 ssl default_server;
    server_name _;

    ssl_certificate     /etc/nginx/self-signed/selfsigned.crt;
    ssl_certificate_key /etc/nginx/self-signed/selfsigned.key;

    return 444;
}

The default_server block catches all requests where the SNI does not match any configured server_name. The return 444 directive is nginx-specific: it closes the TCP connection without sending any HTTP response.

Caddy:

# Real site: only served for the exact hostname
example.com:443 {
    tls /etc/caddy/certs/fullchain.pem /etc/caddy/certs/privkey.pem
    root * /srv
    file_server
}

# Catch-all: reject everything else
:443 {
    tls /etc/caddy/self-signed/selfsigned.crt /etc/caddy/self-signed/selfsigned.key
    abort
}

Caddy’s abort directive immediately closes the connection. The catch-all :443 block without a hostname matches any request that does not match a more specific site block.

Note that in both configurations, the TLS handshake with the self-signed certificate still completes before the connection is terminated. Standard web servers cannot reject the connection before presenting some certificate, since SNI is evaluated during the handshake. The critical point is that the self-signed certificate does not contain any real domain names, so an attacker learns nothing from it.

Summary and conclusion

Host header fuzzing remains useful, but it is incomplete. Tools like ffuf and gobuster operate exclusively at the HTTP layer and cannot discover services that gate access at the TLS handshake via SNI validation. Their reliance on connection pooling further compounds the problem, producing domain-fronted requests that SNI-enforcing servers will reject. SNItch fills this gap by fuzzing the SNI extension directly, establishing a fresh TLS handshake per candidate and combining TLS-level probing with certificate analysis and DNS reconnaissance in an iterative discovery loop.

On the defensive side, SNItch doubles as a hardening validation tool. Running it against your own infrastructure from a starting point based on IP addresses only reveals exactly the information an opportunistic scanner would obtain: leaked certificates, fallback pages and unprotected plaintext endpoints. A clean SNItch run, one that extracts no hostnames, confirms that the server is properly configured against IP address-based reconnaissance.

Defenders should also be aware that SNI-based enumeration leaves minimal traces in HTTP access logs when the handshake is rejected. Detecting it requires TLS-level logging or connection-metadata analysis, capabilities that most monitoring stacks do not enable by default.

Check out the SNItch source code on GitHub.

References

Further blog articles

Red Teaming

Windows Instrumen­tation Call­backs – Part 4

February 10, 2026 – In this blog post we will cover ICs from a more theoretical standpoint. Mainly restrictions on unsetting them, how set ICs can be detected and how new ones can be prevented from being set. Spoiler: this is not entirely possible.

Author: Lino Facco

Mehr Infos »
Reverse Engineering

Windows Instrumen­tation Call­backs – Part 3

January 28, 2026 – In this third part of the blog series, you will learn how to inject shellcode into processes with ICs as an execution mechanism without creating any new threads for your payload and without installing a vectored exception handler.

Author: Lino Facco

Mehr Infos »
Command-and-Control

Beacon Object Files for Mythic – Part 3

December 4, 2025 – This is the third post in a series of blog posts on how we implemented support for Beacon Object Files (BOFs) into our own command and control (C2) beacon using the Mythic framework. In this final post, we will provide insights into the development of our BOF loader as implemented in our Mythic beacon. We will demonstrate how we used the experimental Mythic Forge to circumvent the dependency on Aggressor Script – a challenge that other C2 frameworks were unable to resolve this easily.

Author: Leon Schmidt

Mehr Infos »
Command-and-Control

Beacon Object Files for Mythic – Part 2

November 27, 2025 – This is the second post in a series of blog posts on how we implemented support for Beacon Object Files (BOFs) into our own command and control (C2) beacon using the Mythic framework. In this second post, we will present some concrete BOF implementations to show how they are used in the wild and how powerful they can be.

Author: Leon Schmidt

Mehr Infos »
Command-and-Control

Beacon Object Files for Mythic – Part 1

November 19, 2025 – This is the first post in a series of blog posts on how we implemented support for Beacon Object Files into our own command and control (C2) beacon using the Mythic framework. In this first post, we will take a look at what Beacon Object Files are, how they work and why they are valuable to us.

Author: Leon Schmidt

Mehr Infos »
Do you want to protect your systems? Feel free to get in touch with us.
Search
Search