Search

Microsoft Defender for Identity evasions in 2026 – Part I

Search

Microsoft Defender for Identity evasions in 2026 – Part I

June 16, 2026

Microsoft Defender for Identity evasions in 2026 – Part I

Introduction

When it comes to working with Microsoft Defender for Identity (DfI) from an offensive perspective, for instance during a red team assessment, research has already been conducted that highlights detection and evasion possibilities for different alerts. Research was previously done by Synacktiv, for example, for one of the pass-the-cert alerts (“Suspicious certificate usage over Kerberos protocol (PKINIT)”), multiple reconnaissance alerts, alerts for kerberoasting, AS-REP roasting and golden-ticket attacks.

The first part of this blogpost will summarize the research conducted at cirosec during the last few weeks related to DfI’s detection capabilities for high-impact attacks on Active Directory like shadow-credentials, pass-the-cert, ESC8 and DCSync and its respective evasion possibilities. Also, one of DfI’s main components called “Network Name Resolution” will be introduced, which is vulnerable to spoofing and relaying in DfI version 2.2, allowing multiple alerts to be evaded. Differentiation will be made and demonstrated between the DfI versions 2.2 and 3.0. 

The second part of the blogpost will show options for the blue teamer’s perspective and offer alternative possibilities to detect some of the attacks that were performed while using DfI evasion. If you are interested in this, the blogpost can be found here: Microsoft Defender for Identity evasions in 2026 – Part II

When talking about “evasion” in this blogpost, the term is defined in two ways. The first is when the detection logic for a part of an attack does not exist, which can be used to evade alerting DfI in general. The other definition of evasion is when performing an attack and actively misleading existing detection logics to evade the alert. 

Defender for Identity – architecture and overview

Microsoft DfI is one of the main components of the Microsoft Defender XDR solution besides other security products like Microsoft Defender for Endpoint and Defender for Office 365. DfI aims to help organizations to detect identity-related attacks across on-premises Active Directory. To accomplish that task, DfI collects different signals from the network through its agents, which are placed at the most critical Windows servers. The identity signals gathered by these agents are transferred into the Microsoft Defender XDR portal, where a correlation of these signals with data from other products like Defender for Endpoint happens, which can highlight ongoing attacks, starting from one endpoint, going across the domain against sensitive targets like domain controllers.

Figure 1: Microsoft Defender XDR (https://learn.microsoft.com/en-us/defender-xdr/pilot-deploy-overview)

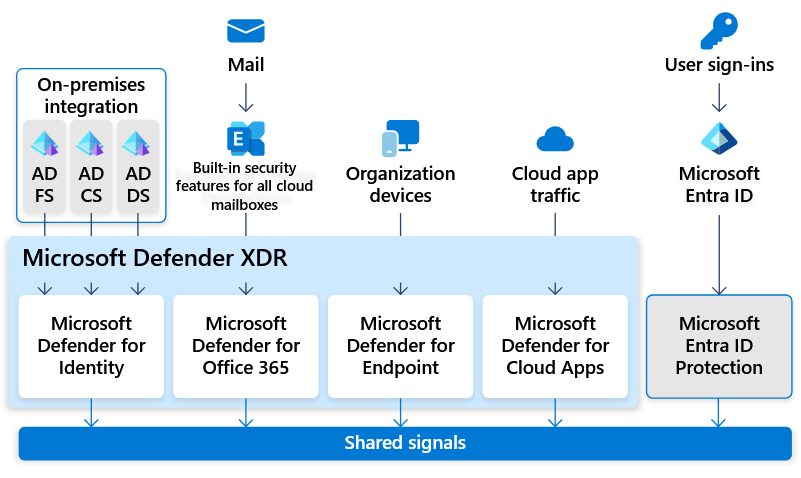
The following Windows server rolls for DfI deployment are currently supported:

  • Active Directory – Domain Services (AD DS)
  • Active Directory – Certificate Services (AD CS)
  • Active Directory – Federation Services (AD FS)
  • Entra Connect server

Laboratory setup

Figure 2: Lab setup
Jakob Scholz

Consultant

Category
Date
Navigation

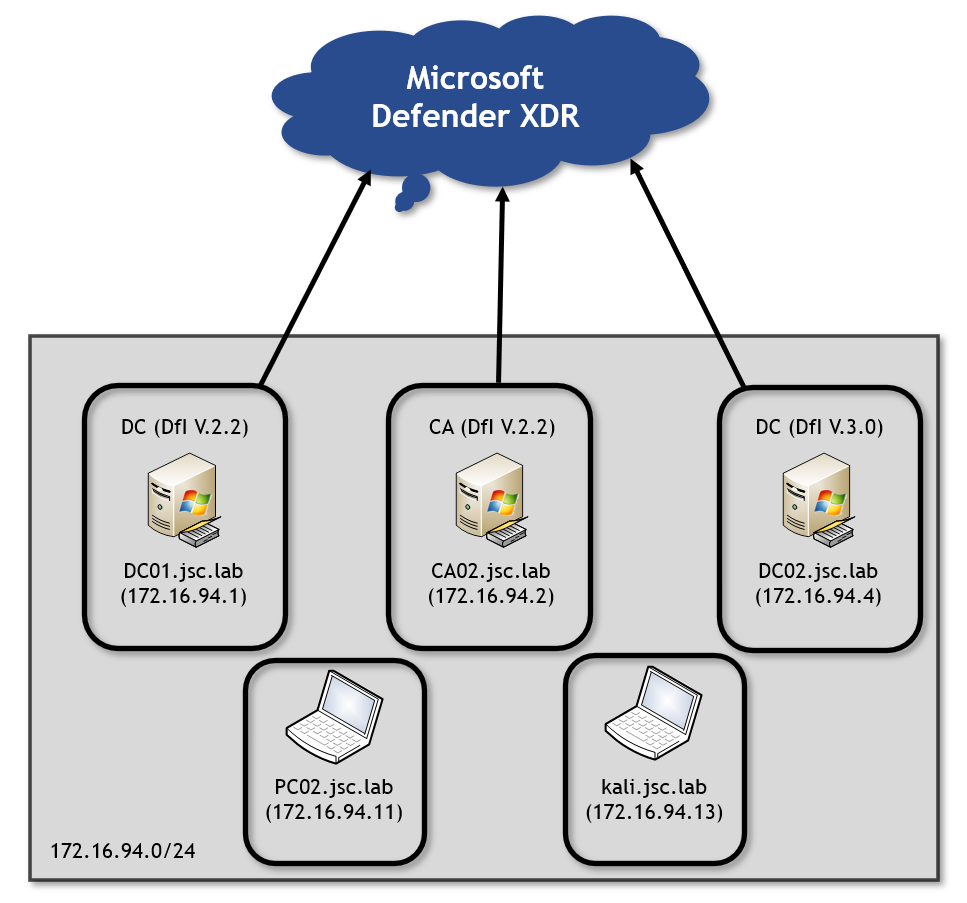
Looking at the initial lab setup, there are two domain controllers (DC) in the DfI versions 2.2 and 3.0, and a certificate authority (CA) is provided, too. Besides that, there are two clients: a domain-joined Windows workstation called PC02 and a Kali client that is not domain joined. Both clients represent an attacker on the network. The domain controllers with the two different versions of DfI allow to test against both of them.

The alerts covered in this blogpost don’t have a learning period, meaning there is no baseline that must be learned over a given time about what normal or unnormal network activities are. They behave on “static” conditions, making the alert work from the beginning of the setup. The information whether an alert has a learning period is shown at the DfI documentation here, at least for alerts classified as “DfI classic alerts”. Microsoft is moving the DfI classic alerts during an ongoing transition to “DfI XDR Alerts”, where less information is provided.

Another aspect to consider is the endpoint where attacks are carried out. Since Defender XDR correlates information between its different security products, it can even detect attacks that are evaded “DfI-wise”, for instance when the corresponding tool to perform an attack is recognized at an endpoint that is monitored through Defender for Endpoint. Since the focus was on DfI only, in the lab, PC02 is set up without Defender for Endpoint.

All of the results shown in this blogpost were generated between November 1, 2025 and February 1, 2026 and are based on the laboratory setup, which does not represent an enterprise environment. Therefore, DfI and the results may behave differently in a productive environment.

Shadow credentials

Attack overview

The shadow-credentials attack makes use of the msDS-KeyCredentialLink (KCL) attribute. This attribute can be used to store public keys and link them to the corresponding user or computer object, allowing for Kerberos authentication. When an attacker gets into a position where he can write the KCL attribute for another user or computer, he can essentially store his own public key there, making it possible to authenticate with the certificate as these entities. The authentication is done over the Kerberos extension for “Public Key Cryptography for initial authentication” (PKINIT) by presenting the certificate. The following weaknesses and evasion options occur in DfI versions 2.2 and 3.0.

General detection requirements

Talking about the alerting possibilities, there are two different alerts, and it must be distinguished between three different scenarios when looking at DfI’s detection capabilities. These scenarios differ regarding which entity is setting a shadow credential to which entity. The relevant difference in the entities is the target type, i.e. whether it’s a user object or a computer object.

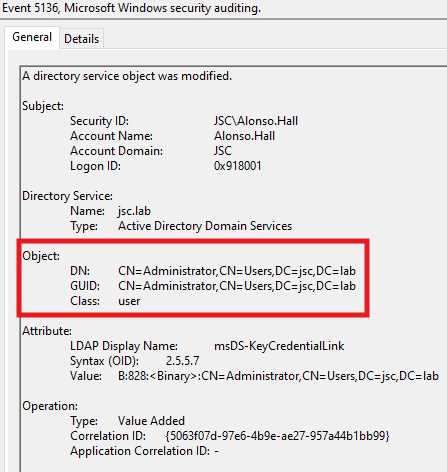
A general requirement for DfI to identify a shadow-credentials attack is the correct auditing on the domain controllers. The event 5136 “A directory service object was modified” is required in order to make DfI capable of knowing that the KCL attribute, where the public key (shadow credential) is stored, was modified.

User to user

In the first scenario, a user is able to set a shadow credential for another user. There seems to be nearly no detection logic for this. A user can set a shadow credential for another user, except for the AD built-in administrator (S-1-5-<domain>-500), without raising the alert.

When setting a shadow credential (in this case for the built-in administrator (S-1-5-<domain>-500)), the first thing to happen is the event that occurs and is evaluated by DfI: 

Figure 3: Shadow credential – event 5136

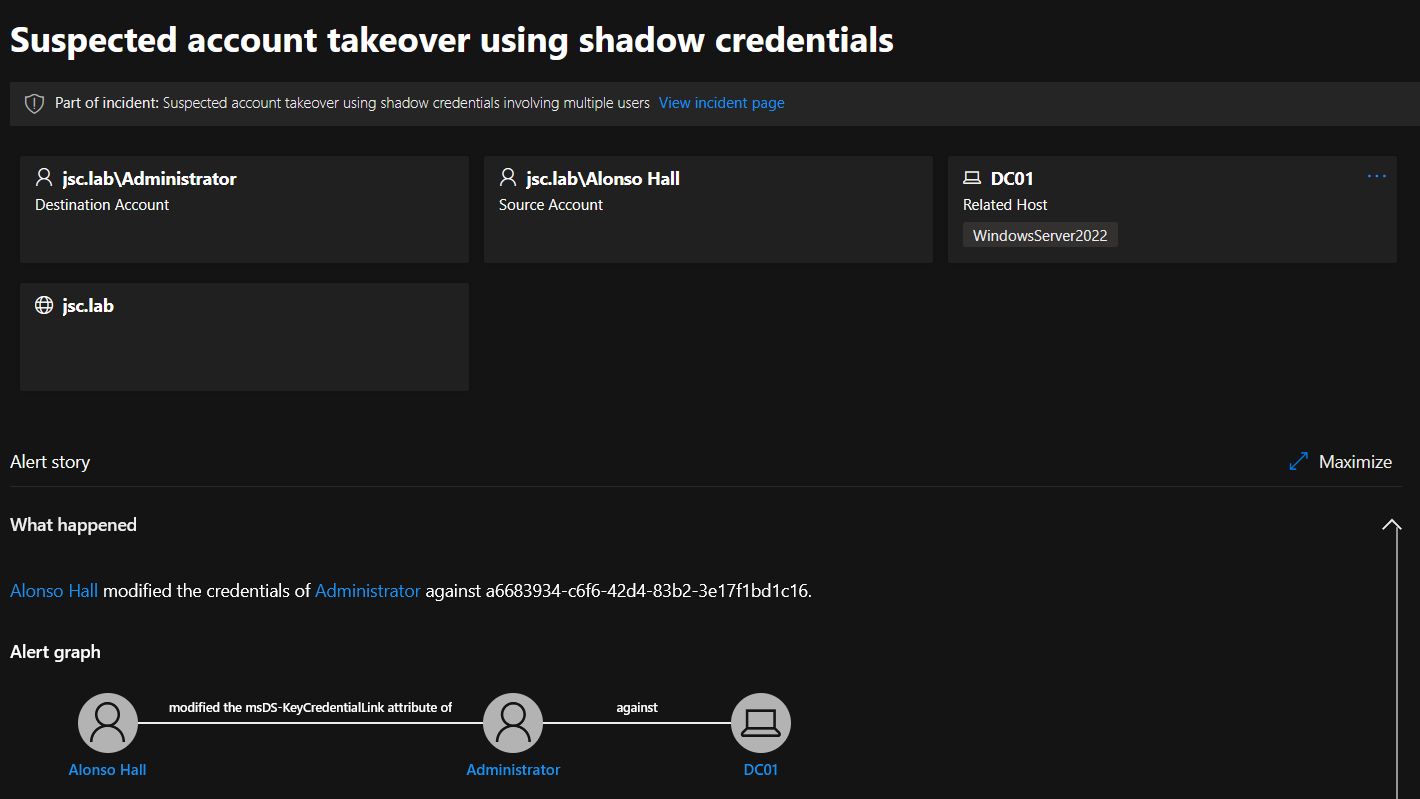
If done for the built-in administrator, the alert for setting a shadow credential is raised:

Figure 4: Shadow credential alert: Suspected account takeover using shadow credentials

For all other kinds of user objects – even when high privileged through group membership – shadow credentials can be set without alerting DfI. In the tests, the users for which a shadow credential has been set were members of the following groups:

  • Administrators
  • Domain Admins
  • Enterprise Administrators
  • Group Policy Creator Owners
  • Schema Admins

User to computer

The second scenario to consider is writing a shadow credential from the user context to a computer object. Here, a distinction between sensitive and non-sensitive computer objects can be made. Computer objects seen as sensitive and instantly alerted when a shadow credential is set for them are Windows servers with the following rolls:

  • Active Directory – Domain Services (AD DS)
  • Active Directory – Certificate Services (AD CS)
  • Active Directory – Federation Services (AD FS)
  • Entra Connect server

This list is not exhaustive, and more server roles could be affected. But regular workstations that don’t hold a Windows server role seem to be classified as non-sensitive by Microsoft, and shadow credentials can be set without any alerting.

Computer to computer

Using authentication-coercions combined with NTLM relaying can be used by an attacker to authenticate as a foreign computer, allowing to write shadow credentials for the impersonated computer. This is because computer objects have the legitimate right to self-edit their KCL attribute.

In a coercion attack, a third-party machine account can be forced to authenticate via NTLM to a target of the attacker’s choosing. The attacker can forward this authentication information to another target via NTLM relaying and can thus impersonate the relayed machine account. Extensive information about these two attack techniques can be found in the following two blogposts: NTLM Relay and The Ultimate Guide to Windows Coercion Techniques in 2025.

The context here is different when compared to writing a shadow credential from a user identity to a computer: A machine account is writing the shadow credentials for itself, and there also exists a legitimate mechanism making use of it, which may be the reason why no shadow-credentials alert is raised when setting one for a sensitive computer object like a DC or a CA through NTLM relaying. Windows enables the possibility of “domain-joined device public key authentication”, which allows a computer to perform Kerberos authentication using key trust. When certain requirements are met like the device is running Credential Guard or TPM existence, the device can create a key pair and store the public key in its KCL attribute.

When performing the attack, it must be kept in mind that there are alerts in DfI targeting NTLM-relaying and authentication-coercions attacks. But as described there is no detection for the shadow-credentials attack itself, when talking about the NLTM relay scenario, where the identity of the computer object is used to write the shadow credential to that computer.

Shadow-credentials alert through PKINIT

The second alert that can be triggered in the context of a shadow-credentials attack is called “Shadow Credential Added to Account and used for Authentication”. This alert depends on another alert, namely the alert: “Suspicious certificate usage over Kerberos protocol (PKINIT)”. This alert is triggered when DfI detects that the usage of a certificate over the PKINIT extension is done by an attacker, namely as pass-the-cert attack, which is explained in the next section. When redeeming the set shadow credential to retrieve a Ticket Granting Ticket (TGT), which is done over the PKINIT extension of the Kerberos protocol, the set shadow credential can be detected retroactively by detecting the pass-the-cert attack. This extends the possibilities to detect shadow credentials set to user objects, which, as said previously, was nearly impossible. But the problem with this alert is that it depends on another alert, which makes it less robust. In summary, someone who can evade the alert for “Suspicious certificate usage over Kerberos protocol (PKINIT)” will automatically evade the alert for “Shadow Credential Added to Account and used for Authentication”.

Pass-the-cert attack

Attack overview

When having obtained a certificate through a shadow-credentials attack or an ADCS-ESC vulnerability, an attacker can use this certificate to request a TGT, authenticating him as the victim in whose context the certificate was created. The ADCS-ESC vulnerabilities refer to a range of misconfigurations possible for the Active Directory Certificate Services. See the whitepaper from Specter Ops Certified Pre-Owned for more information.

Reviewing existing evasion possibility

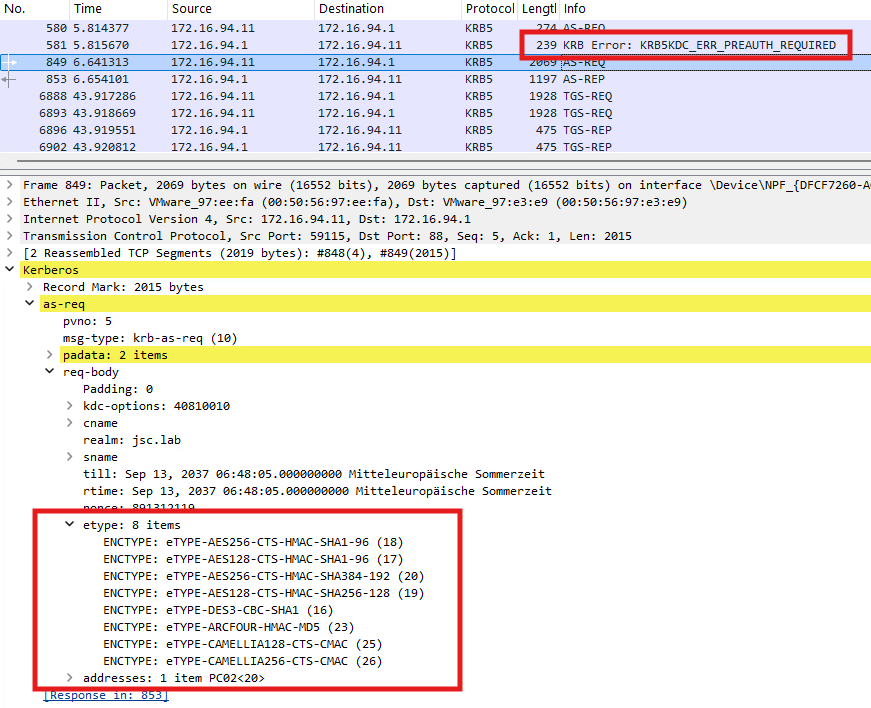
DfI comes with a detection logic for this attack, in which it tries to determine if an offensive tool like Rubeus was used to build the Authentication Service request (AS-REQ). The AS-REQ is the initial Kerberos message sent by a client to the Key Distribution Center (KDC) to request a TGT and initiate the authentication process. The detection is done by looking at the way how the ticket was requested. Synacktiv has done the research for the respective alert “Suspicious certificate usage over Kerberos protocol (PKINIT)” and found out that the indicators used by DfI to tell if an AS-REQ is built in a legitimate way or by an attacking tool are the eTypes. The eTypes are supported encryption types suggested by the client to encrypt the Kerberos tickets. Those suggested by Rubeus when building an AS-REQ are unique, making it easy for DfI to fingerprint that Rubeus was used.

The eTypes that are common in legitimate applications and can be used to bypass this alert are listed in Synacktiv’s blogpost here. The evasion was still working at the time of writing this article in March 2026 for DfI versions 2.2 and 3.0. The following Wireshark dump shows the AS-REQ when built with an adjusted version of Rubeus, using legitimate eTypes:

Figure 5: AS-REQ with legitimate eTypes

Taking a deeper look at the detection logic

Interestingly, this tool-based detection, where DfI tries to figure out if an AS-REQ is suspicious by inspecting the eTypes, is the second part of the detection chain for this alert. Before DfI investigates the suggested eTypes, it checks whether the creation time of the certificate is bigger or lower than two hours. This is done using the value NotBefore inside the certificate, which indicates the date on which the certificate becomes valid. The tool-based detection is only applied for certificates created during the last two hours. If the NotBefore value indicates that the certificate’s creation time is bigger than two hours, no further investigation is done by DfI, even if an unmodified version of Rubeus using the standard eTypes is used, which could be fingerprinted.

Shadow credentials and PKINIT

The awareness of that behaviour opens up another attack vector. If someone could modify the NotBefore value of a certificate that is used for Kerberos client authentication, they could bypass the whole detection chain. Certificates gained through ADCS-ESC-related attacks, e.g. ESC1, will be signed by the CA and cannot be modified without breaking the signature, which would result in the certificate getting rejected by the KDC when requesting the TGT. But for a self-signed certificate, which results from setting a shadow credential, the NotBefore value could be adjusted to a value in the past, make it look like the creation date was different. This could be done by using Michael Grafnetter’s DSInternals PowerShell module with the following code snippet from here. This makes it possible to write a shadow credential while having the possibility to modify the self-signed certificate. The following part of the script generates a self-signed certificate:

$upn = 'ADM@jsc.lab'
$ownerDN = 'CN=ADM,OU=Test_User,DC=jsc,DC=lab'
$userSid = 'S-1-5-21-1605340795-4164095229-358834758-7125'
$deviceID = (New-Guid)
$certificateSubject = '{0}/{1}/{2}' -f $userSid, $deviceID, $upn

$certificate = New-SelfSignedCertificate -Subject $certificateSubject `
      -KeyLength 2048 `
      -Provider 'Microsoft Strong Cryptographic Provider' `
      -CertStoreLocation Cert:\CurrentUser\My `
      -NotBefore (Get-Date).AddHours(-2)`
      -NotAfter (Get-Date).AddYears(30) `

-TextExtension '2.5.29.19={text}false', '2.5.29.37={text}1.3.6.1.4.1.311.20.2.2' `
      -SuppressOid '2.5.29.14' `
      -KeyUsage None `
      -KeyExportPolicy Exportable

The relevant part for the evasion is to set the NotBefore parameter to a value in the past:

-NotBefore (Get-Date).AddHours(-2)

After the creation of the certificate, a key credential link can be extracted from it, suitable to be set in the KCL attribute as a shadow credential:

$ngcKey = Get-ADKeyCredential -Certificate $certificate -DeviceId $deviceID -OwnerDN $ownerDN -CreationTime (Get-Date)

Set-ADObject -Identity $ngcKey.Owner -Add @{'msDS-KeyCredentialLink' = $ngcKey.ToDNWithBinary()}

As discussed in the section about shadow credentials, in part “Shadow-credentials alert through PKINIT”, the creation of a shadow credential can be detected through the subsequent authentication against the KDC when DfI classifies the authentication as malicious, which then also results in the alert for shadow credentials. As shown in this section, the pass-the-cert alert can also be bypassed by waiting two hours or making the certificate look like it’s older than two hours, but this only applies to self-signed certificates. Eventually, this makes it possible to evade the pass-the-cert alert when creating shadow credentials, which also results in evading the alert for setting the shadow credential.

Network Name Resolution (NNR)

Network Name Resolution (NNR) is a core component for several alerts to work, but is vulnerable to spoofing and relaying, making it possible to evade multiple alerts.

The DfI documentation describes NNR as follows:
Using NNR, Defender for Identity can correlate between raw activities (containing IP addresses), and the relevant computers involved in each activity. Based on the raw activities, Defender for Identity profiles entities, including computers, and generates security alerts for suspicious activities”.

NNR works by requesting the NetBIOS host and domain name as well as the DNS name from the IP address, from where a potential attack occurred, using three different primary methods:

  • NTLM over RPC (TCP port 135)
  • NetBIOS (UDP port 137)
  • Remote desktop protocol (TCP port 3389)

There also exists a secondary method, which is used if there is no response from any of the primary methods or if there’s a conflict in the responses received from two or more primary methods. The secondary option makes use of DNS. The DfI agent will make a reverse DNS lookup of the IP address to get the hostname of the machine.

By using these methods, DfI can tell the origin of the suspicious traffic and map it to a computer hostname, making it possible to distinguish between an attack or legitimate behavior. How knowing the hostname of the suspicious computer helps DfI determine if an attack occurred is explained in the next section using one alert whose detection logic is based on NNR.

NNR in action: Suspected suspicious Kerberos ticket request

Using an example to see the inner working of NNR and its weakness, it can be continued to obtain TGTs by using certificates. While having already discussed the alert “Suspicious certificate usage over Kerberos protocol (PKINIT)”, there is another alert when trying to request a TGT by offering a certificate via PKINIT. This alert is called “Suspected suspicious Kerberos ticket request” and has an interesting scope. The research has shown that it is only applied when trying to authenticate as a domain controller machine account using a certificate.

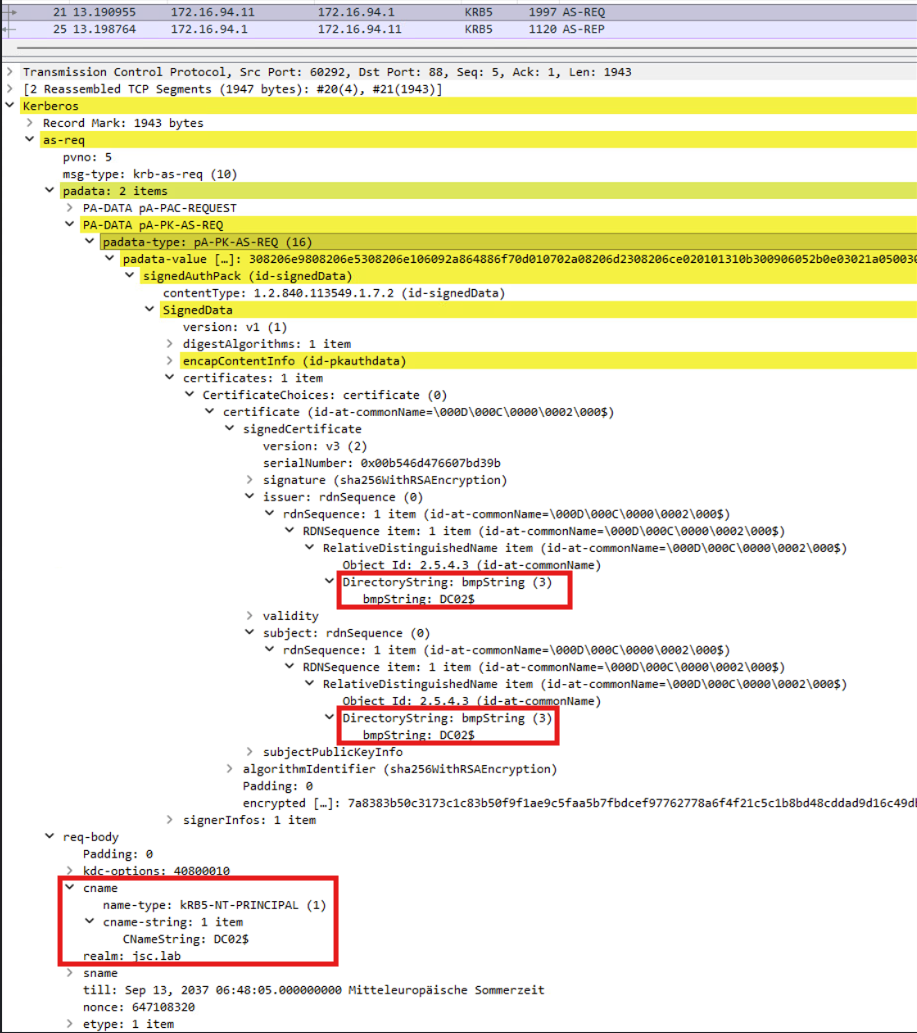
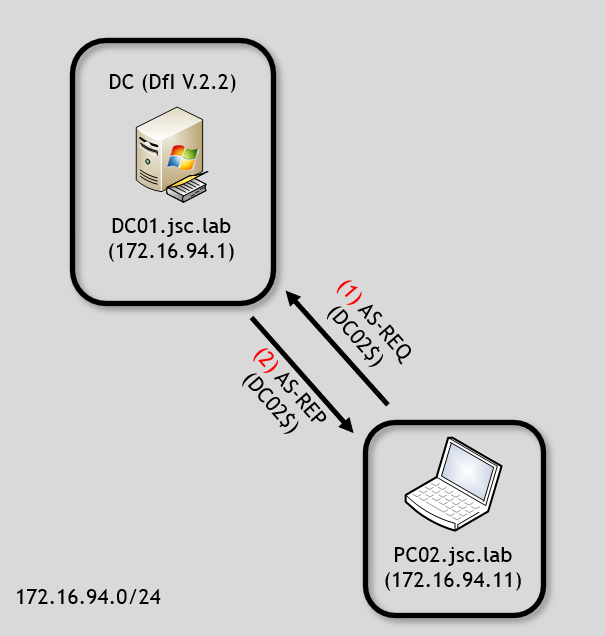
For this example, it is assumed that the adversary is on PC02.jsc.lab (172.16.94.11) and has managed to get a certificate valid for DC02 allowing Kerberos client authentication, for instance through shadow credentials or an ADCS-ESC vulnerability. When the attacker from PC02 uses the certificate to authenticate as DC02$ against DC01.jsc.lab, the DfI agent at DC01 will send NNR requests to the source IP address from which the AS-REQ for DC02 request originated, which is 172.16.94.11. This is done to determine if DC02 is actually at this IP address. The described flow is illustrated in the following image:

Figure 6: NNR flow

The only information the DfI agent has before starting the investigation using NNR is an AS-REQ requesting a TGT for DC02 and the source IP address of the suspicious machine. The AS-REQ provides a valid certificate with the subject DC02$, indicating that the certificate belongs to DC02$. The requester has also sent the signed timestamp, giving proof of possession of the private key.

Figure 7: AS-REQ DC02$

Therefore, it makes sense to have a detection logic for that kind of request. An AS-REQ for a domain controller machine account must originate from the source IP address of the respective domain controller, in the case of Kerberos authentication. If a TGT for a domain controller machine account is requested from a machine that is not the domain controller itself, as indicated by network attributes such as IP address and hostname, this strongly indicates that an adversary has obtained a valid certificate, which would be explainable through attacks like shadow-credentials or ADCS-ESC-related attacks.

Inspection of NNR primary methods

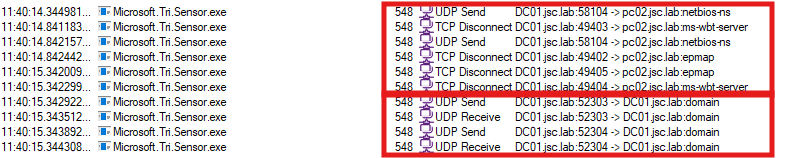
Continuing with the example from above, specific actions are happening on DC01 and PC02 when the attacker performs an AS-REQ for DC02 against the KDC on DC01 starting from PC02. The DfI agent’s reaction on DC01 (172.16.94.1) to the incoming AS-REQ is inspected using Procmon:

Figure 8: DfI sensor process performing NNR

“Microsoft.Tri.Sensor.exe” is the relevant process of DfI, which performs the NNR. The first two entries 1.) and 2.) are requests and responses to PC02 using NetBIOS – UDP port 137. Entries 3.), 4.), 5.) and 6.) are responsible for the NNR method using the endpoint mapper – TCP port 135. Entry 7.) uses RDP – TCP port 3389.  

When monitoring PC02, the incoming NNR requests can be noticed, where each source port can be mapped to the source ports in figure 8:

Figure 9: NBNS node status request

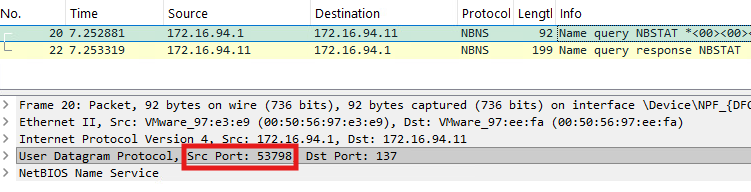
The NetBIOS request from the DfI agent to port 137 on PC02 can be noticed in figure 9. Furthermore, we can see the request at the DCE/RPC endpoint mapper on TCP port 135:

Figure 10: NTLM over RPC

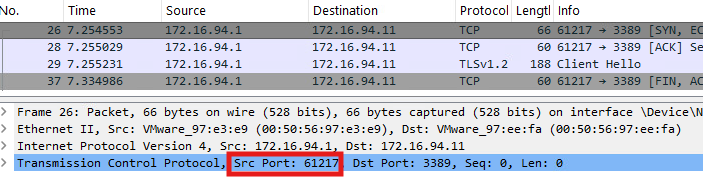
Eventually, there is the connection to RDP on TCP port 3389:

Figure 11: RDP

NNR method: NetBIOS node status request

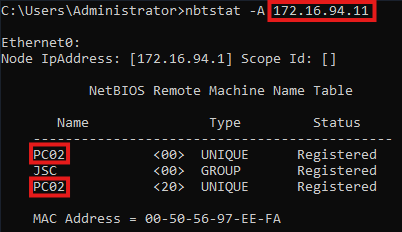
The NetBIOS request done by DfI is a so-called NetBIOS node status request, which is a unicast request to retrieve NetBIOS-related information about an endpoint. The NetBIOS node status response from PC02 contains information about its NetBIOS hostname, the NetBIOS domain name and the NetBIOS service type. The hostname and domain name are the relevant information which is used by the DfI agent to answer the previous question of whether the computer with IP address 172.16.91.11 (PC02) is in fact DC02. Since PC02 is not DC02, the NetBIOS-related information from PC02 will lead DfI to alert this attack.

Figure 12: NetBIOS node status response (PC02)

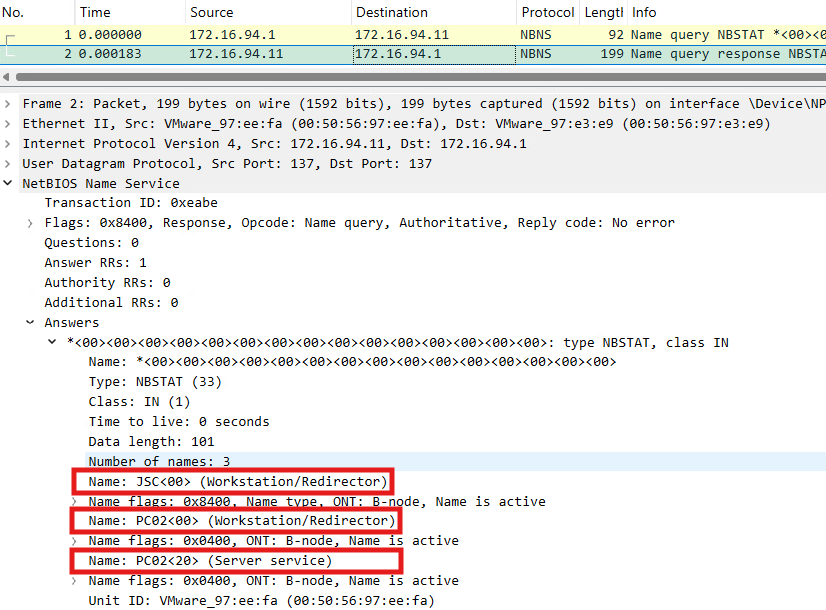
The three highlighted areas in figure 12 contain the discussed information that is essential for the detection logic. Each entry corresponds to a registered name, which are three in total. The first name “JSC<00> (Workstation/Redirector)” states that the NetBIOS domain name is “JSC”, and the service type is 0x00, which represents a workstation. The two other names just differ in the service types, while 0x20 indicates a file service. “PC02<00> (Workstation/Redirector)” indicates the NetBIOS hostname is “PC02”.

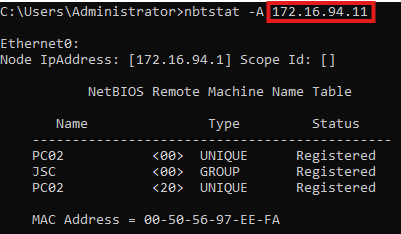
The NetBIOS request generated by DfI can also be triggered by using the native Windows tool nbtstat by using nbtstat -A <ip>. The result can be seen in the following image, containing the same information as when inspecting the NetBIOS request through Wireshark:

Figure 13: NetBIOS node status request using nbtstat

The alert can even be inspected before appearing in the Defender XDR portal, by looking into the local logging files. These are stored at “C:\Program Files\Azure Advanced Threat Protection Sensor\2.255.XXXXX.XXXXX\Logs\Microsoft.Tri.Sensor.log” at the DC. The collected information can be found in the log file:

Figure 14: Alert: “Suspected suspicious Kerberos ticket request” in logs

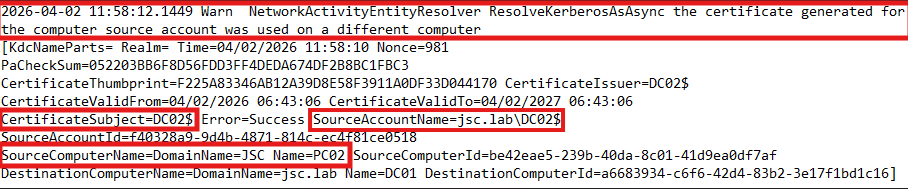
The log file indicates an alert triggered by the use of a certificate for one machine account on another computer. The highlighted items “CertificateSubject=DC02$” and “SourceAccountName=jsc.lab\DC02$” is the information extracted from the AS-REQ and the provided certificate. “SourceComputerName=DomainName=JSC Name=PC02” is obtained from the NetBIOS node status response. These are the key values for the detection logic. If the NetBIOS hostname and NetBIOS domain name don’t match to the certificate subject and account name, like in this case, the alert is raised. If the values match, no alert will be raised.

Evasion using NetBIOS

Since the detection logic for the alert “Suspected suspicious Kerberos ticket request” was uncovered, evasion possibilities can be considered.

There are two possibilities to evade the alert or more generally, to manipulate NNR. The first is to spoof a NetBIOS response to the DfI agent directly by specifying the needed NetBIOS information and answering the NetBIOS node status request. The other option is to take the incoming NetBIOS request from the DfI agent, relay it to the desired target and relay the response back to the DfI agent.

Relaying the NetBIOS node status request

To understand the relaying of the NetBIOS request, refer to the following two diagrams:

Figure 15: AS-REQ
Figure 16: Relaying of NetBIOS node status request/response

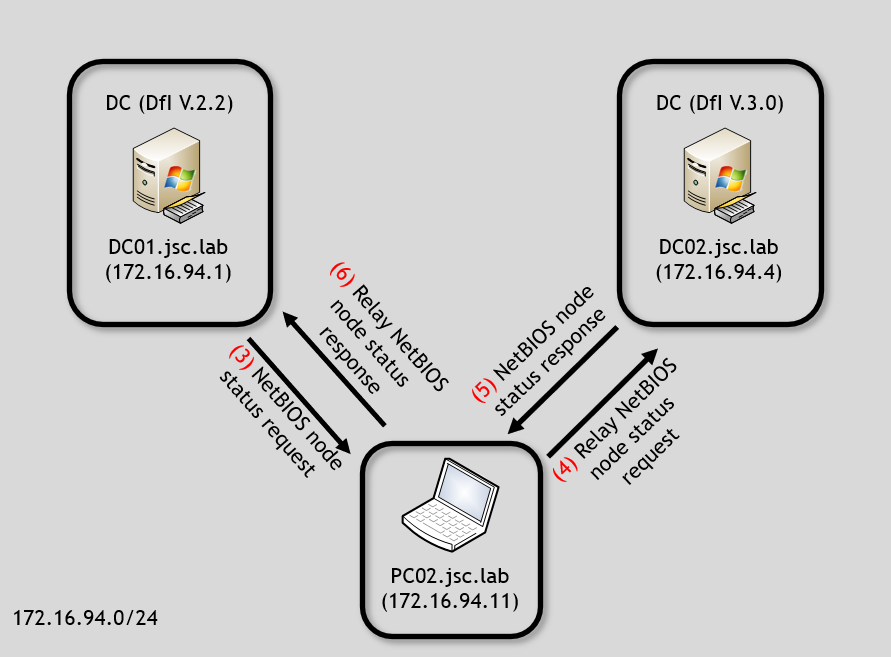
After the request of the TGT (1 & 2), DfI will start using NNR and asking the sender for its NetBIOS node status (3). A malicious actor can relay the NetBIOS request to the target to which that TGT would belong, which is DC02 (4) in the example. The response from DC02 can be relayed back over PC02 to DC01 (6). This will result in evading the detection since the AS-REQ and certificate indicates DC02$ as the subject and the NetBIOS information from the machine that performed the AS-REQ seems to match to DC02, from the perspective of the DfI agent on DC01.

The relaying of the NetBIOS method can be performed in a PoC using the Python library Scapy.

def relay_nbns_node_status_request(pkt):
   dc01_ip = "172.16.94.1"
   dc02_ip = "172.16.94.4"
   udp_src_port = pkt[UDP].sport
   dc01_nbns_node_status_request = pkt[NBNSHeader]

    dc02_nbns_node_status_response =
   sr1(IP(dst=dc02_ip)/UDP()/dc01_nbns_node_status_request)

   dc02_nbns_node_status_response = dc02_nbns_node_status_response[NBNSHeader]
   send(IP(dst=dc01_ip)/UDP(dport=udp_src_port)/dc02_nbns_node_status_response)

The function takes a network package as argument (pkt), which must be sniffed before; this can be done with Scapy. In the first block, the relevant IP addresses and the UDP source port from which the package originated are saved as well as the extraction of the NetBIOS node status request from DC01.

The second block builds the NetBIOS node status request for DC02, sends it to DC02 and also receives the response – the NetBIOS node status response. The last block builds the response to DC01 and sends it.

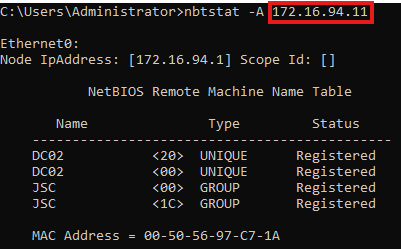
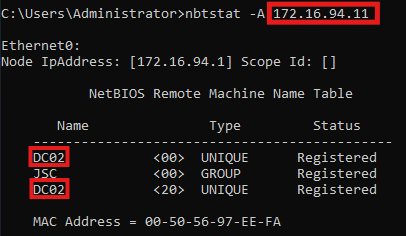
When using nbtstat on DC01 again to retrieve the NetBIOS information from PC02, it can be seen that it was possible to successfully tamper with the NetBIOS node status request. PC02 (172.16.94.11) is now appearing to be DC02.

Figure 17: Tampered NetBIOS node status response PC02 (relayed)

This way to perform the evasion using relaying has some advantages, but also certain disadvantages when compared with the second method, which will be presented next.

First of all, doing the evasion this way is fast and straightforward, because it’s not necessary to care about the different values like NetBIOS hostname and NetBIOS domain name since the NetBIOS node request is directly answered by the correct target. This also comes with the advantage that the NetBIOS node response is 100 % accurate compared to when manually spoofing a NetBIOS node response, where values that are not important to the evasion may be ignored or overlooked, potentially generating indicators of compromise (IOCs). The above image shows that one example is the MAC address. While the MAC address is not critical to DfI’s detection logic, it can be ignored when manually crafting a NetBIOS node status response but theoretically leads to IOCs for malicious actions.

The biggest disadvantage for this approach is the fact that it depends on the availability of another target’s (in this case another DC’s) port, here UDP 137, to retrieve it’s NetBIOS information. When it’s not possible to reach the target on UDP port 137, for instance due to firewalling or network issues, no NetBIOS information can be relayed back to the initial requester, resulting in failing the evasion. Therefore, the manual crafting of NetBIOS node status responses is discussed, too.

Spoofing the NetBIOS node status response

While it can be differentiated technically between relaying a request to receive a correct response or just building the correct response oneself, it’s essentially resulting in the same: a spoofed response is sent. In this case, it’s discussed how to build a spoofed NetBIOS node response to DfI with the relevant information. This can also be done by using Scapy:

def send_spoofed_nbns_node_status_response(pkt):
sample_nbns_node_status_response = (rdpcap(r"PC02_nbns_node_status_response.pcap"))[0]
   udp_src_port = pkt[UDP].sport
   transaction_id = pkt[UDP][NBNSHeader].NAME_TRN_ID

spoofed_nbns_node_status_response = sample_nbns_node_status_response[NBNSHeader]
spoofed_nbns_node_status_response.NAME_TRN_ID = transaction_id
  spoofed_netbios_host_name = 'DC02'.ljust(15, " ")
   spoofed_nebtios_domain_name = 'JSC'.ljust(15, " ")

for index, nbns_entry in enumerate(spoofed_nbns_node_status_response.NODE_NAME):
       if nbns_entry.NAME_FLAGS == 0x04: # UNIQUE
spoofed_nbns_node_status_response.NODE_NAME[index].NETBIOS_NAME = spoofed_netbios_host_name
       elif nbns_entry.NAME_FLAGS == 0x84: # GROUP
spoofed_nbns_node_status_response.NODE_NAME[index].NETBIOS_NAME = spoofed_nebtios_domain_name

    send(IP(dst=dfi_agent_ip)/UDP(dport=udp_src_port)/
   spoofed_nbns_node_status_response)

As a basis, a sample of a NetBIOS node status response from PC02 was captured and saved as PCAP file. This file can be loaded and used for further processing. Besides, the UDP source port and the transaction ID of the incoming request are saved.

In the second block, the node status response is adjusted with the correct transaction ID, and the spoofed NetBIOS names are prepared. The NetBIOS names are specified as 16 bytes fixed length, padded with spaces, while the last byte is the suffix for the service type that is already set in the sample. The last block adjusts the NetBIOS node status response to use the spoofed NetBIOS names.

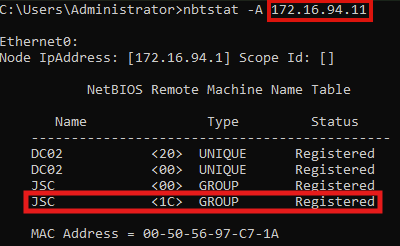
The result can be seen in the comparison displayed below, while the left image equals the original NetBIOS node status from PC02 and the right image shows the spoofed response that was generated with the script. The NetBIOS domain name stays “JSC” since it was already set.

Figure 18: Original node status PC02
Figure 19: Spoofed node status PC02

When inspecting the result of the spoofed response, differences can be noticed between the spoofed and the relayed attempt. When the relaying attempt is used, there is one more registered NetBIOS name. The entry “JSC <1C> GROUP Registered” is missing when spoofing the DC02 node status response, like it was done with the previous script. The missing entry with the service type 1C is indicating that this node is a domain controller inside the domain (JSC). While this seems to be a relevant criterion to DfI, when it comes to telling whether some requests originate from a domain controller, like it’s the case for the alert: “Suspected suspicious Kerberos ticket request”, it is not. The alert has the limited scope to identify a suspicious request for a TGT domain controller machine account that was not requested from the DC itself. It is not relevant whether the node is registered as domain controller inside the domain; the evasion is working by just spoofing the correct NetBIOS hostname and domain name. This may be explainable through the fact that the two other NNR methods cannot indicate whether one endpoint is registered as a domain controller by a raw, single value, like it’s the case for the NetBIOS node status. Additionally, the detection logic is designed to work with just one NNR method active in the environment, which means that every method must be able to detect all threats independently of the other NNR methods, but with the same reliability.

Figure 20: Tampered NetBIOS node status response PC02 (relayed)

Additional considerations when evading NNR

Windows endpoint considerations

To perform an evasion when working with NNR, there are two more things to consider than just spoofing the NetBIOS node status response. DfI mustn’t receive any NNR responses from the actual operating system (OS) by the machine used by the attacker for the attack and the evasion. When performing the evasion technique with the provided scripts, there would be a race condition between the script-generated, spoofed response and the OS-generated legitimate response. To avoid the race condition, it’s possible to block incoming traffic to the destination ports used for NNR on the attacker machine. The Windows firewall allows to create rules for incoming traffic, but it must be noted that local administrator privileges are required to modify the Windows firewall. Scapy works with using Npcap, allowing to sniff and inject traffic onto the network interface, independently from the Windows OS and therefore the firewall, too. Using that approach, it’s possible to send spoofed NNR responses to the DfI agent while supressing the Windows OS from answering the NNR requests.

The other thing to think of are the two other NNR methods. When inspecting the NNR documentation, it can be seen that it’s recommended when configuring DfI to open up at least one of the related ports on all devices in the environment to allow for at least one primary method to work. This means DfI can perform detection when only one of the NNR methods is answered, which allows to just respond to the NetBIOS method, while ignoring the two others. This can also be done by blocking the required ports on the attacker machine.  

Cached NNR responses by Defender for Identity

Another thing to consider when attempting to evade NNR-based detection is the caching of NNR responses. DfI agents in sensor version 2.2 frequently ask domain-joined devices for their hostnames with the described NNR requests and cache this information, independently of whether suspicious traffic was received from the devices. If the DfI agent is holding newly cached NNR information about one machine and a suspected attack from this machine happens, the cached information can be used, instead of asking the machine directly. This comes with a problem when trying to evade an alert that uses NNR. If the DfI agent collected the hostname about the machine right before the attack is performed, the attacker machine may not be asked for its hostname, making the spoofing of the responses impossible, and the evasion would fail. Therefore, the script for spoofing the NNR responses must be running on the machine, and it must be waited until the DfI agent automatically asks for NNR information. Spoofed responses will be sent, effectively poisoning the DfI cache with spoofed information. Now the attack with the respective NNR detection logic can be performed, and two scenarios can happen: The DfI agent uses the spoofed, cached information or the attacker machine is asked for its NNR information and spoofed responses can be sent. Both will result in successfully evading the alert.

Indicators of Defender for Identity 2.2 usage in the environment

It can be attempted to fingerprint DfI in version 2.2 when having control over a domain-joined machine. As described above, DfI frequently queries domain-joined devices in the domain for their hostnames using NNR requests. Having the access required to sniff the network interface on a compromised host, it can be looked for the three primary methods of NRR: NetBIOS node status request, RDP and NTLM over RPC originating from a Windows server that could run DfI. Specific characteristics about the RDP and NTLM over RPC messages, which help to identify DfI 2.2, are described in the section “Reviewing the remaining NNR methods”. The certainty with which it can be said that a Windows server is running DfI v.2.2 depends on the number of related ports that are open on the attacker machine and on the network. The three NNR requests are sent together as a bundle. If all three ports are open, essentially all three messages arrive as a “bundle”, presenting a high likelihood that it’s from DfI. If we assume that two ports are closed and just UDP port 137 is open, it’s not possible to say with high certainty that this request is from DfI, when just receiving a single NetBIOS node status request.

ADCS-ESC8

DfI also comes with an alert for the ACDS-ESC8 attack. To detect this attack, it’s required that DfI is installed on the related CA.

Attack overview

This attack technique is aimed against the Active Directory Certificate Services (AD CS), allowing an attacker who is capable of performing a NLTM-relaying attack of a machine account to obtain a certificate valid to be used for Kerberos authentication in the name of the impersonated machine account. Additionally, some requirements must be met to make the CA’s web enrolment endpoint vulnerable to this attack. For further information check out the white paper from Specter Ops: Certified Pre-Owned: Abusing Active Directory Certificate Services.

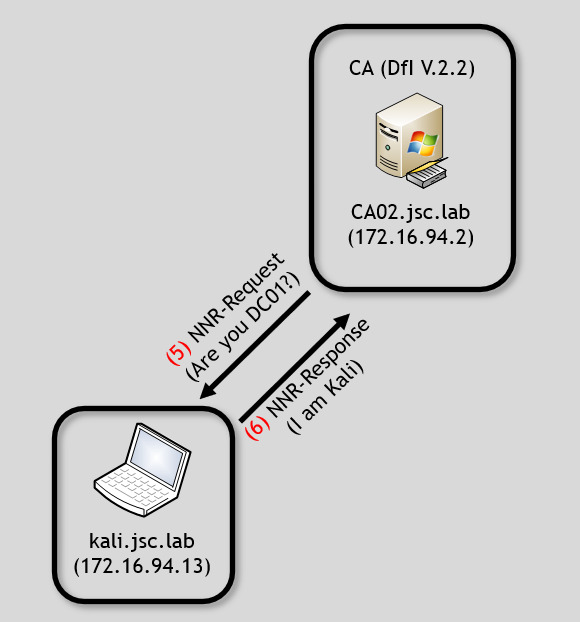
This time, the actor is on kali.jsc.lab (172.16.94.13) performing the attack. The attack scenario looks like this:

Figure 21: ADCS-ESC8 simplified overview

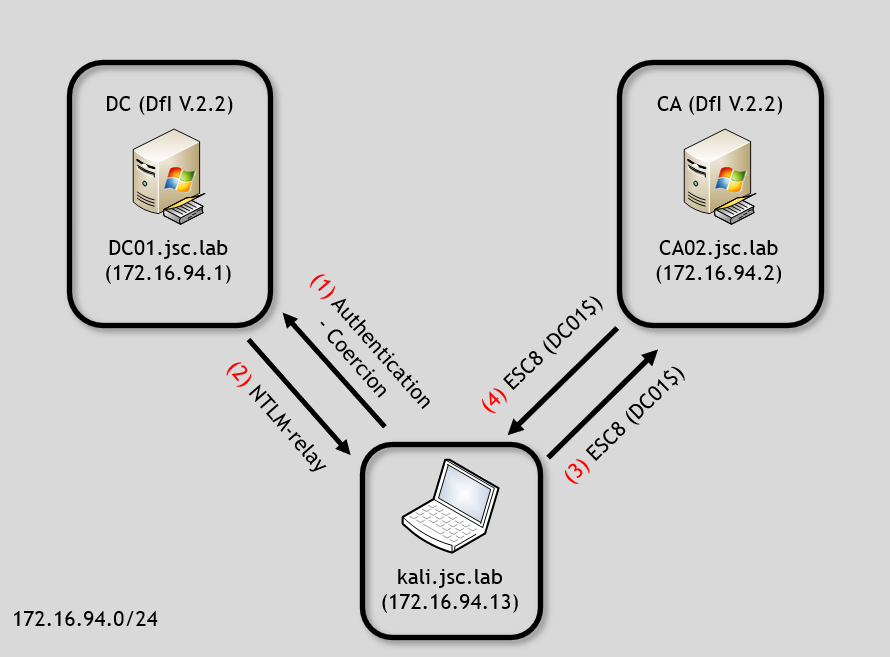
Note that the ESC8 attack consists of using an authentication-coercion attack and NTLM relay, which is only represented in a simplified way in this image. What happens effectively is the following:

  • The Kali machine forces the DC01 machine account to authenticate at the Kali machine using NTLM (1)
  • In step (2) and (3), Kali performs the authentication via NTLM as DC01 against the CA
  • In step (4), the attacker obtains a certificate in the name of DC01, which allows for later Kerberos authentication

Evading ESC8 using NNR

The detection logic for the alert also depends on the NNR feature. This time, the DfI agent installed on the CA02 is responsible for performing the detection. The question to be answered is whether the requestor of the certificate for DC01 is indeed DC01. The issuing of the certificate for DC01$ happened between the Kali machine and the CA. Therefore, DfI will investigate if the IP address 172.16.94.13 belongs to DC01, using NNR.

Assuming no evasion technique is used and the Kali machine responds to the NNR requests, the flow would look as follows:

Figure 22: NNR flow after ESC8

Using the previously described evasion technique for NNR, the ESC8 alert “Suspicious Domain Controller certificate request (ESC8)” can be evaded by pretending to be the machine account in whose context the certificate was requested. In this example, that machine account is DC01. While using the ESC8 attack, the detection capabilities for different coercion attacks and NTLM relay must be considered, too.

Comparing NNR usage for ESC8 to NTLM-relayed shadow credentials

An interesting inconsistent usage of the NNR feature by DfI can be observed when comparing ESC8 with relayed shadow credentials. In the shadow credentials section, in part “Computer to computer”, it was said that shadow credentials can be set for machine accounts without triggering an alert when this is done over a NTLM-relayed connection. The question arising in the shadow-credentials scenario is the same as in the ESC8: “Is the request performed by the actual machine associated with the machine account, or by a different machine that successfully authenticated as that machine account via NTLM”. But for relayed shadow credentials, no NNR requests are sent to the machine from which the traffic for setting the shadow credential originated.

DCSync

Attack overview

DCSync attack refer to an attacker who has control over an entity that has the high privileges in the domain necessary to replicate parts of the domain. When having access to such an entity, which could be a domain controller machine account or a high privileged service account with the replication rights or a domain administrator, an attacker can obtain sensitive data. For example, he could receive the AES key of the krbtgt user, which is used to encrypt and sign TGTs inside the domain, allowing him to create golden tickets and persist himself.

The alert for DCSync is also vulnerable to spoofing NNR responses since its detection logic builds on NNR. But for the evasion possibilities, it must be distinct from the identity that performs the DCSync. While domain controllers always have the replications right, user and service accounts can also be permitted.

Evading DCSync alert using domain controller machine account

When performing DCSync attacks using the identity of a domain controller machine account, the detection is the same as for the alert “Suspected suspicious Kerberos ticket request” and the ESC8 alert, and the evasion works in the same way, too. If the attacker has obtained a TGT for DC02, the DCSync attack can be performed against DC01, answering the incoming NNR requests, pretending to be DC02 and vice versa.

Considerations for evading DCSync alert using service and user accounts

While detection and evasion of DCSync attack using domain controller machine account is reliable, it cannot be definitely tested for service and user accounts as the detection by DfI is unreliable for those types of accounts.

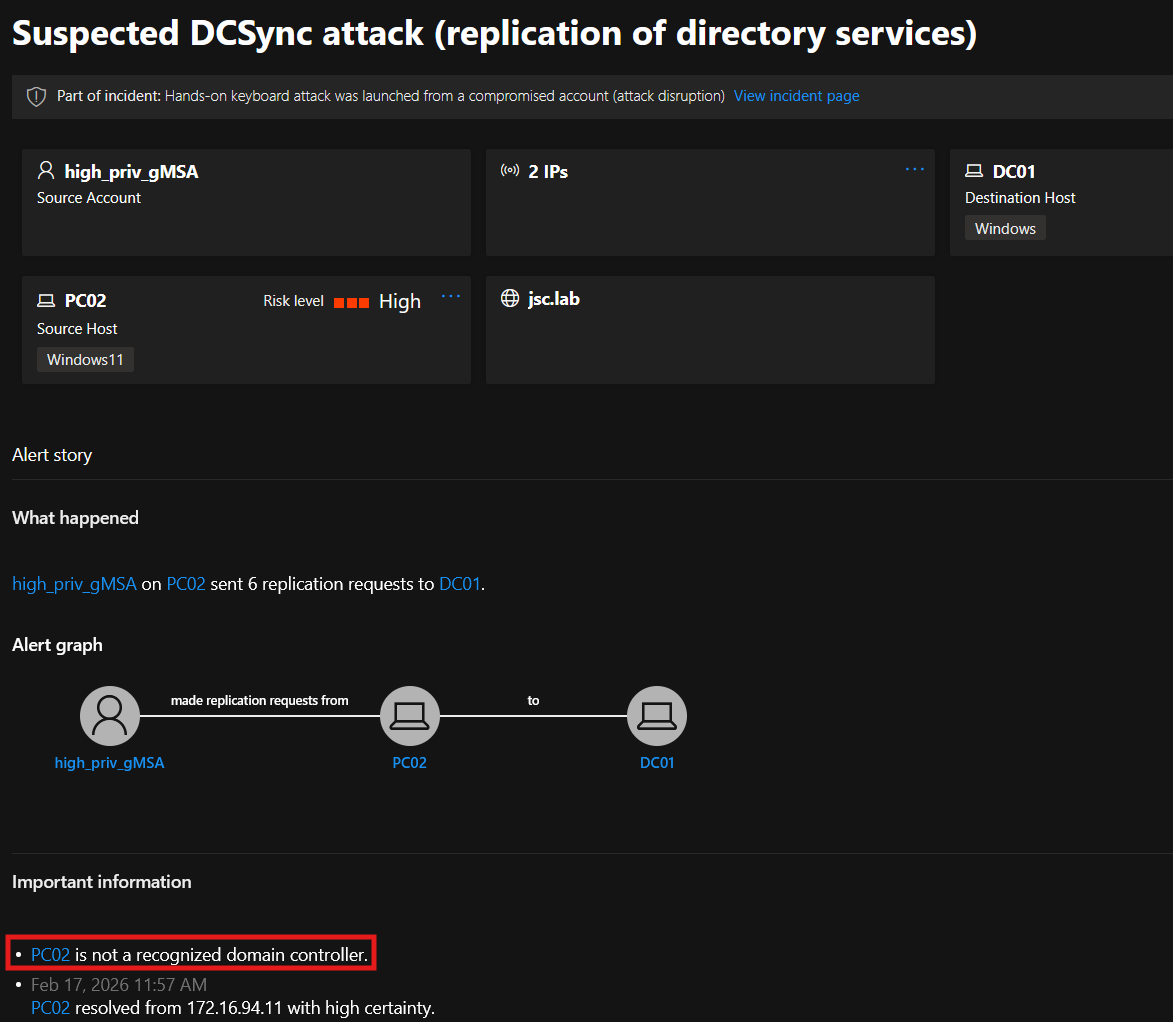
But there is a theory of one detection criterion that is used for these accounts. When successfully triggering DfI for a DCSync alert using a self-created, non-default service or user account, the alert appears in the portal with the following information: “PC02 is not a recognized domain controller” (see figure 23). The attacks in the tests were performed with the identities of a self-created service account and a user account holding the replication rights and were done from PC02 against DC01. Adding the information that NNR requests are also made to machines from which DCSync attacks originate when using service or user accounts, it can be suspected that originating from any domain controller may be considered legitimate when performing a DCSync attack. Unfortunately, the detection of DCSync attacks with these accounts is unreliable, making it hard to tell if an evasion is successfully performed.

Figure 23: DCSync alert with service account

Reviewing the remaining NNR methods

The focus in this blogpost is on the NNR method using NetBIOS. However, if UDP port 137 is not configured to be open on the network, NetBIOS cannot be used to evade the respective alerts, since the NetBIOS node request will never be received by the attacker and therefore, cannot be answered with a spoofed response. Consequently, the other two methods must also be inspected.

Remote desktop protocol (RDP)

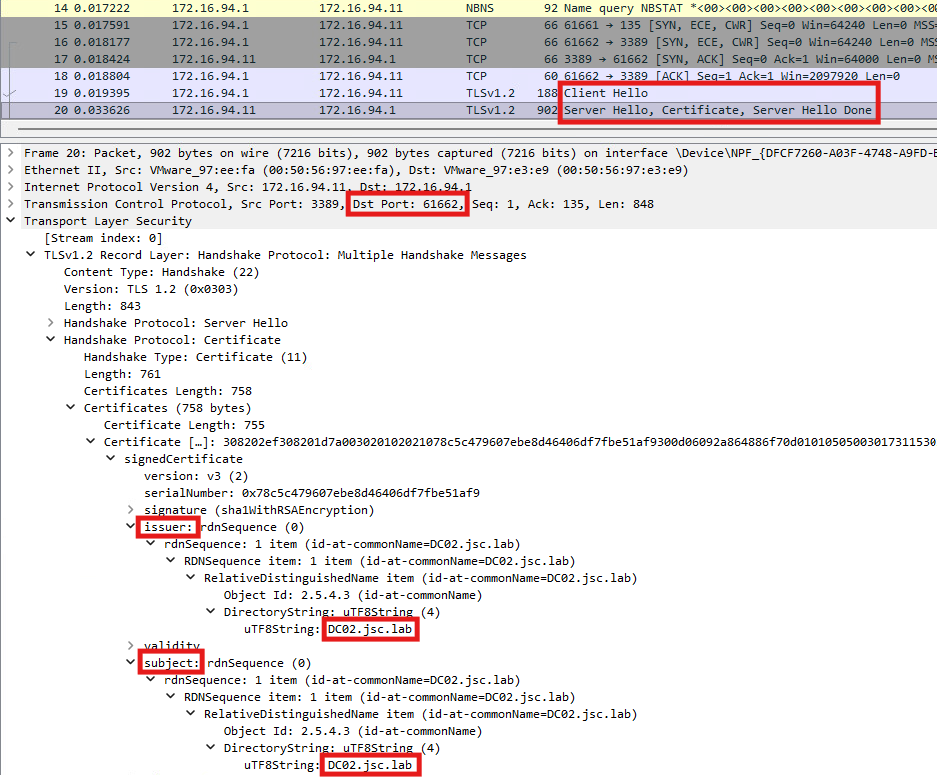
Another primary method is the usage of RDP. According to documentation, “RDP (TCP port 3389) – only the first packet of Client hello” is used to perform the name resolution. No RDP connection is established; the DfI agent initiates a TLS handshake based on port 3389, acting as a client to the suspected attacker machine and sending the “Client Hello” message. If the machine is configured to listen on TCP port 3389, it will respond with the “Server Hello” message. Part of that message is the machine’s RDP certificate with extended key usage for server authentication, allowing to authenticate against the client. The RDP certificate used for this purpose can be found at the local machine’s certificate store at “cert:\LocalMachine\Remote Desktop”. By default, this is an auto-generated self-signed certificate, using the FQDN of the machine as subject and issuer. To get information related to the domain- and hostname from one machine in order to compare it with the information provided in the discussed attacks like pass-the-cert for domain controller, ESC8 or DCSync, the same technique is used as it was done with NetBIOS. This time, DNS-related information is obtained, using that NNR technique. In this case, the subject of the provided certificate is used to resolve the IP address from a potential attacker’s machine to domain and hostnames.

DfI accepts the certificate to gain the FQDN of the machine even if it is self-signed, which provides the possibility to answer to the NNR request with a spoofed, self-signed certificate. This request could also be relayed to the desired target by the attacker but requires having the RDP port open.  

In the following image the flow can be seen using a spoofed certificate indicating that PC02’s (172.16.94.11) FQDN is DC02.jsc.lab:
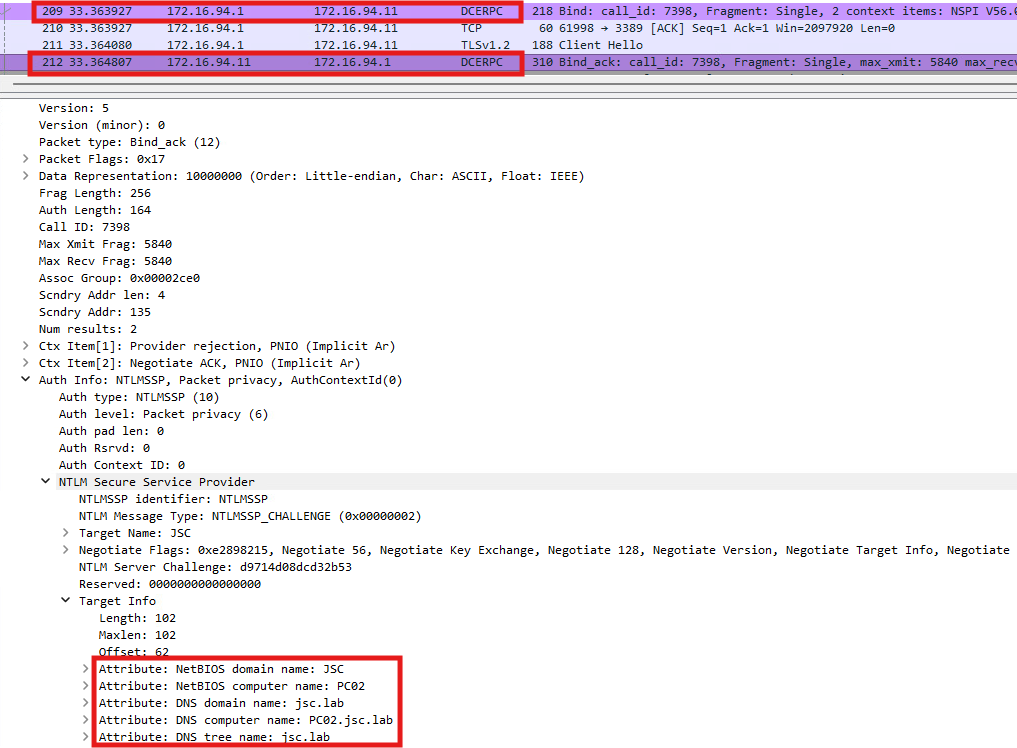
Figure 24: Connection to port 3389 on PC02 by DfI
Figure 25: Spoofed certificate in RDP NNR method

NTLM over RPC

The last primary method uses the endpoint mapper on TCP port 135. When a client needs to call a Windows service, for example WMI, it first contacts the endpoint mapper on port 135 to discover on which dynamic port the requested service is actually listening. The mapper then returns that high port, and the client connects to it to complete the RPC exchange. In the case of DfI, a bind request is sent to the suspected malicious machine asking to bind on the RCP interface to the name service provider (NSPI) while using the NLTM security provider to authenticate. The response sent from the suspected machine contains the information relevant to DfI, while information related to the RCP interface and the binds is irrelevant since DfI cares only about about the information required to resolve host- and domain names. This information is included in the part where the NTLM negotiation happens. Besides the NTLM server challenge, the machine gives information about its NetBIOS and DSN names to DfI. At this particular time, no authentication happened between DfI and the machine and no tamper protection is included in these messages. This also allows the manipulation and spoofing of these messages to evade NNR detection. The two messages exchanged can be seen below:

Figure 26: NTLM over RCP NNR method

Secondary method: DNS lookup

When the primary methods (NetBIOS, RDP, NTLM over RPC) fail, a DNS lookup is used. This is the case if there is no response from any of the primary methods or if there’s a conflict in the responses received from two or more primary methods. Inspecting the DfI agent using Procmon, the described behavior is as follows:

Figure 27: Secondary method: DNS lookup

In the upper highlighted area, the three primary methods can be seen, while no connection to “PC02” could be established using these protocols and no NNR response will be received. The second area shows that two DNS requests are made by the DfI agent. The exact request made can be seen in Wireshark, when monitoring the loopback interface on DC01:

Figure 28: DNS lookup by DfI agent

The first request is a reverse DNS lookup, using the IP address from which the suspected attack originated to receive the hostname of the machine. The second request is a forward DNS lookup using the received hostname, serving as a secondary verification step to check whether the initial IP address is returned again.

Reviewing the impact of NNR vulnerability

It was discussed how the flaw in NNR could be exploited, leading to an evasion of alerts that rely on NNR. The impact of that vulnerability can also be rated by the number of alerts that are affected by it. Microsoft writes: “NNR data is crucial for detecting the following threats:”

  • Suspected identity theft (pass the ticket)
  • Suspected DCSync attack (replication of directory services)
  • Network-mapping reconnaissance (DNS)

Which means that at least three alerts depend on NNR to be triggered. While the DCSync alert appears here, there are two additional alerts not shown in this list that rely on NNR, as previously discussed. These two are the ADCS-ESC8 alert “Suspicious Domain Controller certificate request (ESC8)” and the pass-the-cert alert for domain controller machine account “Suspected suspicious Kerberos ticket request”. This makes at least five alerts in total, and there may be more alerts using NNR as detection technique.

It should be noted that NNR working in that way only applies to DfI version 2.X. DfI in version 3.0 uses NNR but does not include the attacker machine in its detection logic. For performing the name resolution, the defender device inventory is used, which is outside of the attacker’s control. The device inventory is a centralized overview of all discovered devices in the organization. The device information is collected through multiple of Microsoft’s security products like DfI and Defender for Endpoint.

Defender for Identity deployment overview

Furthermore, it can be inspected which Windows server can run DfI sensors in version 3.0 and which remains at version 2.2 to get a better idea of the risk posed by NNR.

Figure 29: DfI sensor deployment overview (https://learn.microsoft.com/en-us/defender-for-identity/deploy/deploy-defender-identity)

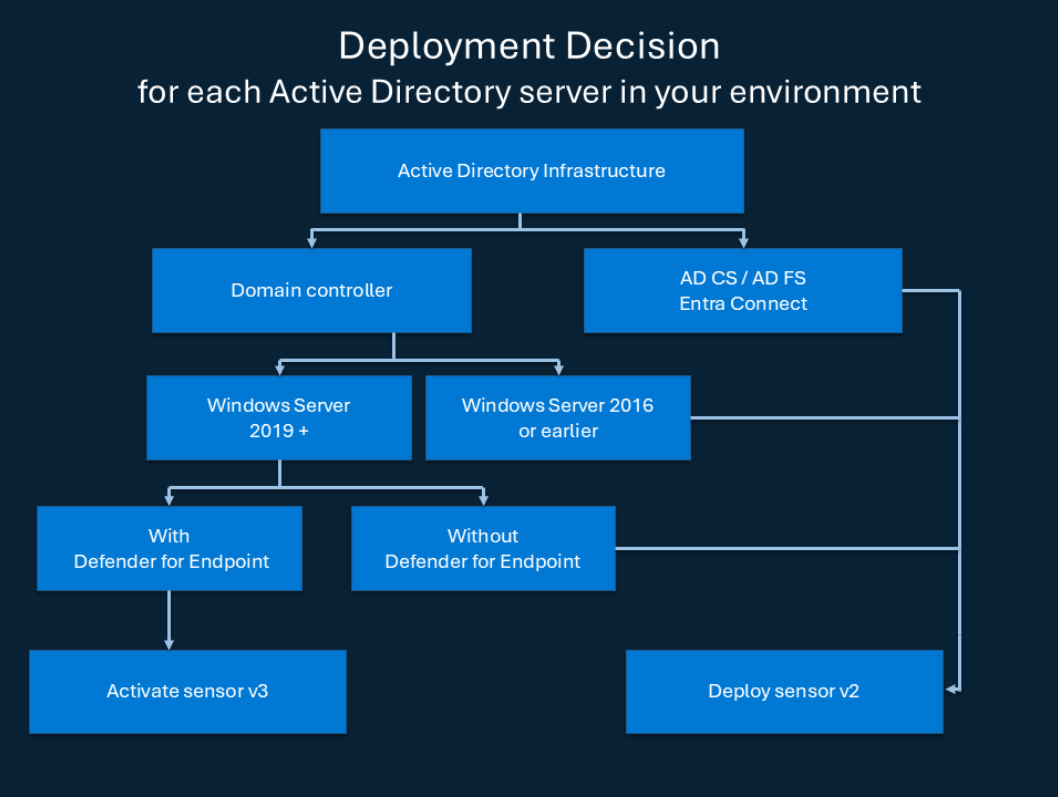
First, only domain controllers can use the sensor in version 3.0. The CA, Federation server and Entra connect server remain in sensor version 2.2. This makes alerts that are generated from DfI agents running on these servers and depending on NNR vulnerable to being evaded.

For domain controllers the usage of version 3.0 is only possible when running as Windows Server 2019 or higher and when Microsoft Defender for Endpoint is enabled on that Windows Server.

Disclosure to Microsoft MSRC

A security advisory about the flaw in the core feature NNR affecting DfI version 2.2 was disclosed to Microsoft via the MSRC portal on February 22, 2026. The vulnerability was not recognized by Microsoft and was reasoned to be below the bar for immediate servicing. As far as the answer from MSRC can be interpreted, no fix will be issued.

Conclusion

While this blogpost focused on alerts that could be evaded, the summary focuses on the results from these investigations. The biggest problem DfI faces are issues related to the involvement of the assumed attacker into the detection logic using indicators to make decisions, controlled by him. This problem can be observed when looking at the pass-the-cert alert, where DfI attempts to detect the attack through attacker-controlled indicators. The problem also becomes evident through the reliance on information provided by self-signed certificates under the attacker control, like the age of a certificate, which is used to determine if further detection logic needs to be applied. Also, the NNR method using RDP relies on information from self-signed certificates and builds decisions on this.

The general problem with the NNR feature in DfI version 2.2 is that it involves the suspected attacker machine while using techniques that do not provide authentication or tamper protection, thereby giving malicious actors the possibility to evade NNR-based detection logic.

Using a trusted database, such as the Defender device inventory, to resolve raw IP addresses to hostnames is a good approach, since it cannot be interfered with by a malicious actor, but it should be available in all DfI versions, not only version 3.0.

Despite various technical issues and the fact that Microsoft does not consider these as vulnerabilities and has no plans to make any changes, security professionals can still take steps to improve security and detectability. This will be described in the second blogpost: Microsoft Defender for Identity evasions in 2026 – Part II.

References

  1. https://www.synacktiv.com/publications/a-dive-into-microsoft-defender-for-identity
  2. https://www.synacktiv.com/publications/understanding-and-evading-microsoft-defender-for-identity-pkinit-detection
  3. https://learn.microsoft.com/en-us/defender-for-identity/nnr-policy
  4. https://learn.microsoft.com/en-us/defender-xdr/pilot-deploy-overview
  5. https://specterops.io/wp-content/uploads/sites/3/2022/06/Certified_Pre-Owned.pdf
  6. https://learn.microsoft.com/en-us/defender-for-identity/deploy/deploy-defender-identity
  7. https://blog.redteam-pentesting.de/2025/windows-coercion/
  8. https://en.hackndo.com/ntlm-relay/#preliminary
Red Teaming

Microsoft Defender for Identity evasions in 2026 – Part I

June 16, 2026 – Microsoft Defender for Identity (DfI) is one of Microsoft’s key solutions for detecting identity-based attacks in Active Directory environments – but how well does it hold up against a skilled attacker? This two-part blog post dives into DfI’s detection capabilities for high-impact attacks such as shadow credentials, pass-the-cert, ESC8, and DCSync. Additionally, it uncovers a spoofing and relaying vulnerability in DfI’s Network Name Resolution component that can be used to evade multiple alerts, and offers blue team perspectives on closing these gaps.


Author: Jakob Scholz

Mehr Infos »
Red Teaming

Windows Instrumen­tation Call­backs – Part 4

February 10, 2026 – In this blog post we will cover ICs from a more theoretical standpoint. Mainly restrictions on unsetting them, how set ICs can be detected and how new ones can be prevented from being set. Spoiler: this is not entirely possible.

Author: Lino Facco

Mehr Infos »
Do you want to protect your systems? Feel free to get in touch with us.

Reife­grad für Sicherheits­über­prüfungen

Search

Reife­grad für Sicherheits­über­prüfungen

May 11, 2026

Reifegrad für Sicherheitsüberprüfungen
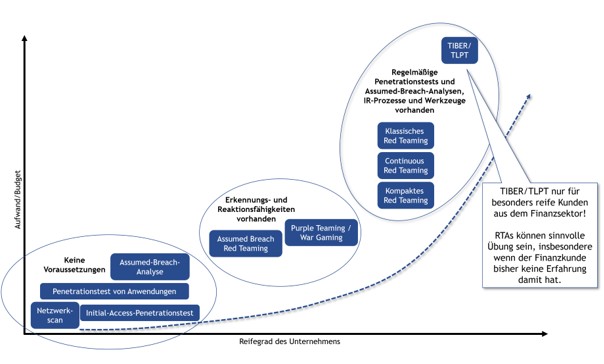
: die richtige Prüfung zur richtigen Zeit

Auf den cirosec TrendTagen habe ich kürzlich einen Vortrag zum Thema Pentesting, Assumed Breach, Red Teaming, TLPT & Co. gehalten. Besonders die grafische Einordnung der einzelnen Prüfungsformen nach Reifegrad und Budget stieß auf großes Interesse. Eine kurze Zusammenfassung zum Nachlesen:

Eine Sicherheitsprüfung ist nur dann effizient, wenn sie zum Reifegrad des Unternehmens passt. Wer seine Hausaufgaben bei der Basis-Hygiene noch nicht gemacht hat, verschwendet mit einem komplexen Red Teaming wertvolle Ressourcen und kann vom Mehrwert eines derartigen Projekts nicht profitieren.

Netzwerkscans, Penetrationstests von Anwendungen oder Initial-Access-Prüfungen benötigen kaum Voraussetzungen. Hier geht es darum, effizient Schwachstellen zu finden. Bei einer Assumed-Breach-Analyse liegt der Fokus auf der Identifikation von Schwachstellen im internen Netzwerk und im Active Directory. Erkennungs- und Reaktionsfähigkeiten spielen dabei noch keine Rolle. Dadurch lassen sich derartige Prüfungen mit einem überschaubaren Budget durchführen. Dies erlaubt auch eine entsprechende Regelmäßigkeit.

Sobald Erkennungs- und Reaktionsfähigkeiten vorhanden sind, werden Purple Teamings / War Gamings oder Assumed Breach Red Teamings relevant. Hierbei wird nicht mehr nur die Prävention geprüft, sondern gezielt das Zusammenspiel zwischen Angriff (Red-Team) und Verteidigung (Blue-Team) trainiert.

Klassisches, kompaktes und kontinuierliches Red Teaming setzt eine solide Infrastruktur und etablierte Incident-Response-Prozesse voraus. Das Ziel ist die Simulation realer, langanhaltender Angriffe. Solche Projekte zielen in der Regel auf das gesamte Unternehmen ab und liefern Erkenntnisse auf unterschiedlichsten Ebenen.

Eine besondere Form des Red-Team-Assessments ist der Threat-led Penetration Test (TLPT) nach TIBER. Diese Durchführungsform ist jedoch nur für besonders reife Unternehmen aus dem Finanzsektor relevant. Detaillierte Informationen dazu finden Sie im separaten Blogpost zu diesem Thema.

Zusammengefasst: Man muss nicht mit einem Red Teaming starten. Wer sich bei der Durchführung von Sicherheitsüberprüfungen am Reifegrad orientiert, baut Sicherheit nachhaltig und budgetgerecht auf. Unternehmen mit einem fortgeschrittenen Reifegrad profitieren hingegen von den Erkenntnissen aus den ganzheitlichen Angriffen eines Red-Team-Assessments.

Eine Übersicht zu möglichen Schwerpunkten von Penetrationstests und Red-Team-Assesessments gibt es auf unserer Website.

Michael Brügge

Managing Consultant

Category
Date

Further blog articles

Red Teaming

Microsoft Defender for Identity evasions in 2026 – Part I

June 16, 2026 – Microsoft Defender for Identity (DfI) is one of Microsoft’s key solutions for detecting identity-based attacks in Active Directory environments – but how well does it hold up against a skilled attacker? This two-part blog post dives into DfI’s detection capabilities for high-impact attacks such as shadow credentials, pass-the-cert, ESC8, and DCSync. Additionally, it uncovers a spoofing and relaying vulnerability in DfI’s Network Name Resolution component that can be used to evade multiple alerts, and offers blue team perspectives on closing these gaps.


Author: Jakob Scholz

Mehr Infos »
Red Teaming

Windows Instrumen­tation Call­backs – Part 4

February 10, 2026 – In this blog post we will cover ICs from a more theoretical standpoint. Mainly restrictions on unsetting them, how set ICs can be detected and how new ones can be prevented from being set. Spoiler: this is not entirely possible.

Author: Lino Facco

Mehr Infos »
Reverse Engineering

Windows Instrumen­tation Call­backs – Part 3

January 28, 2026 – In this third part of the blog series, you will learn how to inject shellcode into processes with ICs as an execution mechanism without creating any new threads for your payload and without installing a vectored exception handler.

Author: Lino Facco

Mehr Infos »
Command-and-Control

Beacon Object Files for Mythic – Part 3

December 4, 2025 – This is the third post in a series of blog posts on how we implemented support for Beacon Object Files (BOFs) into our own command and control (C2) beacon using the Mythic framework. In this final post, we will provide insights into the development of our BOF loader as implemented in our Mythic beacon. We will demonstrate how we used the experimental Mythic Forge to circumvent the dependency on Aggressor Script – a challenge that other C2 frameworks were unable to resolve this easily.

Author: Leon Schmidt

Mehr Infos »
Command-and-Control

Beacon Object Files for Mythic – Part 2

November 27, 2025 – This is the second post in a series of blog posts on how we implemented support for Beacon Object Files (BOFs) into our own command and control (C2) beacon using the Mythic framework. In this second post, we will present some concrete BOF implementations to show how they are used in the wild and how powerful they can be.

Author: Leon Schmidt

Mehr Infos »
Command-and-Control

Beacon Object Files for Mythic – Part 1

November 19, 2025 – This is the first post in a series of blog posts on how we implemented support for Beacon Object Files into our own command and control (C2) beacon using the Mythic framework. In this first post, we will take a look at what Beacon Object Files are, how they work and why they are valuable to us.

Author: Leon Schmidt

Mehr Infos »
Do you want to protect your systems? Feel free to get in touch with us.

Effektive Governance-Strategien im Red Teaming

Search

Effektive Governance-Strategien im Red Teaming

June 30, 2025

Effektive Governance-Strategien im Red Teaming: Kommunikation, Risikoanalyse und OPSEC

This blog post is written in German. A summary is provided in English.

Summary

This blog post explores effective governance strategies in red teaming, with particular focus on customer consultation, risk management, OPSEC, and the use of AI technologies.

Abstrakt

In diesem Blogbeitrag werden effektive Governance-Strategien im Red Teaming unter besonderer Berücksichtigung von Kundenabstimmung, Risikomanagement, OPSEC und dem Einsatz von KI-Technologien untersucht.

Die rasante Weiterentwicklung von KI-Technologien, wie beispielsweise LLMs, ermöglicht es Angreifern, Phishing-Angriffe automatisiert und überzeugend durchzuführen – eine Entwicklung, die eine optimale Vorbereitung der Blue-Teams und regelmäßige Überprüfungen der IT-Sicherheitsinfrastrukturen unerlässlich macht. Basierend auf der Definition von Governance und dem umfassenden Ansatz des Red Teaming wird gezeigt, wie sich durch klar definierte Testparameter, strukturierte Kommunikationsstrategien und präzise Risikobewertungen Sicherheitsüberprüfungen zur Identifikation von Schwachstellen in Produktivsystemen risikominimiert durchführen lassen. Die Methodik kombiniert eine dokumentenbasierte Analyse relevanter Normen mit empirischen Daten aus internen Experteninterviews, um Einblicke in die Umsetzung von Governance im Red Teaming zu gewinnen.

Einführung

Die kontinuierliche Weiterentwicklung von Angriffstechniken und der dazugehörigen Erkennungs- und Reaktionsmöglichkeiten sorgt dafür, dass sich die Bedrohungslandschaft ständig verändert – insbesondere durch den Boom von KI-Technologien, die sowohl Angreifern als auch Verteidigern mächtige Werkzeuge an die Hand geben. In diesem dynamischen Umfeld ist es entscheidend, Schwachstellen auf allen Ebenen – von der Infrastruktur über Prozesse bis hin zu menschlichen Faktoren – genau zu kennen.

Traditionell wurden hierzu häufig Penetrationstests durchgeführt, die isoliert einzelne Aspekte detailliert beleuchteten. Allerdings besteht dabei die Gefahr, dass der ganzheitliche Überblick verloren geht. Daher setzen immer mehr Unternehmen auf Red-Team-Assessments, die einen umfassenden, ganzheitlichen Ansatz verfolgen. Bei diesen Assessments wird bewusst ein offener Scope gewählt, um realistische Angriffsszenarien zu simulieren und das Verhalten der Verteidiger unter realen Bedingungen zu testen.

Doch ein solcher Ansatz ist ohne eine solide Governance nicht denkbar. Governance stellt den strukturellen Rahmen bereit, in dem alle Aktivitäten – von der Festlegung des Scope über die Abstimmung mit dem Kunden bis hin zur kontinuierlichen Evaluierung der Ergebnisse – transparent und kontrolliert ablaufen. Somit bildet Governance die Grundlage für eine effektive Sicherheitsstrategie, die den aktuellen und zukünftigen Herausforderungen gerecht wird.

Definition von Governance im Red Teaming

Nach ISO 37000 umfasst Governance das System von Richtlinien, Strukturen und Prozessen, mit dem eine Organisation geführt und kontrolliert wird. Es stellt sicher, dass Entscheidungen im Einklang mit ethischen, rechtlichen und gesellschaftlichen Anforderungen getroffen werden, und definiert die Verantwortlichkeiten, die Zuständigkeiten sowie die Mechanismen zur Überwachung und Rechenschaftspflicht. Governance bildet somit den Rahmen, in dem strategische Ziele gesetzt, Risiken gemanagt und die Leistung kontinuierlich verbessert werden – stets unter Berücksichtigung der Interessen aller Stakeholder.

Red Teaming ist ein umfassender, angreifergetriebener Ansatz, der darauf abzielt, durch realitätsnahe Angriffssimulationen Schwachstellen in technischen Systemen, organisatorischen Abläufen und im Verhalten von Menschen aufzudecken und auszunutzen. Im Gegensatz zu herkömmlichen Penetrationstests, die den Fokus auf die Identifikation möglichst vieler Sicherheitslücken innerhalb eines Prüfgegenstands legen, bewertet Red Teaming die gesamte Sicherheitsarchitektur einer Organisation. Dabei werden nicht nur technische Defizite, sondern auch Reaktionsmechanismen und das Sicherheitsbewusstsein der Mitarbeiter unter möglichst realistischen Bedingungen getestet.

Im Gegensatz zu einem klassischen Penetrationstest werden Red-Team-Assessments typischerweise verdeckt durchgeführt. Dies stellt einen wesentlichen Unterschied dar und ermöglicht es daher, die Erkennungs- und Reaktionsfähigkeiten des Blue-Teams zu überprüfen und zu trainieren.

Die Integration von Governance in den Red-Teaming-Prozess stellt sicher, dass alle Testaktivitäten unter klar definierten Verantwortlichkeiten, standardisierten Abläufen und regelmäßigen Kontrollen erfolgen. So wird gewährleistet, dass Red-Team-Assessments transparent, ethisch und rechtssicher durchgeführt werden.

Zielsetzung des Blogbeitrags

Das Ziel dieses Beitrags besteht darin, effektive Governance-Strategien im Red Teaming zu identifizieren und ihre Praxistauglichkeit zu bewerten. Im Mittelpunkt stehen dabei drei wesentliche Aspekte:

Kundenabstimmung und Risikomanagement:
Es soll untersucht werden, wie klare Absprachen und eine akkurate Risikoanalyse einen sicheren Rahmen für Red-Team-Assessments schaffen.

OPSEC-Maßnahmen:
Es wird erörtert, wie durch gezielte operative Sicherheitsmaßnahmen – beispielsweise das Vier-Augen-Prinzip – die unauffällige Durchführung von Assessments gewährleistet werden kann.

Einsatz von KI:
Die Chancen und Herausforderungen, die sich durch den verstärkten Einsatz von KI-Technologien im Red Teaming ergeben, werden analysiert.

Die daraus gewonnenen Erkenntnisse sollen als praxisorientierter Leitfaden dienen und Unternehmen dabei unterstützen, Red-Team-Assessments sicher, effektiv und im Einklang mit strategischen sowie regulatorischen Vorgaben durchzuführen.

Methodik

Für die Bearbeitung dieses Themas wurden dokumentenbasierte Analyse und empirische Erhebung kombiniert.

Dokumentenbasierte Analyse:
Zunächst werden relevante Normen und offizielle Dokumente ausgewertet, um die theoretischen Grundlagen von Governance und Red Teaming zu erfassen.

Empirische Datenerhebung:
Ergänzend dazu fließen Daten aus internen Experteninterviews in die Untersuchung ein. Diese Interviews liefern praxisnahe Einblicke in die Umsetzung von Governance-Strategien im Red Teaming.

Kundenabstimmung und Risikomanagement

Die umfangreiche und präzise Abstimmung mit dem Kunden ist das Fundament eines erfolgreichen Red-Team-Assessments. Nur durch klare Kommunikation und detaillierte Vereinbarungen lassen sich Risiken minimieren und ein reibungsloser Projektablauf erreichen. Im Folgenden werden alle wesentlichen Aspekte jener Kundenabstimmung zusammengefasst.

Kundenabsprachen

Klare Kundenabsprachen dienen dazu, Missverständnisse zu vermeiden und unerwünschte Eingriffe in das Produktionssystem des Kunden auszuschließen. Vor Beginn eines Assessments müssen mehrere zentrale Punkte abgestimmt werden, um einen reibungslosen und sicheren Ablauf zu gewährleisten:

Verantwortlichkeiten:
Es wird eindeutig festgelegt, wer als primärer Ansprechpartner fungiert – typischerweise ein CISO oder eine andere verantwortliche Person. Dies schafft klare Kommunikationslinien und stellt sicher, dass im Falle von Fragen oder Problemen schnell reagiert werden kann.

Zieldefinition und Scope:
Der Prüfungsumfang wird detailliert festgehalten, indem alle relevanten Aspekte, wie bspw. die anzugreifenden IP-Adressbereiche, Standorte, Systeme und Mitarbeiter, erfasst werden. Eine präzise Scope-Erfassung verhindert, dass Bereiche ungewollt getestet werden, und ermöglicht eine zielgerichtete Analyse der Sicherheitsinfrastruktur.

Testparameter – Zeitrahmen und Ausschlüsse:
Es wird ein klarer Zeitrahmen für das Assessment festgelegt und es werden explizite Ausschlüsse definiert, um kritische Systeme zu schützen. Die Festlegung von Rules of Engagement regelt zudem, welche Angriffstechniken, wie etwa Social Engineering, zulässig sind.

Formale Dokumentation:
Durch die Erstellung eines detaillierten Aufklärungsbogens werden alle vereinbarten Testbereiche und Risiken schriftlich festgehalten. Ergänzend wird eine sogenannte „Get-out-of-Jail-Free-Card“ ausgestellt, welche die Legitimität durchgeführter Angriffe vom Auftraggeber bescheinigt und im Zweifelsfall zur Klärung einer Situation genutzt werden kann.

Bild 1: Kundenabsprache

Diese Vereinbarungen werden typischerweise in einem ausführlichen Kick-off-Workshop erarbeitet, der den Rahmen für das gesamte Assessment definiert. Zusätzlich finden regelmäßige Jour-fixe-Termine statt, in denen der aktuelle Stand des Assessments, potenzielle Risiken und angedachte Angriffsszenarien kontinuierlich besprochen werden. Durch diesen strukturierten Kommunikationsprozess wird sichergestellt, dass alle Parteien – sowohl intern als auch seitens des Kunden – stets über den Umfang und die Grenzen des Assessments informiert sind. Dies trägt maßgeblich dazu bei, dass das Red-Team-Assessment unter klar definierten, sicheren Rahmenbedingungen durchgeführt wird.

Risikobewertung: Angriffsauswirkungen auf Produktivsysteme

Die Risikobewertung geplanter Angriffe spielt eine entscheidende Rolle im Verlauf eines Red-Team-Assessments. Hierbei muss im Vorhinein präzise evaluiert werden, wie mögliche Schäden und Eintrittswahrscheinlichkeiten minimiert werden.

Ein Beispiel hierfür wäre die Planung eines Passwort-Spraying-Angriffs. Dabei versucht der Angreifer, im Gegensatz zum herkömmlichen Brute-Force-Angriff nicht die Anmeldung eines Users mit vielen Passwörtern zur erraten, sondern testet mithilfe weniger, möglichst allgemeiner Passwörter (Firma2025, Sommer2025 etc.) alle ihm bekannten Useranmeldungen. In der Regel existieren Maßnahmen zum Schutz von Benutzerkonten vor derartigen Angriffen. Dabei führen zu viele fehlgeschlagene Anmeldeversuche zu einer Sperrung des betroffenen Kontos. Da ein Passwort-Spraying-Angriff auf eine breite Benutzerbasis abzielt, besteht somit das Risiko, massenhaft Benutzerkonten zu sperren und so das produktive Arbeitsgeschehen zu beeinträchtigen.

Um solche Szenarien zu vermeiden, werden zum einen die Risiken möglicher Angriffe schriftlich im Aufklärungsbogen vor jedem Assessment festgehalten, um so den Kunden möglichst gut über potenzielle Risiken aufzuklären. Zum anderen sollten kritische Angriffe in regelmäßigen Jour-fixe-Terminen präventiv besprochen und bewertet werden.

Kommunikationsstrategien mit dem Kunden

Der Kick-off-Workshop stellt einen essenziellen Bestandteil der Vorbereitungsphase dar. In diesem Treffen werden alle relevanten Aspekte des Red-Team-Assessments im Detail besprochen. Dabei werden unter anderem der Prüfumfang, bestehend aus Scope und Prüfzeitraum, die festgelegten Rules of Engagement, die Benennung der Ansprechpartner sowie die Abgrenzung der Testbereiche definiert. Durch die frühzeitige Klärung dieser Parameter wird sichergestellt, dass alle Beteiligten, sowohl auf Kundenseite als auch innerhalb des Red-Teams, ein gemeinsames Verständnis der Ziele, Vorgehensweisen und Grenzen haben.

Da Red-Team-Assessments immer unvorhersehbare Entwicklungen aufweisen können, ist es entscheidend, vor Beginn jedes Assessments eine Kommunikationsstruktur mit dem Kunden aufzubauen. Durch die Einrichtung von Ad-hoc-Messenger-Gruppen, in denen alle relevanten Ansprechpartner gebündelt sind, wird sichergestellt, dass im Notfall umgehend und effizient kommuniziert werden kann – sodass zeitnah Unterstützung und Klärung gewährleistet sind.

Zusätzlich zu den Ad-hoc-Messenger-Gruppen bilden regelmäßige Jour-fixe-Termine einen zentralen Bestandteil der Kommunikationsstrategie. Diese fest eingeplanten Besprechungen ermöglichen einen kontinuierlichen Austausch zwischen dem Red-Team und den Ansprechpartnern beim Kunden. In diesen Meetings werden aktuelle Ergebnisse, mögliche Abweichungen vom geplanten Ablauf und potenzielle Risiken durch geplante Angriffe erörtert. So können frühzeitig auf unvorhergesehene Entwicklungen reagiert und notwendige Anpassungen im Prüfablauf vereinbart werden. Durch diesen strukturierten Kommunikationsrhythmus wird gewährleistet, dass alle Beteiligten stets auf dem neuesten Stand sind und im Ernstfall schnell und effektiv unterstützt werden können.

OPSEC im Red Teaming

Im Rahmen von Red-Team-Assessments spielt die operative Sicherheit (OPSEC) eine entscheidende Rolle. Während technische Prüfungen und strategische Abstimmungen wesentliche Bestandteile eines Assessments sind, stellt OPSEC sicher, dass die Angriffsaktivitäten möglichst unauffällig ablaufen und nicht zu unbeabsichtigten Alarmen führen. Des Weiteren soll sie dafür sorgen, dass keine Attribution zum Red-Team möglich ist. Das umfasst sowohl technische als auch organisatorische Maßnahmen, die vermeiden sollen, dass Angriffe durch abweichendes Verhalten, nicht obfuskierte Tools oder mangelnde interne Abstimmungen entdeckt werden. Die konsequente Anwendung von OPSEC-Prinzipien ist daher ein wichtiger Bestandteil, um den Erfolg eines jeden Red-Team-Assessments sicherzustellen.

Prinzipien der Tarnung: Vermeidung von Identifikation durch den Kunden

Im Rahmen von Red-Team-Assessments ist es essenziell, die Aktivitäten des Red-Teams so auszuführen, dass sie für den Kunden nicht als gezielte Sicherheitsüberprüfung erkennbar sind. Dies wird erreicht durch eine Kombination aus technischen und organisatorischen Maßnahmen:

Technische Maßnahmen:
Technische Maßnahmen im Red Teaming beinhalten einige Ansätze, die darauf abzielen, die digitalen Spuren von Angriffen möglichst zu minimieren und deren Erkennung durch Sicherheitsmechanismen wie EDR- und SIEM-Systeme durch Anomalieerkennung zu verhindern. Ein zentraler Aspekt ist dabei die weitgehende Eliminierung von Log-Einträgen, die auf verdächtige Aktivitäten hinweisen könnten. Dies umfasst nicht nur das gezielte Löschen oder Verschleiern von Protokolldaten, sondern auch die Anpassung von Angriffstechniken, sodass sie sich nahtlos in den normalen Systembetrieb einfügen.

Ein wesentlicher Punkt ist die Modifikation von Angreifer-Tools, um deren Verhaltensmuster zu normalisieren. Standardmäßig eingesetzte Tools wie Mimikatz weisen oft charakteristische Signaturen und Abläufe auf, die von EDR-Systemen oder Sicherheitsanalysten schnell erkannt werden können. Daher sollte der Einsatz von nicht obfuskierten Versionen solcher Tools idealerweise vermieden werden. Falls der Einsatz unumgänglich ist, müssen zusätzliche Obfuskierungstechniken angewendet werden. Dies kann durch das Einführen von Verschleierungsmethoden erfolgen, die den Code modifizieren oder variabel gestalten, sodass dessen typische Signaturen nicht mehr identifizierbar sind.

Zusätzlich wird empfohlen, dynamische Parameter in den Tools zu implementieren, um das Verhalten unvorhersehbar zu machen und somit den Vergleich mit bekannten Mustern zu erschweren. All diese Maßnahmen tragen dazu bei, dass Angriffsaktivitäten im System als normale, unauffällige Vorgänge interpretiert werden und die Wahrscheinlichkeit einer Identifikation durch automatisierte Systeme oder manuelle Analysen signifikant sinkt.

Organisatorische Maßnahmen:
Die Einhaltung interner OPSEC-Richtlinien wird maßgeblich durch das konsequente Anwenden des Vier-Augen-Prinzips bei kritischen Aktionen unterstützt. Dies bedeutet, dass bei sensiblen Schritten stets mindestens zwei Teammitglieder involviert sind, um die Durchführung zu überwachen, Entscheidungen gemeinsam zu validieren und so das Risiko von Informationslecks deutlich zu reduzieren. Durch diese Maßnahmen wird effektiv verhindert, dass Rückschlüsse auf die Identität und Vorgehensweise des Red-Teams gezogen werden können, wodurch die Diskretion und Sicherheit der Operationen gewährleistet sind.

Fallbeispiel: Konsequente OPSEC

Ein praxisnahes Fallbeispiel verdeutlicht eindrücklich die Bedeutung einer konsequenten Umsetzung von Governance-Richtlinien im Bereich der OPSEC während eines Red-Team-Assessments. In einem Assessment wurde ein Rechtschreibfehler in der Konfiguration eines Softwareverteilungsprogramms festgestellt, das vom Red-Team verwendet wurde. Dieser vermeintlich unbedeutende Fehler ermöglichte es einem Blue-Team-Analysten, auf Aktivitäten des Red-Teams im System des Kunden zu schließen.

Obwohl der Fehler innerhalb des Red-Teams erkannt wurde, wurde die Korrektur auf den Folgetag verschoben. Diese Verzögerung bot dem Blue-Team ausreichend Zeit, den Fehler als Indiz zu nutzen und somit die Angriffsaktivitäten zu entlarven. Dadurch konnte der Kunde seine Reaktionsfähigkeiten prüfen und trainieren. Das Red-Team musste anschließend neue Wege zur weiteren Ausbreitung im internen Netz identifizieren und ausnutzen.

Dieses Beispiel zeigt, wie entscheidend es ist, auch kleinste Unstimmigkeiten sofort zu beheben und strikte OPSEC-Maßnahmen umzusetzen. Die lückenlose Einhaltung von Governance-Richtlinien – von der präzisen Konfiguration bis hin zur sofortigen Reaktion auf Fehler – ist unerlässlich, um die Diskretion des Red-Teams zu wahren und die Integrität des Assessments sicherzustellen.

KI im Red Teaming

Im Red Teaming werden KI-gestützte Tools bereits experimentell eingesetzt, beispielsweise zur Feinabstimmung von E-Mail-Inhalten mithilfe von ChatGPT oder Gemini sowie zur Unterstützung bei Scripting-Aufgaben. KI birgt insbesondere Potenziale im Bereich des Social Engineering, indem sie hilft, authentische Kommunikationsmuster zu generieren und die Erstellung sowie Anpassung von Skripten effizienter zu gestalten.

Risiken und Einschränkungen

Der Einsatz KI-gestützter Tools birgt Risiken, die vor allem den Umgang mit sensiblen Daten betreffen. Strenge Datenschutzvorgaben (z. B. DSGVO) müssen eingehalten werden, um unbefugten Zugriff zu verhindern. Fehler in der Datenverarbeitung können zu ungenauen Ergebnissen führen, während mangelnde Transparenz der KI-Entscheidungsprozesse die Nachvollziehbarkeit erschwert. Zudem können Schwachstellen in den KI-Systemen selbst als neue Angriffsvektoren dienen. Insgesamt erfordert der KI-Einsatz eine sorgfältige Balance zwischen Innovation und strikten Sicherheits- und Compliance-Maßnahmen.

Zukünftige Entwicklungen

Zukünftige Entwicklungen könnten den Einsatz von KI bei der Automatisierung von Website-Fuzzing-Prozessen vorsehen, was einen groß angelegten Informationsgewinn ermöglichen würde – wenngleich diese Ansätze derzeit noch kostenintensiv sind. Ebenso wird der Einsatz von Deepfakes im Social Engineering als möglicher Trend betrachtet. Insgesamt wird erwartet, dass KI in Zukunft eine bedeutendere Rolle im Red Teaming einnehmen wird, wobei strikte Governance-Vorgaben und Datenschutz weiterhin zentrale Anforderungen bleiben.

Fazit und Ausblick

Im Anschluss wird ein Einblick in zukünftige Entwicklungen und Herausforderungen im Bereich der Governance-Strategien im Red Teaming gegeben und mögliche Ansätze für Optimierungen werden veranschaulicht.

Zusammenfassung der wichtigsten Erkenntnisse

In diesem Blogbeitrag wurde gezeigt, dass eine strukturierte Governance im Red Teaming essenziell ist, um ganzheitliche Sicherheitsüberprüfungen risikominimiert durchzuführen. Zu den zentralen Erkenntnissen zählen:

Klare Kundenabstimmung und Scope-Definition:
Durch präzise Festlegung des Prüfungsumfangs und regelmäßige Abstimmungen wird sichergestellt, dass Testaktivitäten eindeutig definiert und potenzielle Risiken frühzeitig erkannt werden.

Effektive OPSEC-Maßnahmen:
Die Kombination aus technischen und organisatorischen Maßnahmen – wie die Minimierung von Log-Spuren, der Einsatz obfuskierter Tools und das konsequente Vier-Augen-Prinzip – sorgt dafür, dass Angriffe unauffällig bleiben und nicht zu unbeabsichtigten Alarmen führen.

Integration von Governance-Prinzipien:
Die Einbindung von Governance-Standards in den gesamtenRed-Teaming-Prozess gewährleistet, dass sowohl interne Sicherheitsvorgaben als auch Kundenanforderungen eingehalten werden. Dies schafft einen strukturierten Rahmen, der den sicheren und effektiven Ablauf der Assessments unterstützt.

Chancen und Herausforderungen durch KI:
Der Einsatz von KI im Red Teaming eröffnet vielversprechende Möglichkeiten, wie die Automatisierung von Angriffsszenarien, eine präzisere Simulation von Social-Engineering-Angriffen und die Optimierung von Scripting-Aufgaben.

Bild 2: Bestandteile

Gleichzeitig bestehen jedoch große Herausforderungen: Strenge Datenschutzvorgaben und Compliance-Anforderungen müssen stets eingehalten werden, um sensible Daten zu schützen. Fehler in der KI-Datenverarbeitung oder mangelnde Transparenz der Entscheidungsprozesse können zu ungenauen Ergebnissen und neuen Angriffsvektoren führen. Insgesamt erfordert der KI-Einsatz eine ausgewogene Balance zwischen neuen Technologien und strikten Governance-Maßnahmen, um auf längere Sicht eine sichere und effektive Sicherheitsstrategie zu gewährleisten.

Zukunftsperspektiven

Die fortschreitende Integration von KI in das Red Teaming hat großes Potenzial für zukünftige Entwicklungen. So könnte die Automatisierung von Website-Fuzzing-Prozessen, unterstützt durch KI, zu einem breiten Informationsgewinn führen und dadurch die Effizienz bei der Identifikation von Schwachstellen deutlich erhöhen. Gleichzeitig bietet der Einsatz von Deepfakes im Bereich Social Engineering die Möglichkeit, noch realistischere Angriffsszenarien zu simulieren und die Reaktionsfähigkeit der Blue-Teams weiter zu testen.

Neben diesen Fortschritten wird es zukünftig zunehmend darauf ankommen, Governance-Prinzipien kontinuierlich an die wandelnden Anforderungen anzupassen. Dies bedeutet, dass strenge Datenschutz- und Compliance-Vorgaben und das konsequente Vier-Augen-Prinzip weiterentwickelt werden müssen, um den komplexeren Risiken im KI-gestützten Red Teaming gerecht zu werden. Die enge Verzahnung von innovativen KI-Technologien und bewährten Sicherheitsstrategien wird somit ein zentraler Erfolgsfaktor sein, um langfristig eine robuste und zukunftssichere Sicherheitsarchitektur zu gewährleisten.

Hannes Allmann

Dualer Student

Category
Date
Navigation

Further blog articles

Command-and-Control

Beacon Object Files for Mythic – Part 3

December 4, 2025 – This is the third post in a series of blog posts on how we implemented support for Beacon Object Files (BOFs) into our own command and control (C2) beacon using the Mythic framework. In this final post, we will provide insights into the development of our BOF loader as implemented in our Mythic beacon. We will demonstrate how we used the experimental Mythic Forge to circumvent the dependency on Aggressor Script – a challenge that other C2 frameworks were unable to resolve this easily.

Author: Leon Schmidt

Mehr Infos »
Command-and-Control

Beacon Object Files for Mythic – Part 2

November 27, 2025 – This is the second post in a series of blog posts on how we implemented support for Beacon Object Files (BOFs) into our own command and control (C2) beacon using the Mythic framework. In this second post, we will present some concrete BOF implementations to show how they are used in the wild and how powerful they can be.

Author: Leon Schmidt

Mehr Infos »
Command-and-Control

Beacon Object Files for Mythic – Part 1

November 19, 2025 – This is the first post in a series of blog posts on how we implemented support for Beacon Object Files into our own command and control (C2) beacon using the Mythic framework. In this first post, we will take a look at what Beacon Object Files are, how they work and why they are valuable to us.

Author: Leon Schmidt

Mehr Infos »
Red Teaming

The Key to COMpromise – Part 4

February 26, 2025 – In this final part of our series on COM hijacking, we will examine a custom-named pipe IPC protocol implemented by Bitdefender Total Security and detail our approach to reverse engineering it. We will explore how we could use COM hijacking and this custom communication to gain SYSTEM privileges (CVE-2023-6154). Additionally, we will examine how to mitigate the vulnerabilities discussed throughout this series of blog posts. Lastly, we will demonstrate how COM hijacking can be exploited to perform a Denial-of-Service (DoS) attack on security products.

Author: Alain Rödel and Kolja Grassmann

Mehr Infos »
Red Teaming

The Key to COMpromise – Part 3

February 12, 2025 – In this third part of our blog post series, we will cover the details of two additional vulnerabilities we found based on COM hijacking. The first vulnerability impacted Webroot Endpoint Protect (CVE-2023-7241), allowing us to leverage an arbitrary file deletion to gain SYSTEM privileges. In the second case, we targeted Checkpoint Harmony (CVE-2024-24912) and used a file download primitive to gain SYSTEM privileges.

Author: Alain Rödel and Kolja Grassmann

Mehr Infos »
Red Teaming

The Key to COMpromise – Part 2

January 29, 2025 – In this post, we will delve into how we exploited trust in AVG Internet Security (CVE-2024-6510) to gain elevated privileges.
But before that, the next section will detail how we overcame an allow-listing mechanism that initially disrupted our COM hijacking attempts.

Author: Alain Rödel and Kolja Grassmann

Mehr Infos »
Pentesting

TLPT: Bedroh­ungs­­­orientierte Penetra­tions­tests nach DORA

January 24, 2025 – Since January 17, 2025, the Digital Operational Resilience Act (DORA) has been put into practice. One important aspect of DORA is the requirement of regularly performing threat-led penetration tests (TLPT). Only selected entities within the financial sector are required to conduct TLPTs. Even though TLPTs sound like a new concept, they have actually existed in Germany since 2020 in form of TIBER tests. This blog post describes the concepts behind TLPTs and how they are conducted. Furthermore, alternatives for targeted and budget-oriented red team assessments are given.

Author: Michael Brügge

Mehr Infos »
Red Teaming

The Key to COMpromise – Part 1

January 15, 2025 – In this series of blog posts, we cover how we could exploit five reputable security products to gain SYSTEM privileges with COM hijacking. If you’ve never heard of this, no worries. We introduce all relevant background information, describe our approach to reverse engineering the products’ internals, and explain how we finally exploited the vulnerabilities. We hope to shed some light on this undervalued attack surface.

Author: Alain Rödel and Kolja Grassmann

Mehr Infos »
Blog

Loader Dev. 4 – AMSI and ETW

April 30, 2024 – In the last post, we discussed how we can get rid of any hooks placed into our process by an EDR solution. However, there are also other mechanisms provided by Windows, which could help to detect our payload. Two of these are ETW and AMSI.

Author: Kolja Grassmann

Mehr Infos »
Do you want to protect your systems? Feel free to get in touch with us.

The Key to COMpromise – Part 2

Search

The Key to COMpromise – Part 2

January 29, 2025

The Key to COMpromise - Abusing a TOCTOU race to gain SYSTEM, Part 2

Recap

In the first post of this blog series, we explored the architectural design of various security products and demonstrated how COM hijacking can be leveraged to exploit them: We examined a vulnerability that allowed us to replay a modified message over a named pipe, highlighting a potential attack vector.

As discussed previously, many security products have frontend processes operating in the context of an unprivileged user, which are capable of initiating privileged actions – such as adding exclusions  – by interacting with a backend service running at higher privileges. To prevent abuse, most vendors implement mechanisms to ensure these actions originate from trusted processes and take steps to protect those processes from tampering.

However, because frontend processes execute with limited user privileges, COM hijacking presents an opportunity to load a malicious DLL into the process. In our research, we found that this attack vector was viable across all the products we targeted, allowing us to exploit the security product’s inherent trust in its own processes.

To capitalize on this trust relationship, we needed to reverse engineer the communication protocols between the frontend and backend processes. This helped us identify interactions that could be manipulated to escalate privileges.

In this post, we will delve into how we exploited this trust in AVG Internet Security (CVE-2024-6510 ) to gain elevated privileges. But before that, the next section will detail how we overcame an allow-listing mechanism that initially disrupted our COM hijacking attempts.

Figure 1: User Interface of the AVG Internet Security Solution
Alain Rödel and Kolja Grassmann

Consultants

Category
Date
Navigation

Circumventing an allow list

For this part of our research, we employed the same basic technique as before, but with one key difference: this time, the COM interface was triggered each time we opened a file dialog to block an application. However, we encountered a restriction – we could not load our DLL from just any folder.

When trying to load the DLL from our custom folder at C:\poc, we could not observe any successful DLL load in the Process Monitor. In contrast, the original DLL path worked without issue.
Through trial and error, we discovered that placing our DLL in the  C:\Windows\system32 directory allowed it to load successfully. This behavior revealed that the product validates the DLL’s directory against an allow list, likely as a defense against DLL hijacking attacks.

While loading from C:\Windows\system32 bypassed the allow list, this approach was impractical for our privilege escalation since an unprivileged user cannot write to this directory. However, based on our prior experience bypassing AppLocker configurations, we knew that some subdirectories within C:\Windows\system32 were writable by unprivileged users. One such directory is C:\Windows\System32\spool\drivers\color. By placing the DLL used for the COM hijacking in this writable subdirectory, we successfully bypassed the allow list and achieved code execution in the frontend process.

Figure 2: Schematic ACLs on specific folders in SYSTEM32

With this DLL injection method established, the next step was to analyze the communication with backend processes. In the following section, we will discuss how we leveraged this primitive to manipulate the trust relationship and escalate privileges.

Reverse engineering the RPC communication

Reverse Engineering RPC communication can be a daunting task, especially in the beginning. Fortunately, tools like RpcView are invaluable for enumerating and identifying RPC interfaces. However, the process ultimately requires in-depth reverse engineering efforts. For our work with AVG, we used the excellent Akamai Research RPC Toolkit to identify and analyze various RPC interfaces across the different AVG binaries.

Our focus was on RPC server interfaces, as these are the endpoints exposed by high-privileged processes. While the AVGSvc.exe executable does not contain RPC server bindings, we found that the ashServ.dll DLL, which is loaded by the service, does expose such interfaces!

The Akamai RPC Toolkit produced the following output: 

"ashServ.dll": {
// [...]
"908d4c23-138f-4ac5-af4a-08584ae7c67b": {
"number_of_functions": 22,
"functions_pointers": [
"0x1654e0700",
"0x1654e0790",
// [...]
],
"role": "server",
"flags": "0x6000000",
"interface_address": "0x165f96020",
// [...]
"eb915940-6276-11d2-b8e7-006097c59f07": {
"number_of_functions": 106,
"functions_pointers": [
"0x1655c8180",
"0x1655c8290",
// [...]
"role": "server",
"flags": "0x6000000",
"interface_address": "0x165fca670"
},
"1118fbbd-02ee-4910-9d86-9940537ee146": {
"number_of_functions": 23,
"functions_pointers": [
"0x1655c08d0",
"0x1655c6be0",
// [...]
],
"role": "server",
"flags": "0x6000000",
"interface_address": "0x165fccfb0"
}

From this output, we can observe three major interfaces with 22, 106, and 23 exposed endpoints. The largest interface is the [Aavm] RPC interface, which has been the subject of previous research and exploitation. Searching the interface GUID on the web reveals some other interesting blog posts back in the year 2015.

Reverse engineering and renaming the functions within the RPC interface is tedious but relatively straightforward.

Figure 3: Some renamed RPC functions of the Aavm RPC interface

Through this analysis, we discovered an RPC function named AavmRpcRunSystemComponent that uses the CreateProcess API without RPC impersonation:

.rdata:0000000165FCA550 dq offset sub_1655C5580
.rdata:0000000165FCA558 dq offset sub_1655C55D0
.rdata:0000000165FCA560 dq offset AavmRpcRunSystemComponent
.rdata:0000000165FCA568 dq offset DecryptData
.rdata:0000000165FCA570 dq offset AddNetAlert

When the RPC client is not impersonated, any new process spawned through this function will run with SYSTEM privileges, creating a critical opportunity for privilege escalation. However, before this process is initiated, a DSA_FileVerify check takes place:

__int64 __fastcall AavmRpcRunSystemComponent(__int64 a1, unsigned int whitelist_id, __int64 arguments, DWORD *out_pid)
{
// [...]
char out_string[32];
// [...]
v8 = GetFileById(out_string, whitelist_id); // [1]
// [...]
FileW = CreateFileW((LPCWSTR)out_string, 0x80000000, 1u, 0i64, 3u, 0x8000000u, 0i64);
v12 = FileW;
v21 = (__int64)FileW;
if ( FileW == (HANDLE)-1i64 )
{
// file not found
}
if ( !GetFinalPathNameByHandleW(FileW, szFilePath, 0x104u, 0) )
{
// File path could not be resolved
}
if ( whitelist_id != 2 && !(unsigned __int8)DSA_FileVerify(szFilePath, 0i64, 18i64) ) // [2]
{
LastError = 87; // ERROR_INVALID_PARAMETER
CloseHandle(v12);
return LastError;
}
// [...]
snprintf(combined_arguments, v15, L"%s %s", szFilePath, arguments); // [3]
// [...]
if ( CreateProcessW(szFilePath, combined_arguments, 0i64, 0i64, 0, 0, 0i64, 0i64, &StartupInfo, &ProcessInformation) ) // [4]
{
// Win ?

The DSA_FileVerify function performs several validations:

  1. Based on the integer argument in [1], it returns a filename. Most of the executable files in this list are repair or setup tools, such as aswOfferTool.exe, SupportTool.exe and AvEmUpdate.exe, which limits the options to those predefined binaries.
  2. A file signature verification is performed in [2] to ensure only trusted binaries can be executed. This check prevents an attacker from inserting their own malicious binary into the process.
  3.  Finally, the program arguments are constructed in [3], and the process is created with SYSTEM privileges in [4].

Although this function appears to be a promising privilege escalation vector, the constraints of the allow-listed binaries and file signature verification present significant roadblocks. Without the ability to exploit any of the allow-listed programs, this avenue may seem like a dead end.

To overcome this limitation, we decided to experiment with the RPC client bindings found in the aavmrpch.dll library. Using this approach, we began testing the functionality of various RPC interfaces, with particular emphasis on the AavmRpcRunSystemComponent function, to explore potential exploitation paths.

Abusing the update mechanism

The most promising target for exploitation was the AvEmUpdate.exe executable, which accepts a range of command-line arguments. This executable is responsible for installing updates provided as cab or DLL files. Since we could control the arguments passed to it, this presented a compelling opportunity for further exploration.

One particularly interesting argument was /applydll, which allows the process to load a specified DLL. Crucially, because the process runs with SYSTEM privileges, this argument could potentially be abused to escalate privileges. However, the update mechanism includes an additional safeguard: it verifies that the provided DLL is signed by the manufacturer. This signature check prevented us from directly supplying a custom DLL to gain SYSTEM privileges.

TOCTOU race

Despite this limitation, we were confident that we could bypass the integrity check by carefully analyzing and exploiting the logic of the process. We finally found a time of use vs time of check (TOCTOU) issue in the logic, which made the integrity checks bypassable. To exploit this reliably, we employed a combination of OpLocks (opportunistic locks) and junctions.

To control the timing of the file accesses during exploitation and exploit our race reliably we needed a way to put the update process in a waiting state. Here we used OpLock to block access to the DLL file and force the update process to wait for us releasing the OpLock. This works even on processes running as SYSTEM, while operating as an unprivileged user. This gives us time to prepare for the next step.

We also want to be able to switch out the DLL file while holding our OpLock. This is where junctions come in. Junctions are symbolic links that can redirect file system access to a different location. Since an unprivileged user can create junctions, we used this capability to redirect file accesses during the exploitation process while holding our OpLock. We can point the junction to an other location for the next file access and there precisely control which file is accessed for each single file access. For more information on OpLocks and junctions, refer to the code provided by James Forshaw and this article from ZDI.

Here’s how the exploit worked:

  1. The AvEmUpdate.exe process made multiple file accesses before loading the DLL, likely to verify its legitimacy.
  2. Using a junction, we redirected the process to a valid, signed DLL for the first three file access attempts.
  3.  On the fourth file access, when the process attempted to load the DLL, we redirected the junction to our malicious DLL containing the privilege escalation payload.

Because we were holding an OpLock on the initial three file accesses, we could dynamically change the target of the junction while the SYSTEM process was waiting for access to the previous file. After updating the junction’s target, we released the OpLock, allowing the process to move on to the next file. We repeated this until the fourth access successfully loaded our malicious DLL.

Figure 4: Visualization of the junction redirects

Note that the process always accesses the same file; however, using the junction, we change the files accessible under this path.

While this technique successfully allowed us to bypass the signature verification and load our malicious DLL, it wasn’t sufficient on its own to fully escalate privileges. In the next section, we will delve into the additional steps required to achieve high privileges on the system and the challenges we encountered along the way.

Disabling self-defence

Even after successfully executing the TOCTOU (time-of-check-to-time-of-use) race, our malicious DLL was not loaded into the process. Upon further investigation, we discovered that the process only loaded DLLs with valid signatures. This added layer of protection significantly complicated our exploitation attempts. We suspect this behavior was due to the process being launched as a PPL (Protected Process Light) process.

After some trial and error, we found that this restriction was enforced only when the product’s self-protection feature was enabled. Fortunately, we identified an RPC function, AavmRpcDisableSelfDefense, that could disable this self-protection mechanism. This function was exported by the same DLL (ashServ.dll) we had already interacted with in our previous RPC calls. By calling this function, we successfully disabled the product’s self-defense feature.

With self-defense disabled, our malicious DLL was successfully loaded into the process running with SYSTEM privileges, finally completing the privilege escalation.

To summarize, the exploitation in this case worked as follows:

1. Initial entry with COM hijacking:

  • We used COM hijacking to load a DLL into the frontend process.
  • To bypass the allow-listing mechanism, the DLL was placed in C:\Windows\System32\spool\drivers\color

2. Disabling self-defense:

  •  The loaded DLL then called the function AavmRpcDisableSelfDefense to deactivate the product’s self-protection feature.

3. Triggering the update mechanism:

  •  The DLL triggered an update by calling AavmRpcRunSystemComponent.
  • Using a junction in combination with OpLocks, we tricked the update process into loading an unsigned DLL.
  • This allowed us to escalate our privileges to SYSTEM.

Summary

In this blog post, we demonstrated how COM hijacking was leveraged to gain SYSTEM privileges for exploiting AVG Internet Security to gain privileges. Unlike the previous case, we encountered additional obstacles, namely an allow-listing mechanism, that initially blocked our DLL. We described how we bypassed this restriction by placing the DLL in a writable system directory. We detailed our reverse engineering of the product’s RPC calls, which uncovered functions that allowed us to disable self-protection and trigger the update mechanism. By combining a junction and OpLocks, we bypassed the signature check and successfully loaded an unsigned DLL, enabling us to escalate privileges to SYSTEM.

In the next post, we will explore two additional vulnerabilities related to COM hijacking and describe how we exploited them to achieve privilege escalation.

This article was written as part of joint research with Neodyme.

Further blog articles

Command-and-Control

Beacon Object Files for Mythic – Part 3

December 4, 2025 – This is the third post in a series of blog posts on how we implemented support for Beacon Object Files (BOFs) into our own command and control (C2) beacon using the Mythic framework. In this final post, we will provide insights into the development of our BOF loader as implemented in our Mythic beacon. We will demonstrate how we used the experimental Mythic Forge to circumvent the dependency on Aggressor Script – a challenge that other C2 frameworks were unable to resolve this easily.

Author: Leon Schmidt

Mehr Infos »
Command-and-Control

Beacon Object Files for Mythic – Part 2

November 27, 2025 – This is the second post in a series of blog posts on how we implemented support for Beacon Object Files (BOFs) into our own command and control (C2) beacon using the Mythic framework. In this second post, we will present some concrete BOF implementations to show how they are used in the wild and how powerful they can be.

Author: Leon Schmidt

Mehr Infos »
Command-and-Control

Beacon Object Files for Mythic – Part 1

November 19, 2025 – This is the first post in a series of blog posts on how we implemented support for Beacon Object Files into our own command and control (C2) beacon using the Mythic framework. In this first post, we will take a look at what Beacon Object Files are, how they work and why they are valuable to us.

Author: Leon Schmidt

Mehr Infos »
Red Teaming

The Key to COMpromise – Part 2

January 29, 2025 – In this post, we will delve into how we exploited trust in AVG Internet Security (CVE-2024-6510) to gain elevated privileges.
But before that, the next section will detail how we overcame an allow-listing mechanism that initially disrupted our COM hijacking attempts.

Author: Alain Rödel and Kolja Grassmann

Mehr Infos »
Red Teaming

The Key to COMpromise – Part 1

January 15, 2025 – In this series of blog posts, we cover how we could exploit five reputable security products to gain SYSTEM privileges with COM hijacking. If you’ve never heard of this, no worries. We introduce all relevant background information, describe our approach to reverse engineering the products’ internals, and explain how we finally exploited the vulnerabilities. We hope to shed some light on this undervalued attack surface.

Author: Alain Rödel and Kolja Grassmann

Mehr Infos »
Blog

Loader Dev. 4 – AMSI and ETW

April 30, 2024 – In the last post, we discussed how we can get rid of any hooks placed into our process by an EDR solution. However, there are also other mechanisms provided by Windows, which could help to detect our payload. Two of these are ETW and AMSI.

Author: Kolja Grassmann

Mehr Infos »
Blog

Loader Dev. 1 – Basics

February 10, 2024 – This is the first post in a series of posts that will cover the development of a loader for evading AV and EDR solutions.

Author: Kolja Grassmann

Mehr Infos »
Do you want to protect your systems? Feel free to get in touch with us.

TLPT: Bedroh­ungs­­­orientierte Penetra­tions­tests nach DORA

Search

TLPT: Bedroh­ungs­­­orientierte Penetra­tions­tests nach DORA

January 24, 2025

TLPT: Bedrohungs­orientierte Penetrations­tests nach DORA

This blog post is written in German as it is very specific to the implementation of DORA and TLPT in Germany. A summary is provided in English.

Summary

Since January 17, 2025, the Digital Operational Resilience Act (DORA) has been put into practice. One important aspect of DORA is the requirement of regularly performing threat-led penetration tests (TLPT). Only selected entities within the financial sector are required to conduct TLPTs. Even though TLPTs sound like a new concept, they have actually existed in Germany since 2020 in form of TIBER tests. This blog post describes the concepts behind TLPTs and how they are conducted. Furthermore, alternatives for targeted and budget-oriented red team assessments are given.

Wen betreffen DORA und TLPT?

Am 17.01.2025 trat der Digital Operational Resilience Act (DORA) der Europäischen Union in Kraft. Die Verordnung hat das Ziel, die digitale operationale Resilienz im Finanzsektor sicherzustellen und zu stärken. Dadurch soll der europäische Finanzmarkt bestmöglich gegen Angriffe und Risiken in der IT‑ und Informationssicherheit geschützt werden. Nach Aussage der BaFin sind so gut wie alle beaufsichtigten Institute und Unternehmen im Finanzsektor regulatorisch betroffen (Quelle BaFin).

Ein wesentliches Instrument von DORA ist die Durchführung bedrohungsorientierter Penetrationstests, kurz TLPT. Diese Abkürzung leitet sich aus dem Englischen ab und steht für Threat-led Penetration Test. Während DORA nahezu alle Unternehmen im Finanzsektor betrifft, müssen längst nicht alle diese Unternehmen auch TLPTs durchführen. Ob ein Unternehmen zur Durchführung dieser erweiterten, bedrohungsorientierten Penetrationstests verpflichtet ist, entscheidet die zuständige Aufsichtsbehörde auf Basis der in DORA, Artikel 26 festgelegten Kriterien (siehe Verordnung der Europäischen Union) und informiert betroffene Unternehmen.

„Die BaFin wird diesen Identifikationsprozess Ende 2024/Anfang 2025 das erste Mal durchführen und dann regelmäßig wiederholen. Separat davon wird die BaFin in Abstimmung mit der Bundesbank die jeweiligen Institute und Unternehmen über den konkreten individuellen Testbeginn (Testanordnung) informieren.“, so die BaFin.

Neben potenziellen kritischen Auswirkungen auf systemrelevante Dienstleistungen des Unternehmens sowie den europäischen Finanzmarkt ist insbesondere auch der Reifegrad in der IT‑ und Informationssicherheit bei der Auswahl relevant.

Was versteckt sich hinter TLPT genau?

Regelmäßig führen meine Kollegen und ich Gespräche mit unseren Kunden aus dem Finanzsektor zum Thema TLPT. Die Kernfrage der Unternehmen ist dabei stets, was denn nun unter TLPT zu verstehen sei.

Im Grunde ist TLPT nichts Neues. Bereits seit 2020 begleitet die Deutsche Bundesbank die Durchführung von TIBER-DE-Projekten. TIBER-DE ist die Umsetzung von TIBER-EU für Deutschland. TIBER steht dabei für Threat Intelligence-based Ethical Red Teaming und stellt somit eine bedrohungsgetriebene Form eines Red-Team-Assessments dar.

Bei einem Red-Team-Assessment handelt es sich um einen ganzheitlichen Ansatz zur Überprüfung der IT‑ und Informationssicherheit. Dabei werden unterschiedliche Angriffsvektoren und ‑szenarien auf technischer, prozessualer und organisatorischer Ebene überprüft. Diese Überprüfung erfolgt durch die Simulation gezielter Angriffe mit aktuellen und relevanten Angriffstechniken.

Bei TIBER wird die Auswahl der Angriffsszenarien sowie der Taktiken, Techniken und Verfahren (aus dem Englischen Tactics, Techniques and Procedures – TTPs) durch unternehmensspezifische Threat Intelligence getrieben. Konkret bedeutet das, dass gezielt auf Basis der aktuellen Bedrohungslage des betroffenen Unternehmens Angreifergruppen mit ihren jeweiligen TTPs simuliert und so die Widerstandsfähigkeit des Unternehmens geprüft wird (siehe dazu Informationen der Deutschen Bundesbank). Dementsprechend stellt TIBER eine spezialisierte und bedrohungsorientierte Form von Red-Team-Assessments dar und steht als konkretes Rahmenwerk für die Projektdurchführung zur Verfügung (siehe Deutsche Bundesbank).

Ein TLPT im Rahmen von DORA baut laut der BaFin auf diesem Rahmenwerk auf und intensiviert die Zusammenarbeit zwischen der BaFin und der Deutschen Bundesbank (siehe dazu Informationen der BaFin). Gemäß der BaFin ändern sich lediglich „kleinere Details in der operativen Durchführung eines TLPT im Vergleich zu dem etablierten TIBER-DE Rahmenwerk“ (siehe Deutsche Bundesbank). Man kann also festhalten, dass ein TLPT im Wesentlichen ein TIBER-Test ist.

Wie bei TIBER-DE-Projekten ist auch bei TLPTs die Deutsche Bundesbank in die gesamte Projektdurchführung involviert. Sie unterstützt bei der Durchführung, überwacht deren Konformität und attestiert diese abschließend. Ohne eine Involvierung der Deutschen Bundesbank geht es also nicht.

Bereits aus dieser kompakten Beschreibung lässt sich erahnen, dass es sich bei einem TLPT nicht um einen alltäglichen Penetrationstest handelt. Die folgende Grafik der BaFin veranschaulicht dies:

Michael Brügge

Leitender Berater

Category
Date
Navigation
Abbildung 1: TLPTs als seltene, dafür spezialisierte Penetrationstests

Konkret fordert DORA die Durchführung eines TLPT in regelmäßigen Abständen von drei Jahren. Unternehmen, die in der Vergangenheit bereits freiwillig eine offizielle Überprüfung nach TIBER-DE durchgeführt haben, können sich diese entsprechend anrechnen lassen (siehe BaFin).

Wie läuft ein TLPT ab?

An der Durchführung eines TLPT sind unterschiedliche Akteure beteiligt. Diese Teams und ihre Rollen sind in der folgenden Grafik der BaFin dargestellt:

Abbildung 2: Involvierte Akteure eines TLPT

Da ein TLPT auf TIBER-DE aufsetzt, lässt sich der Ablauf eines TLPT-Projekts gut anhand von TIBER-DE erläutern. Grundsätzlich gliedert sich das Projekt in die folgenden drei Phasen:

  • Vorbereitungsphase
  • Testphase
  • Abschlussphase

Jede diese Phasen gliedert sich wiederum in mehrere Teilschritte und involviert verschiedene Akteure. Die folgende Grafik der BaFin skizziert den gesamten Ablauf eines TLPT:

Abbildung 3: Involvierte Akteure eines TLPT

Wie Abbildung 3 zu entnehmen ist, identifiziert die zuständige Finanzaufsicht betroffene Finanzunternehmen, legt die Testfrequenz fest und validiert den Testumfang. Anschließend sind die betroffenen Unternehmen dafür verantwortlich, die passenden Dienstleister für die Durchführung auszuwählen. Hier ist bewusst nicht nur von einem Dienstleister die Rede, da TIBER-DE eine strikte Trennung zwischen dem Threat-Intelligence-Provider und dem Red-Team-Provider vorsieht, das heißt die Sammlung von Informationen und die Durchführung des Red-Team-Assessments dürfen explizit nicht vom selben Personenkreis durchgeführt werden. Zwar ist es grundsätzlich möglich, hierfür nur einen Anbieter zu wählen, jedoch empfiehlt die Deutsche Bundesbank klar die Auswahl jeweils spezialisierter Dienstleister. Eine Liste attestierter TLPT- bzw. TIBER-Dienstleister gibt es für Deutschland übrigens bislang nicht (siehe BaFin). Unter bestimmten Voraussetzungen erlaubt DORA im Vergleich zu TIBER-DE die interne Durchführung (siehe Deutsche Bundesbank).

In der Testphase erfolgen anschließend zunächst die Sammlung von Informationen und die Ableitung bedrohungsorientierter Angriffsszenarien. Zu diesem Zweck wird sowohl die allgemeine Bedrohungslage für den Finanzsektor als auch unternehmensspezifische Bedrohungen betrachtet. Stellt sich dabei beispielsweise heraus, dass ein bestimmter Threat Actor derzeit verstärkt deutsche Finanzinstitute angreift und dazu Malware über Vishing-Angriffe verteilt, so spiegelt dies ein valides und bedrohungsorientiertes Szenario für den TLPT wider. Gemeinsam mit dem Unternehmen, dem Threat-Intelligence- und dem Red-Team-Provider sowie der Deutschen Bundesbank werden anschließend mehrere Szenarien ausgewählt und konkret definiert. Diese stellen die Ausgangslage für das Red-Team dar und legen die Taktiken, Techniken und Verfahren der simulierten Angreifer fest. Die gesamte Testphase erstreckt sich dabei auf ca. 18 Wochen, wobei auf die Durchführung der Angriffe ca. 12 Wochen entfallen.

Abschließend erfolgt die Berichtserstellung. Dabei ist wichtig zu beachten, dass nicht nur das Red-Team, sondern auch das Blue-Team des betroffenen Unternehmens seine Erkenntnisse entsprechend strukturiert niederschreibt. In anschließenden Replay- und Purple-Team-Workshops wird der gesamte Test noch einmal rekapituliert und es können mögliche „Was wäre, wenn“-Fragen geklärt werden. Diese Workshops sind erfahrungsgemäß für alle Beteiligten stets sehr aufschlussreich und liefern neben den Abschlussberichten tiefgreifende Erkenntnisse zu technischen, prozessualen und organisatorischen Defiziten. Zudem bietet ein derartiger Test eine gute Gelegenheit, die Erkennungs‑ und Reaktionsfähigkeiten des Blue-Teams zu testen und zu trainieren. Alle identifizierten Defizite werden abschließend in einem Behebungsplan adressiert und mit Verantwortlichkeiten versehen. Schlussendlich erfolgt die Attestierung der konformen Durchführung des TLPT durch die Deutsche Bundesbank und ca. 3 Jahre später beginnt das Ganze von vorn.

Sollten Sie zur Durchführung eines TLPT verpflichtet sein, sprechen Sie uns gern an. Als professioneller Anbieter für Red-Team-Assessments und Penetrationstests bieten wir auch die anforderungskonforme Durchführung von TLPTs und TIBER-Tests an. Weitere Informationen finden Sie unter https://cirosec.de/leistungen/red-team-assessments/.

Es muss nicht immer TLPT oder TIBER sein

Falls Ihr Unternehmen zur Durchführung eines TLPT verpflichtet ist, führt kein Weg an einer anforderungskonformen Umsetzung vorbei. In vielen Fällen sind Unternehmen des Finanzsektors jedoch gar nicht von der verpflichtenden Durchführung betroffen. Dann ist möglicherweise eine kompaktere Form eines Red-Team-Assessments sinnvoll.

Mit TIBER bzw. TLPT haben die BaFin und die Deutsche Bundesbank zwar ein wichtiges und konkretes Rahmenwerk für die Durchführung ganzheitlicher bedrohungsorientierter Penetrationstests geschaffen und durch die konkreten Vorgaben lassen sich die Projekte strukturiert und umfassend durchführen. Allerdings ist damit auch ein entsprechend hoher Aufwand verbunden, sowohl bei der notwendigen Anzahl von Personentagen für die externe Durchführung durch einen Threat-Intelligence- und Red-Team-Provider als auch für die notwendigen Eigenleistungen.

cirosec war in der Vergangenheit bereits maßgeblich in die Durchführung von TIBER-Tests involviert und hat daher nicht nur die notwendigen Skills als professioneller Red-Team-Anbieter, sondern kennt auch die damit verbundenen Aufwände. Insbesondere wenn ein Unternehmen nicht von der verpflichtenden Durchführung betroffen ist oder bislang noch keine Erfahrungen in der Durchführung klassischer Red-Team-Assessments gesammelt hat, kann ein kompakterer Ansatz hilfreich sein. Aus unzähligen Gesprächen mit unseren Kunden wissen wir, dass nicht jedes Unternehmen die Kapazitäten oder den notwendigen Reifegrad für ein derartiges Projekt hat. Es muss daher nicht immer TLPT oder TIBER sein.

Dennoch halten wir den Ansatz eines ganzheitlichen, bedrohungsorientierten Penetrationstests für enorm wichtig. Nur so lassen sich Zusammenhänge und übergreifende Risiken erkennen und anschließend adressieren. Als etablierter Anbieter für professionelle Red-Team-Assessments und Penetrationstests haben wir stets den Anspruch, unseren Kunden auf ihre konkreten Bedürfnisse abgestimmte Angebote zu unterbreiten. Aus diesem Grund gibt es bei cirosec nicht das eine Red-Team-Assessment. Stattdessen ermitteln wir gemeinsam mit unseren Kunden ein passendes Gesamtpaket, das die Motivation und die Projektziele des Kunden verfolgt, ins Budget passt und sich nach dem jeweiligen Reifegrad richtet. Insbesondere für Unternehmen, die in Zukunft potenziell von der verpflichtenden Durchführung von TLPTs betroffen sind, bieten kompaktere Formen eine gute Gelegenheit, erste Erfahrungen mit ganzheitlichen bedrohungsorientierten Penetrationstests zu sammeln.

Sprechen Sie uns daher gern an, wenn Sie einen kompetenten Partner für die Durchführung individueller Red-Team-Assessments oder eines standardisierten TLPT brauchen.

Further blog articles

Blog

Loader Dev. 4 – AMSI and ETW

April 30, 2024 – In the last post, we discussed how we can get rid of any hooks placed into our process by an EDR solution. However, there are also other mechanisms provided by Windows, which could help to detect our payload. Two of these are ETW and AMSI.

Author: Kolja Grassmann

Mehr Infos »
Blog

Loader Dev. 1 – Basics

February 10, 2024 – This is the first post in a series of posts that will cover the development of a loader for evading AV and EDR solutions.

Author: Kolja Grassmann

Mehr Infos »
Do you want to protect your systems? Feel free to get in touch with us.

The Key to COMpromise – Part 1

Search

The Key to COMpromise – Part 1

January 15, 2025

The Key to COMpromise - Pwning AVs and EDRs by Hijacking COM Interfaces, Part 1

Introduction

Antivirus (AV) and Endpoint Detection and Response (EDR) products are critical in securing systems in enterprise environments or personal setups. These products are designed to protect devices, but their widespread use – particularly in enterprises – means vulnerabilities in these products can significantly impact overall security. We previously analyzed Wazuh and found vulnerabilities that would have allowed lateral movement in the organization’s network. In this series, we will discuss how we identified vulnerabilities in multiple security products that could, in theory, allow privilege escalation to SYSTEM on millions of devices, assuming initial access was gained. We will introduce the general design of the targeted security products to give you some background information on the mechanisms that allowed us to escalate our privileges.

Technical Background

All the security products we examined include a user interface, which typically allows users to perform actions such as triggering filesystem scans, initiating updates, or modifying settings like excluded files. For example, setting an exclusion should require high privileges to prevent malware from excluding itself from scans. However, the user interface usually operates in the context of the user executing it. Especially in an enterprise setting, this user often lacks high privileges, as granting such privileges would violate good security practices.

How does a low-privileged user change settings?

Since the user interface cannot directly perform privileged actions, such as setting exclusions, a separate system process with higher privileges is required to execute these changes on behalf of the user interface. In our analysis, we will refer to: * The user interface as the front-end process. * The highly privileged system process as the back-end process.

To coordinate actions, the front-end process must communicate with the back-end process. Depending on the product, this communication occurs through named pipes, Remote Procedure Calls (RPC), or Component Object Model (COM) interfaces. Across all products we examined, the back-end process ran with SYSTEM privileges.

Security risks in back-end communication

A natural concern arises: Could malware abuse this communication to perform privileged actions? If malicious software could directly interact with the back-end process, it could exploit this pathway to, for example, modify the registry or other sensitive settings.

To mitigate this, security products typically verify that actions initiated by the back-end process originate from a trusted source. For example, they might check the signature of the executable initiating communication.

However, this safeguard is insufficient on its own, as Windows lacks strict boundaries between processes running under the same user account. A process can read or write to the memory of other processes in the same user context. It can even execute code within those processes. As a result, malware could potentially hijack a trusted process to abuse its connection with the back-end process.

Protections against code injection

To address this risk, security vendors implement additional protections to secure the front-end process:

  • Filter Drivers: These intercept system calls and prevent handles with privileges that could allow code injection from being created for the front-end process. This measure blocks many common code injection techniques, often relying on acquiring such handles.
  • DLL Allowlist Validation: During our testing, we observed measures that verify the location of loaded DLLs against an allowlist to prevent loading of untrusted DLLs.

These defences significantly reduce the risk of untrusted code injection.

Communication between front-end and back-end processes

The diagram below illustrates the components involved in the communication between front-end and back-end processes:

Figure 1: Overview of the components involved in typical communication between different processes of an EDR
Alain Rödel and Kolja Grassmann

Consultants

Category
Date
Navigation

Communication with the back-end process remains an attractive attack surface. For example, attackers could exploit it to trigger privileged actions, such as modifying the registry, from an unprivileged context. Manufacturers are aware of these risks and have implemented safeguards to prevent direct communication with the back-end process. However, previously discovered vulnerabilities, such as those in Avast [1,2], have demonstrated that bypassing these protections is possible.

Exploiting back-end communication

To abuse back-end communication, an attacker must first establish a way to interact with the back-end process. There are two primary approaches:

  • Exploit validation logic flaws: Identify weaknesses in the logic used by the back-end process to verify that requests originate from the front-end process.
  • Inject code into the front-end process: Attackers can indirectly communicate with the back-end process by executing code within the trusted front-end process.

In our research, we pursued the second approach. Using COM hijacking, we successfully injected code into the front-end process, enabling us to communicate with the back-end process from within the trusted front-end.

COM hijacking

Component Object Model (COM) interfaces provide additional functionality to applications, offering a framework for interprocess communication and object reuse. For instance, Windows Runtime (WinRT) is implemented based on COM. A key advantage of COM is its abstraction: developers using COM interfaces do not need to understand the underlying implementation, which could be written in another language, executed in a separate process, or even reside on a remote server in the case of Distributed COM (DCOM).

Some COM interfaces implement their functionality through DLLs that are dynamically loaded into the calling process when the interface is invoked. Hijacking such a COM interface allows injecting a custom DLL into the calling process, enabling code execution within the process’s context.

To use a COM interface the developer invokes the CoCreateInstance with a GUID, which then leads to a search of the right COM interface and returns a COM object if the interface is found. The following graphic gives a high level overview of how this could work for the TaskScheduler interface:

Figure 2: Example COM lookup of the ITaskScheduler COM object

The core idea of COM hijacking is to exploit the registry’s search order for COM interface definitions. When a COM interface is accessed, the system first looks for its definition in the HKEY_CURRENT_USER (HKCU) registry hive before checking the HKEY_LOCAL_MACHINE (HKLM) hive. If the COM interface uses a DLL to provide its functionality, the registry entry will include the path to the implementing DLL. Since the HKCU hive belongs to the current user, it can be modified by processes running with that user’s privileges. This means that any process running in the user’s context — including the front-end process of an EDR product running in the context of our unprivileged user — will prioritize COM definitions in the HKCU hive and stop searching once a match is found. The following diagram shows the registry accesses before and after a COM hijack:

Figure 3: Overview of the involved components

COM hijacking is most often discussed as a persistence technique. For instance, attackers could hijack a COM interface known to be invoked, ensuring their payload is executed. In our research, however, we employed COM hijacking differently. Rather than using it solely for persistence, we specifically targeted the front-end process of EDR products to load a custom DLL. This allowed us to execute code within the process context, leveraging the elevated privileges of the back-end process during communication. Interestingly, this approach proved effective against many EDR products. There was similar research in the past, which abused COM hijacking to bypass the self defense of similar products [5]. Futhermore James Forshaw previously demonstrated its use against VirtualBox [3].

In all the EDR products we examined, COM interfaces were used in the front-end process. Most of these interfaces were located under the HKLM hive, so there was no need to overwrite any data. However, overwriting an interface in the HKCU hive would also have been possible.

After hijacking a COM interface, every invocation of the targeted interface in the user’s context would trigger our hijacked COM interface. For our purposes, this enabled us to load our custom DLL into the front-end process whenever specific actions were performed, such as opening a file dialogue in the user interface.

Now that we have discussed COM-hijacking in theory, the next question is how we identified COM interfaces of interest within the front-end process.

Identifying a hijackable COM interface

The initial step in all the vulnerabilities we discovered involved achieving code execution in a front-end process via COM hijacking. As this was similar across all the products we analyzed, we will outline the general process here instead of repeating it for each specific product.

We can see that each COM lookup is performed via a GUID that matches to an CLSID (Class ID). Now we can hunt for those GUIDs and figure out what COM objects are used by the product.

For each product, the first task was to identify a COM Interface used by the front-end process.

This required considering several factors:

  • When is the COM interface invoked?
    • During the start of the UI
    • When entering a specific menu
  • Is the COM interface used by other processes?
    • To avoid unintended consequences (e.g., disrupting explorer.exe), we ensured the interface was unique to the target process or could be safely used in parallel.

We used the Process Monitor from the SysInternals suit to identify relevant COM interfaces. We first identified the process we wanted to target. Then, we used a filter to view only events triggered by this process. Next, we created a filter for registry events where the path contained CLSID and InProcServer32, indicating that the process tries to load a DLL used for a COM interface.

The following screenshot demonstrates how explorer.exe queries the relevant registry keys, providing insight into the COM interfaces it accesses:

Figure 4: Accesses to COM interfaces by explorer.exe

After identifying a potential COM interface, the next step was to confirm if the front-end process loaded the referenced DLL. We monitored file interactions and filtered paths containing the DLL name to do this. If the DLL was loaded, it would trigger a load event for the DLL specified in the registry:

Figure 5: Loading a DLL related to COM

Once a suitable interface was identified, the next step was to hijack it.

Hijacking a COM interface

One registry key we targeted across multiple products was:

Computer\\HKEY_LOCAL_MACHINE\\SOFTWARE\\Classes\\CLSID\\{9FC8E510-A27C-4B3B-B9A3-BF65F00256A8}

This COM interface loads the dataexchange.dll into the calling process.
To hijack the DLL, we first exported it:

reg export "HKLM\\SOFTWARE\\Classes\\CLSID\\{9FC8E510-A27C-4B3B-B9A3-BF65F00256A8}" .\export.reg /reg:64

Then, we opened the exported file export.reg in a text editor and changed the paths to HKEY_CURRENT_USER. We also changed the file path to point to our custom DLL:

Windows Registry Editor Version 5.00

[HKEY_CURRENT_USER\\SOFTWARE\\Classes\\CLSID\\{9FC8E510-A27C-4B3B-B9A3-BF65F00256A8}]

[HKEY_CURRENT_USER\\SOFTWARE\\Classes\\CLSID\\{9FC8E510-A27C-4B3B-B9A3-BF65F00256A8}\\InProcServer32]
@="C:\\\\poc\\\\dataxchange.dll"
"ThreadingModel"="Both"

Next, we imported the modified registry export:

reg import .\export.reg /reg:64

With these modifications, all calls to this COM interface from the context of our unprivileged user would invoke our custom DLL. This might lead to problems with other processes, so we should remove the hijack when we are done with exploitation.

Our DLL must export the functions the original COM DLL would expose to ensure smooth operation. This can be achieved by proxying calls to the original DLL using a template such as:

#include <windows.h>
#include <combaseapi.h>

#pragma comment( linker, "/export:DllGetClassObject" )

#define ORIGINAL_COM_DLL_PATH "C:\\Windows\\System32\\dataxchange.dll"

void Go(void) {
// Our payload
}

BOOL APIENTRY DllMain(HMODULE hModule, DWORD ul_reason_for_call, LPVOID lpReserved) {

switch (ul_reason_for_call) {
case DLL_PROCESS_ATTACH:
break;
case DLL_THREAD_ATTACH:
break;
case DLL_THREAD_DETACH:
break;
case DLL_PROCESS_DETACH:
break;
}
return TRUE;
}

typedef HRESULT(WINAPI * tDllGetClassObject)(REFCLSID rclsid, REFIID riid, LPVOID* ppv);

STDAPI DllGetClassObject(REFCLSID rclsid, REFIID riid, LPVOID FAR* ppv) {
// Start our payload
Go();

// Load the original DLL and proxy the function call to it
tDllGetClassObject pDllGetClassObject;
HMODULE hOrigDLL = LoadLibrary(ORIGINAL_COM_DLL_PATH);
pDllGetClassObject = (tDllGetClassObject) GetProcAddress(hOrigDLL, "DllGetClassObject");
if (!pDllGetClassObject)
return S_FALSE;

HRESULT hRes = pDllGetClassObject(rclsid, riid, ppv);

return hRes;
}

At this point, we achieved code execution in the context of the targeted product. So, the next step was to analyze the communication between the front-end and back-end processes for the specific product to get an idea of how to abuse this primitive.

Named pipe communication

Named pipes are a common method for communication between a server and one or more clients. They are accessible using a unique name (as the name suggests) and often serve as a communication channel between security products’ front-end and back-end processes.

Figure 6: Typical Named Pipe Communication via the WinAPI

We found that the easiest way to find out if a product uses named pipes was to use IONinja’s Pipe Monitor feature. For this, you click “New Session”, select “Pipe Monitor” and enable “Run as administrator”. You can click the “Capture” button in the top-right corner to start capturing named pipe traffic:

Figure 7: Starting IONinja
Figure 8: Listening to named pipes with IONinja

With this, you can interact with the product’s user interface to generate pipe traffic and watch for captured named pipe traffic that corresponds to the interaction. In our experience, there should be little named pipe communication on a vanilla system, so identifying the relevant communication should be straightforward if you have installed the product on a dedicated system.

Having identified the communication in IONinja, we have a pipe name and a process that opens the named pipe or writes to it. We now need to identify the logic. For this, we can look for strings beginning with \\.\pipe\, used when creating a named pipe. The logic that interacts with the named pipe will likely reference this string. You will also see calls to the CreateNamedPipe and ConnectNamedPipe functions.

For our initial target, all of this turned out to be unnecessary: When capturing data over a named pipe, we observed plaintext communication, including what appeared to be a registry key:

Figure 9: Registry path in named pipe traffic

The next section will detail how we exploited this communication to gain high privileges.

Replaying a recorded message

As shown in the screenshot above, the traffic on the named pipe for our first target contained a registry path and was not obfuscated. This message was sent every time we opened the front-end process.

Using Process Monitor, we observed that the back-end process accessed the registry key running as SYSTEM. This seemed promising, as writing a registry key as SYSTEM could lead to privilege escalation…

To test this theory, we implemented the following steps:

1. Prepare the Payload: We wrote a small program and converted it into shellcode using [donut](https://github.com/TheWover/donut).

2. Inject the Payload: Using our previously via COM hijacking loaded DLL, we injected the shellcode into the process. In the shellcode, we unloaded the DLL after a short sleep and then sent the modified data. This approach bypassed logic in the target process that appeared to validate loaded DLLs. Although we didn’t confirm whether bypassing this validation was essential, avoiding an unsigned DLL during communication helped minimize suspicion.

3. Initial Testing: To confirm our ability to replay the message, we modified the registry path in the recorded message. The modified path was successfully written to the registry:

Figure 10: Modified registry key written

We discovered that our ability to write registry keys was restricted to locations under the manufacturer’s designated registry path. This limitation prevented us from writing keys like RunOnce, which could enable privilege escalation.

However, we identified a promising registry key named Application Path. This key pointed to an application folder under C:\Program Files (x86). By modifying this path to one writable by us, we hypothesized that any high-privilege process loading from this path could execute our files, granting high privileges.

So, we modified the message again, choosing a path that would fit into the message without modifying any offsets. After injecting our DLL into the process, we replayed the modified message to overwrite the Application Path. Following a system restart, we observed that one of the privileged EDR processes executed files from the modified Application Path. By placing our payload in this directory, we successfully gained SYSTEM privileges:

Figure 11: Processes being started from modified path as SYSTEM

Conclusion

This blog post explored the attack surface associated with the interaction between an AV/EDR’s front-end and back-end processes. Key takeaways are:

  • Breaking Trust Assumptions: Using COM hijacking, we demonstrated how the assumption that the front-end process is inherently trusted can be exploited.
  • Finding Hijackable Interfaces: We described our methodology for identifying and hijacking COM interfaces.
  • Privilege Escalation via Named Pipes: We detailed how one target product communicated via named pipes and how replaying recorded messages enabled us to escalate privileges to SYSTEM.

In the next blog post, we will explore reversing RPC via COM and present a more complex exploit to achieve SYSTEM privileges by targeting another security product.

This article was written as part of joint research with Neodyme.

Further blog articles

Command-and-Control

Beacon Object Files for Mythic – Part 3

December 4, 2025 – This is the third post in a series of blog posts on how we implemented support for Beacon Object Files (BOFs) into our own command and control (C2) beacon using the Mythic framework. In this final post, we will provide insights into the development of our BOF loader as implemented in our Mythic beacon. We will demonstrate how we used the experimental Mythic Forge to circumvent the dependency on Aggressor Script – a challenge that other C2 frameworks were unable to resolve this easily.

Author: Leon Schmidt

Mehr Infos »
Command-and-Control

Beacon Object Files for Mythic – Part 2

November 27, 2025 – This is the second post in a series of blog posts on how we implemented support for Beacon Object Files (BOFs) into our own command and control (C2) beacon using the Mythic framework. In this second post, we will present some concrete BOF implementations to show how they are used in the wild and how powerful they can be.

Author: Leon Schmidt

Mehr Infos »
Command-and-Control

Beacon Object Files for Mythic – Part 1

November 19, 2025 – This is the first post in a series of blog posts on how we implemented support for Beacon Object Files into our own command and control (C2) beacon using the Mythic framework. In this first post, we will take a look at what Beacon Object Files are, how they work and why they are valuable to us.

Author: Leon Schmidt

Mehr Infos »
Red Teaming

The Key to COMpromise – Part 2

January 29, 2025 – In this post, we will delve into how we exploited trust in AVG Internet Security (CVE-2024-6510) to gain elevated privileges.
But before that, the next section will detail how we overcame an allow-listing mechanism that initially disrupted our COM hijacking attempts.

Author: Alain Rödel and Kolja Grassmann

Mehr Infos »
Red Teaming

The Key to COMpromise – Part 1

January 15, 2025 – In this series of blog posts, we cover how we could exploit five reputable security products to gain SYSTEM privileges with COM hijacking. If you’ve never heard of this, no worries. We introduce all relevant background information, describe our approach to reverse engineering the products’ internals, and explain how we finally exploited the vulnerabilities. We hope to shed some light on this undervalued attack surface.

Author: Alain Rödel and Kolja Grassmann

Mehr Infos »
Blog

Loader Dev. 4 – AMSI and ETW

April 30, 2024 – In the last post, we discussed how we can get rid of any hooks placed into our process by an EDR solution. However, there are also other mechanisms provided by Windows, which could help to detect our payload. Two of these are ETW and AMSI.

Author: Kolja Grassmann

Mehr Infos »
Blog

Loader Dev. 1 – Basics

February 10, 2024 – This is the first post in a series of posts that will cover the development of a loader for evading AV and EDR solutions.

Author: Kolja Grassmann

Mehr Infos »
Do you want to protect your systems? Feel free to get in touch with us.
Search
Search