
- Blog, Red Teaming
Loader Dev. 1 – Basics
- February 10, 2024
This is the first post in a series of posts that will cover the development of a loader for evading AV and EDR solutions.
Disclaimer
These posts are written to provide information to other professionals of the discussed topics.
The techniques used here are not novel and were documented by other people before. Therefore, the benefits of these posts for threat actors will likely be minimal. Nonetheless, we decided against releasing a full PoC implementation and will instead only provide code snippets as part of the posts. All credit should go to the people who did the original research on the techniques used.
Motivation
In customer environments, we frequently encounter different AV or EDR solutions. While it is often possible to ask for exceptions during a pentest, this is not always the most time-efficient solution and, in our opinion, often gives the customer a false sense of security. Asking for an exception is also not an option during red team engagements.
Therefore, evading AV and EDR solutions is a valuable skill. We recently took the time to develop a custom loader to learn more about the topic and have tooling for our projects. This blog post series documents different topics we explored while developing this loader. There are a lot of other good resources already out there on which our blog posts are based and that we will cite whenever possible.
General design
We decided to implement the actual loader in C with a bit of inline assembly. The reason for this decision was that we are comfortable with C and that native executables are a bit harder to reverse than e.g. C# assemblies. Additionally, we were also interested in implementing some parts of the loader or even the complete loader using Position Independent Code, which we will discuss later on in this series, and which will be easier using C.
Additionally, we wrote a Python script that allows us to provide configuration options and which automates the build process with shellcode or executables. In every build, values like encryption keys are generated anew and only the code needed for the current configuration is placed into the template.
The following graphic gives an overview of the design of the loader:
Consultant
- Blog, Red Teaming
- February 10, 2024
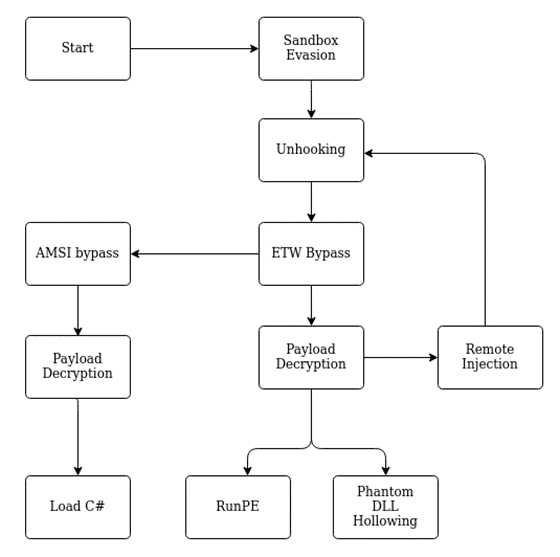
We will go over the details of the implementation in the following blog posts. In the following part of this post, we will document some of the basics needed for implementing a loader, as well as some of the more compact topics.
Signature detection
Most Windows systems will have an AV or EDR solution installed, which in most cases will scan files for known signatures. Therefore, we will need to evade basic signature detections, which look for known malicious patterns in our executable. This could be actual signatures or patterns like suspicious function imports (which we will cover in part 2 of this series).
One option is obviously to avoid these signatures by modifying the executable or the code we try to execute. In some cases, we can obfuscate the code e.g. using tools like chameleon for PowerShell or commercial solutions like Dotfuscator for C# executables. Some obfuscators also use LLVM. In some cases, this works quite well, but it is not necessarily the most flexible option for avoiding AV or EDR solutions as it is often language-specific and some of the solutions are themselves detected by signatures. Access to source code is also required in most cases, so this does not work in all situations.
We can also search the detected strings using tools like ThreatCheck and then modify these parts of our code or command specifically. However, this involves quite a bit of manual work and targets a specific AV or EDR solution (e.g. Windows Defender).
Another option is to decrypt the payload containing the signatures at runtime and execute it in memory. This means that for basic signature scans, we only need to avoid signatures in our loader stub which is used for the decryption and execution of the payload. We will still need to evade memory scans in some cases, but these are more resource intensive and therefore we can try to avoid triggering them or inject into locations that are not scanned by the solution (see Part 4).
Encryption
To decrypt our data, we could use the APIs provided by the Operating System. In general, when programming, this is probably what we should do, as implementing custom cryptography is never a good idea. Especially if you are not an expert in cryptography, which at least the persons working on the loader were not. However, in our context, using secure implementations is less relevant, as we intend to obfuscate a payload and not securely encrypt it.
Using the system APIs could lead to suspicious imports, but we can circumvent this. However, it will also make it easier to analyze our binary, as the API call is a well-defined location where an AV/EDR solution or analyst could see our decrypted data. If a custom function within the binary is used to decrypt the data, this will be harder.
So it would make sense to ship custom logic for decryption in the binary. But which algorithms should we use for this? We could use any algorithm here that successfully decrypts our payload. However, to make our lives easier and to keep our payload small, we should probably stick to algorithms that are easy to implement. Also, our focus here is not on choosing cryptographically secure algorithms, but rather on obfuscation.
One option that is quite simple to implement is XOR encryption with a static key. However, this can also be quite simple to remove if we know the key or can make an educated guess about its value. We would, however, assume that this is only relevant if we try to hinder manual analysis and not if we are facing e.g. an EDR solution. We could be wrong though (please let us know if this is the case). A basic XOR implementation could look as follows:
void xor(unsigned char* data, unsigned int data_length, unsigned char* key, unsigned int key_length) {
for (unsigned int i = 0; i < data_length; i++) {
data[i] = data[i] ^ key[i % key_length];
}
}
As you can see, we simply XOR the data with our key to decrypt it. The same logic is also used for encryption while preparing the payload. This is not a “secure” encryption algorithm, as our key is smaller than our data, but as we are only interested in avoiding signatures, this should work well in our context. We decided to use XOR to obfuscate all strings used in the loader, as it was easy to integrate during testing.
Another common choice is RC4 encryption, which we used in the loader to decrypt the main payload. A basic implementation looks as follows:
void rc4(unsigned char* key, unsigned long key_length, unsigned char* input, unsigned long input_length) {
unsigned char S[256];
unsigned char tmp;
// Key-scheduling algorithm
for (int i = 0; i < 256; i++) {
S[i] = i;
}
for (int i = 0, j = 0; i < 256; i++) {
j = (j + S[i] + key[i % key_length]) % 256;
tmp = S[i];
S[i] = S[j];
S[j] = tmp;
}
// Pseudo-random generation algorithm (PRGA)
for (int n = 0, j = 0, i = 0; n < input_length; n++) {
i = (i + 1) % 256;
j = (j + S[i]) % 256;
tmp = S[i];
S[i] = S[j];
S[j] = tmp;
int rnd = S[(S[i] + S[j]) % 256];
input[n] = rnd ^ input[n];
}
}
This implementation is exactly as described on Wikipedia with the only difference being that we use the output of the PRGA directly to decrypt our input. As this is a stream cipher, it is hopefully a bit harder to remove than XOR encryption (although we would assume that it is not that much harder). There are implementations that modify the cipher slightly, which would prevent the usage of off-the-shelf implementations for removing the obfuscation. However, we have not tried this ourselves.
Both XOR and an RC4 are commonly used in malware and therefore, we would expect any analyst to recognize them and be able to remove the obfuscation in a short time. If we want to buy time when facing actual analysts, it is probably a good idea to implement a less known cipher, as this will take the analyst more time to understand.
Dressing up our executable
Security vendors often have to deal with resource constraints as they need to handle the workload their products are facing while still allowing the user to use the system. In some cases, this leads to insecure compromises. Making your application look more legitimate can lead to less scrutiny from security products and therefore lessen your detection rate. So it is not a bad idea to sign your executable and set some of the attributes that a typical executable would have. This is e.g. done by ScareCrow.
Hiding the shellcode
Another problem is storing the shellcode, which might be quite large. Even if it does not contain any signatures, having a large blob of random data in a relatively small executable might be suspicious. Especially if it has high entropy, as mentioned before.
Resource section
One option here is to place our payload into the resource section. As this section can be used to store e.g. icons in a legitimate executable, I would assume that it can contain high entropy data in other legitimate executables as well and is therefore placed under less scrutiny by security products. We can simply use the Windows API to retrieve our data as described here on stack overflow. We can also try to hide the payload further, e.g. by storing it in a image, although this will likely not buy us much time, as this would probably be easy to recognize during analysis.
Staged payloads
The second option would be to request the payload from a remote server. We would only ship our loader with an URL at which the actual payload is stored and then retrieve the payload during runtime again using the Windows API. One additional advantage of this is that we could use logic similar to RedWarden to ensure, that our payload is executed in the right environment and not in some analyst’s sandbox.
However, there are also some drawbacks to consider here. The request and the payload sent back by the server could be considered suspicious. We must therefore take care that our request and the response from the server blend in with the normal traffic in the environment. There are additional factors that we need to consider here, like the reputation of our URL and security solutions that monitor the web traffic from our target host. Furthermore, we also need to make sure that our logic is proxy aware, as most corporate environments will only allow internet connections over the configured proxy.
Dynamic Analysis
There are different scenarios in which our executable will face dynamic analysis:
- Some products might have basic emulation logic built in to assess whether or not an executable is malicious
- In some environments, a downloaded executable might be placed in a sandbox
- Some products might upload our executable to a sandbox environment in the cloud
- Someone might manually use a sandbox to analyze our executable
In all these cases, it would be good to avoid being classified as malicious.
Sandbox detection
There are many strategies for detecting whether we are executing in a sandbox. If we know that we are executing in a sandbox, we can simply exit our process or display different non-malicious behavior to fool the sandbox.
A very basic technique for evading sandbox analysis is retrieving the system time, sleeping for a certain time, and then comparing the time that passed to the time that we expect to pass during the sleep call. The following code implements this using the NtQuerySystemTime() function:
void sandboxevasion() {
UINT64 system_time_before = 0;
UINT64 system_time_after = 0;
printf("[+] Retrieving system time using syscall\n");
pNtQuerySystemTime(&system_time_before);
printf("[+] System time before sleep: %lu\n", system_time_before);
printf("[+] Sleep for 2 seconds\n");
Sleep(2000);
printf("[+] Retrieving system time a second time\n");
pNtQuerySystemTime(&system_time_after);
printf("[+] System time after sleep: %lu\n", system_time_after);
UINT64 difference = (system_time_after - system_time_before)/10000;
printf("[+] Difference %lu ms\n", difference);
if (difference < 2000) {
printf("[+] Sandbox. Triggering exception.\n");
difference = 1/0;
}
else {
printf("[+] No sandbox :)\n");
}
}
As sandbox solutions will often fast forward sleep calls, the above logic will in some cases be able to detect that it is running in a sandbox. If this is the case, we trigger an uncaught exception by dividing by 0 and terminate the execution of our loader.
A good blog post that goes into more detail on detecting sandbox environments can be found on 0xPat’s blog.
Keying
Another strategy we can use to make it harder to analyze our executable in a sandbox is to key our executable to the target. Here we take properties of the target to e.g. encrypt our payload, so that in a dynamic analysis environment our executable will not run properly.
We could for example retrieve the name of our targeted user and use it as our encryption key:
char key[UNLEN + 1] = {0};
DWORD key_size;
GetUserNameA(key, &key_size);
printf("[+] User name: %s\n", key);
Or we could retrieve the name of the computer we want to execute our payload on and use it as our encryption key:
char key[MAX_COMPUTERNAME_LENGTH + 1] = {0};
DWORD key_size;
GetComputerNameA(key, &key_size);
printf("[+] Computer name: %s\n", key);
The hope here is that the username and the hostname are different in the sandbox than on the target host which seems likely. Therefore, our loader will not be able to decrypt the payload.
Exploiting resource constraints
Another strategy is to take up enough resources to make dynamic analysis impractical. Sandbox environments will most likely have to analyze many more samples than just our own. Therefore, they cannot spend too much time, memory, or computation time analyzing one sample. If we ensure that our executable will spend e.g. the first few minutes with calculations, most sandbox environments will probably have stopped analyzing our sample by the time our malicious logic is executed. A common way to archive this is to spend some time calculating hashes or prime numbers, as done in the following:
unsigned long long prime_sleep(unsigned int seconds) {
unsigned long long finalPrime = 0;
unsigned long long max = seconds * 68500;
for(unsigned long long n = 0; n < max; n++) {
unsigned char ok = 1;
unsigned long long i = 2;
while(i <= sqrt(n)) {
if (n % i == 0) {
ok = 0;
}
i++;
}
if (n <= 1) {
ok = 0;
}
else if (n == 2) {
ok = 1;
}
if (ok == 1) {
finalPrime = n;
}
}
return finalPrime;
}
There are also more sophisticated ways to go here. We could, for example, use the time to calculate iterations of a hash algorithm on our key to retrieve the actual key used for encryption. Alternatively, we could brute force the key used to encrypt our payload. This way we would create a dependency on the sandbox evasion logic, preventing an analyst or solution from simply skipping our logic.
Summary
In this blog post, we covered the basic design of the loader. We also covered basic signature scans and how to avoid them. Finally, we discussed a few basic techniques that can help to avoid detection in some cases. In the next post, we will cover dynamically resolving modules and functions to avoid suspicious imports and thereby lay some foundations for the following topics.
Further blog articles

Loader Dev. 4 – AMSI and ETW
April 30, 2024 – In the last post, we discussed how we can get rid of any hooks placed into our process by an EDR solution. However, there are also other mechanisms provided by Windows, which could help to detect our payload. Two of these are ETW and AMSI.
Author: Kolja Grassmann

Loader Dev. 3 – Evading userspace hooks
April 10, 2024 – In this post, we will go over techniques to avoid hooks placed into memory by an EDR.
Author: Kolja Grassmann

Loader Dev. 2 – Dynamically resolving functions
March 10, 2024 – In this post, we discuss dynamically resolving functions, which help to avoid static detections based on the functions imported by our executable.
Author: Kolja Grassmann

Loader Dev. 1 – Basics
February 10, 2024 – This is the first post in a series of posts that will cover the development of a loader for evading AV and EDR solutions.
Author: Kolja Grassmann