- Command-and-Control
Beacon Object Files for Mythic – Part 1
November 19, 2025
This is the first post in a series of blog posts on how we implemented support for Beacon Object Files into our own command and control (C2) beacon using the Mythic framework. In this first post, we will take a look at what Beacon Object Files are, how they work and why they are valuable to us.
The blog post series accompanies the master’s thesis “Enhancing Command & Control Capabilities: Integrating Cobalt Strike’s Plugin System into a Mythic-based Beacon Developed at cirosec” by Leon Schmidt and the related source code release of our BOF loader.
Introduction to C2 frameworks, Cobalt Strike and Mythic
If you are already familiar with the basics of C2, you can skip right ahead to What are Beacon Object Files and why do we need them?
C2 frameworks are a popular tool for bad actors to attack and infiltrate infrastructures and systems. They allow long-lasting inroads to be made into the infrastructure, through which attackers can interact with it through covert channels. These frameworks thus play a crucial role in cybersecurity and our day-to-day work at cirosec, enabling our red teams and penetration testers to simulate those real-world adversary tactics. The increasing complexity of modern cyber threats has driven the development of advanced C2 frameworks, such as Cobalt Strike and Mythic, which are widely used by threat actors and our red teamers alike.
The default C2 infrastructure
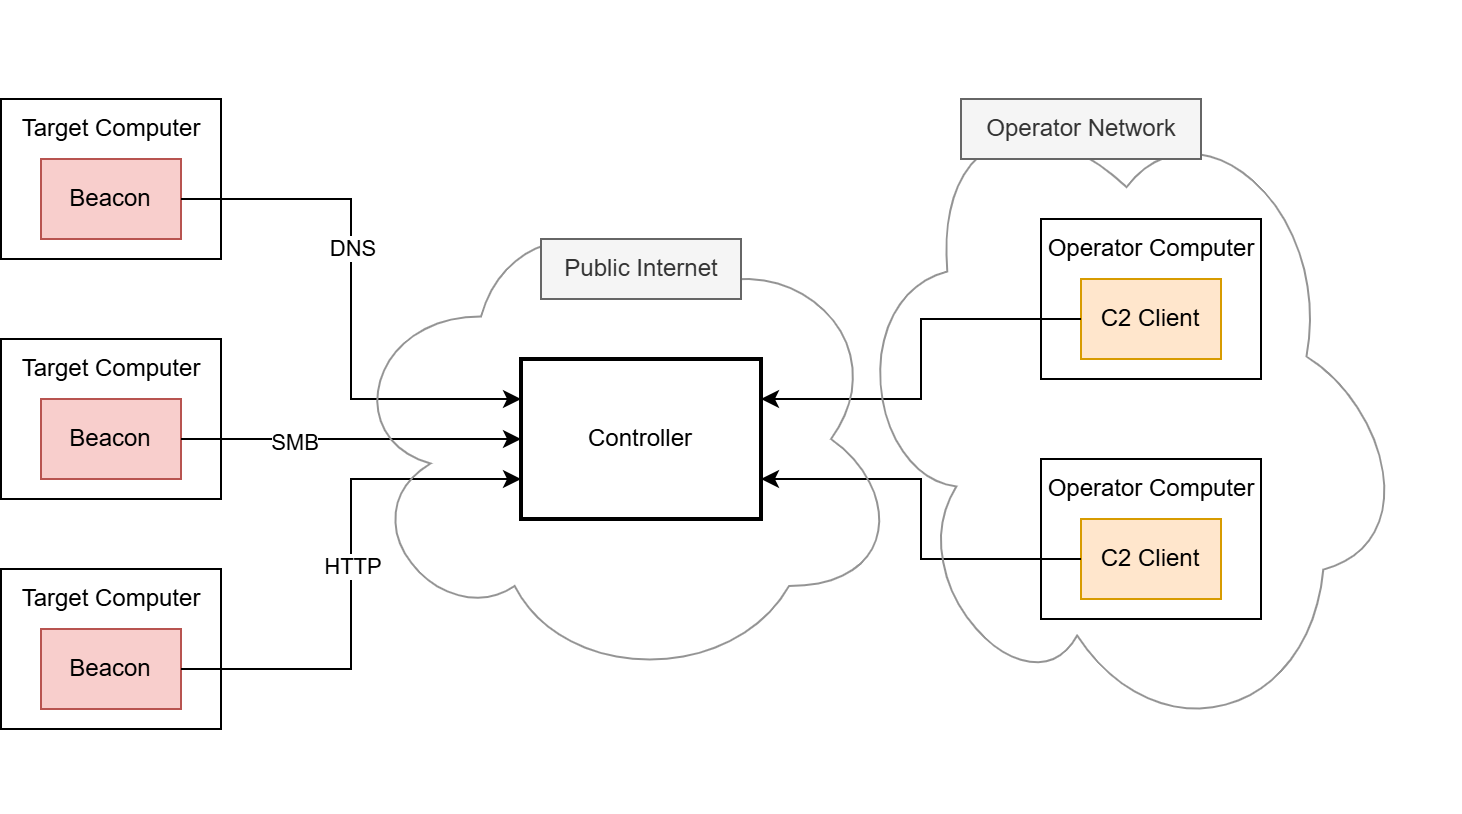
The C2 principle is implemented using two main components, the beacon (also known as the agent or implant) and the controller (also known as the team server).
The beacon is the component that is brought onto the compromised system using various delivery techniques, e.g. by using shellcode injection (we have developed our own shellcode loader to carry out delivery, which we have covered in a separate blog post series starting here, if you are interested). Once the beacon is launched, it connects back to the C2 infrastructure. Each new incoming connection from a beacon is usually referred to as a callback. The payload data transmitted through the callback is usually hidden and obfuscated by a so-called C2 profile. This C2 profile is implemented in both the beacon and the controller and defines the data format and the transport channel through which the payload data is sent. Usually, the HTTP protocol is employed for this, as it is frequently used for legitimate connections. It is rarely recognized as conspicuous in most environments and therefore rarely blocked. In some cases, other common network protocols such as DNS or SMB named pipes are misused to hide these messages. After the connection between the beacon and the controller is established, the red team can send commands to the beacon through this covert C2 channel.
The controller is the second important component, serving as the central control instance for the callbacks. The beacons and the controller must have a means of communication as otherwise no callbacks can be received. In the most basic C2 setup, this means that the controller must be directly accessible for all beacons deployed in the operation, but other, more complex setups are possible.
The controller is provided and administered by the red team. Depending on the C2 framework, the administration is carried out differently, for example via a web interface or a dedicated client.
A default C2 infrastructure, as described above, may look like this:

Consultant
- Command-and-Control
In this blog post series, we will focus on the Cobalt Strike and Mythic frameworks, which both work according to this principle.
Differences between Cobalt Strike and Mythic
Cobalt Strike – a widely used proprietary C2 framework – comes as a “battery included” solution. It contains a controller application to be set up on a Linux host as well as a pre-configured and pre-implemented beacon. The beacon payload can be generated in different formats, like an executable, shellcode or even as a Microsoft Word macro; however, each Cobalt Strike beacon payload is based on the same closed-source codebase.
In Mythic, there is virtually no coupling between the server and the beacon in terms of how the beacon must be designed. Mythic only contains the controller application and defines a set of interfaces to interact with it. The beacon can be developed freely using every programming language possible, as long as it implements at least one of the C2 profiles which interface with the Mythic server properly. This means, there cannot be a common feature set that both Mythic and its beacons can have. This is a huge drawback but also offers a high degree of flexibility: The beacons can adapt to every environment, which is why we decided to use Mythic at cirosec.
We have developed our own Mythic beacon, together with a custom C2 profile, to be used in our red teaming operations. As a result, our beacon is significantly less prevalent in virus databases and other products that search for malware based on file signatures or behavior, which is a major disadvantage of the Cobalt Strike beacon. However, there is a downside to using a custom-made beacon: Fortra, the company behind Cobalt Strike, is naturally continuing to diligently implement new features for its framework. Since we develop our own beacon for Mythic, we are unable to benefit from these features. One of these features, which was introduced back in 2020, recently caught our attention because it changed how operators interact with C2 beacons: Beacon Object Files.
What are Beacon Object Files and why do we need them?
Beacon Object Files, or BOFs for short, are compiled programs written to a convention that allows them to execute within the Cobalt Strike beacon process. They are a way to rapidly extend the beacon’s functionality with new post-exploitation features written in pure C code. It allows the beacon to be modified and extended after deployment since native features would need to be implemented beforehand. This would also result in a bigger size on disk, which may impede EDR evasion or the use of specific shellcode invocation techniques, such as the exploitation of Microsoft Warbird, which we have previously covered in another blog post. Native features can even be replaced by BOFs, which can further reduce the size on disk.
Running code within the beacon process, however, is nothing new in the C2 world. Many frameworks already offer the execution of PowerShell scripts, native PE files and .NET executables. The underlying techniques are usually less sophisticated, as they rely on existing functions of the Windows operating system – particularly the PE loader, the Common Language Runtime (CLR) for .NET executables or the PowerShell runtime. When launching executable programs, the operating system must provide a runtime in a separate process. This is known as “fork and run” and describes the creation of an auxiliary process as a child process (“fork”), in the context of which the program to be loaded is then executed (“run”). The creation of processes and threads is usually closely monitored and regulated by EDR software, which is why fork and run has not been a viable solution in well-secured environments for some time now. .NET executables also run through the Antimalware Scan Interface (AMSI), and removing it is often detected. EDR software is developing rapidly in this area.
This is exactly where BOFs come into play. They are designed in such a way that they are not dependent on the fork-and-run pattern but instead can be executed completely within the beacon process. Of course, this also has the advantage that they do not have to be stored on the hard disk at any time. Since BOFs are developed in C, they theoretically are unlimited in their range of functions.
Due to the relatively high popularity of BOFs (at least within the Cobalt Strike environment), there are already many implementations of known attacks that we also want to make use of. We will see some of them in the second part of this blog series.
While Cobalt Strike, as the pioneer project using BOFs, has a whole ecosystem built around them, Mythic lacks native BOF support. Porting them to other frameworks has been done several times: Havoc, Sliver, Empire and Brute Ratel are other C2 frameworks that also support BOF execution. However, many of these solutions lack compatibility with BOFs that were explicitly built for Cobalt Strike. This is often because many BOFs are instrumented by Cobalt Strike’s Aggressor Script – a proprietary scripting language that manages the invocation of BOFs on the server side amongst many other things. Aggressor Script is based on Sleep, an interpreter language for the Java Virtual Machine (JVM), which is why it cannot be used for Mythic (or any other C2 framework not written in Java).
Likewise, the implemented loaders are technically dependent on the C2 infrastructure in some cases, making it difficult to port them to Mythic. Our goal was to avoid these issues with our own approach and thereby make BOFs usable for us as well. The third part of this blog series covers the development of our BOF loader in detail as well as how we bypassed the dependency on Aggressor Script. But first, we will look at the BOFs’ file format to see how they work.
How do BOFs work?
Forta’s official documentation on developing BOFs is our first point of reference for explaining how they work. It shows the minimum code boilerplate for a BOF and compiler calls for it.
#include <windows.h>
#include "beacon.h"

void go(char *args, int alen) {
    BeaconOutput(CALLBACK_OUTPUT, "Hello, World! ", 13);
}
We will go into detail about the sample code later. Let’s just assume that this is working BOF code that outputs “Hello, World!”.
Since BOFs are designed to run on Windows, they should be compiled with a Windows-native compiler or the cross-compiler toolchain MinGW if you want to build on Linux. These sample calls are listed in the documentation:
- cl.exe /c /GS- hello.c /Fo hello.x64.o
for compilation on Windows - x86_64-w64-mingw32-gcc -c hello.c -o hello.x64.o
for compilation on Linux using MinGW
These calls will compile the source code input file hello.c, which includes our boilerplate BOF code. You may have noticed the /c and -c switches. Apart from those flags, these are just standard compiler calls (the /GS- flag for cl.exe simply disables the stack overflow protection). The /c and -c switches stand for “compile only”, which may sound redundant at first – after all, we are working with a compiler. However, a usual compiler call does more than that: after compilation, the linker is automatically invoked. The compilation step merely converts the source code into machine code. The linker then ensures that external functions are resolved (“linked”) and that the machine code is converted into the executable Portable Executable (PE) format.
When the linking step is left out, the compiler produces a so-called object file (ending in .o or .obj) from the source code instead of a runnable program. Although this file contains the translated machine code, it does not yet contain a complete execution environment. In particular, there are no references to external libraries and functions: their pointers are not yet filled with actual addresses, which is one of the tasks the linker would do. Skipping the linker also has the effect that there can always be exactly one object file per translation unit, which is just the fancy term for a single C/C++ source code file after precompilation. Linking several object files together is also a task of the linker. It also provides the entry point for the executable so that the operating system knows where to begin running it.
A simplified compilation process is shown below. In our case, we stop after the compilation step and are thus left with the .o files.
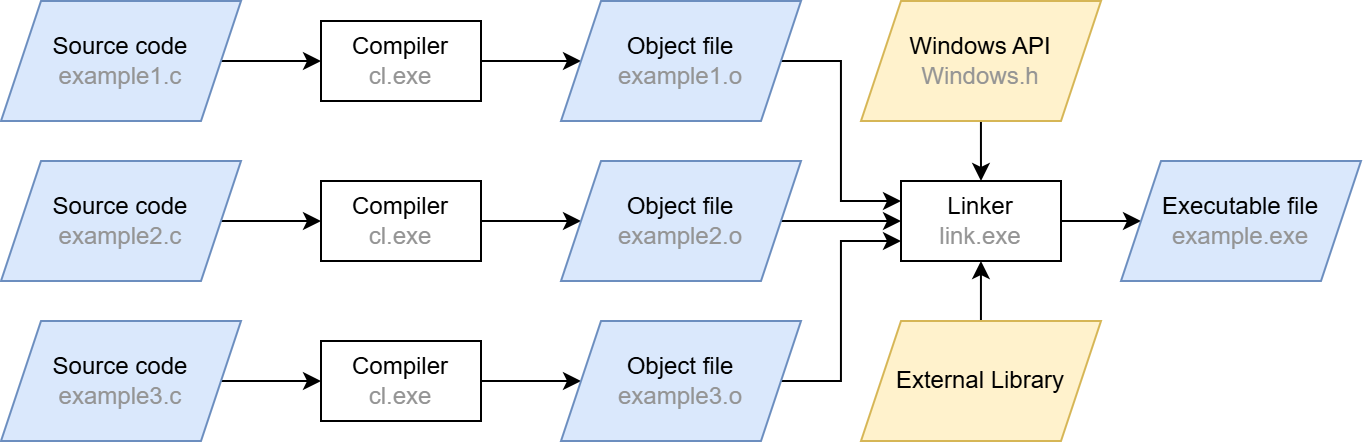
When targeting Linux, these object files are saved in the Executable and Linking Format (ELF) just like fully linked, executable files. On Windows, a separate format is used called Common Object File Format (COFF). Since BOFs are targeting Windows, COFFs are the ones generated by these compilation instructions provided by the Cobalt Strike documentation.
Let’s take a look at how this format is structured.
Understanding the COFF file format
The COFF format originated in the Unix ecosystem, where it was already used for object files. Linux nowadays uses the ELF format, but COFF has been adopted by Windows. It is structurally very similar to the executable PE format and serves as its basis. Therefore, many of the COFF elements are part of the PE specification.
Thus, COFF is an intermediate unit right before PE where the linker has not yet engaged. As a result, COFF files must hold metadata for the linker, as it is intended that the linker will later process them into an executable. Due to this metadata, the COFF format is more verbose and contains more debugging information but still remains smaller than a PE file, as most external implementations and operating system specifics to run it are not yet included. This usually results in file size savings between 65 and 90 percent compared to a linked PE file, mostly depending on the proportion of external symbols.
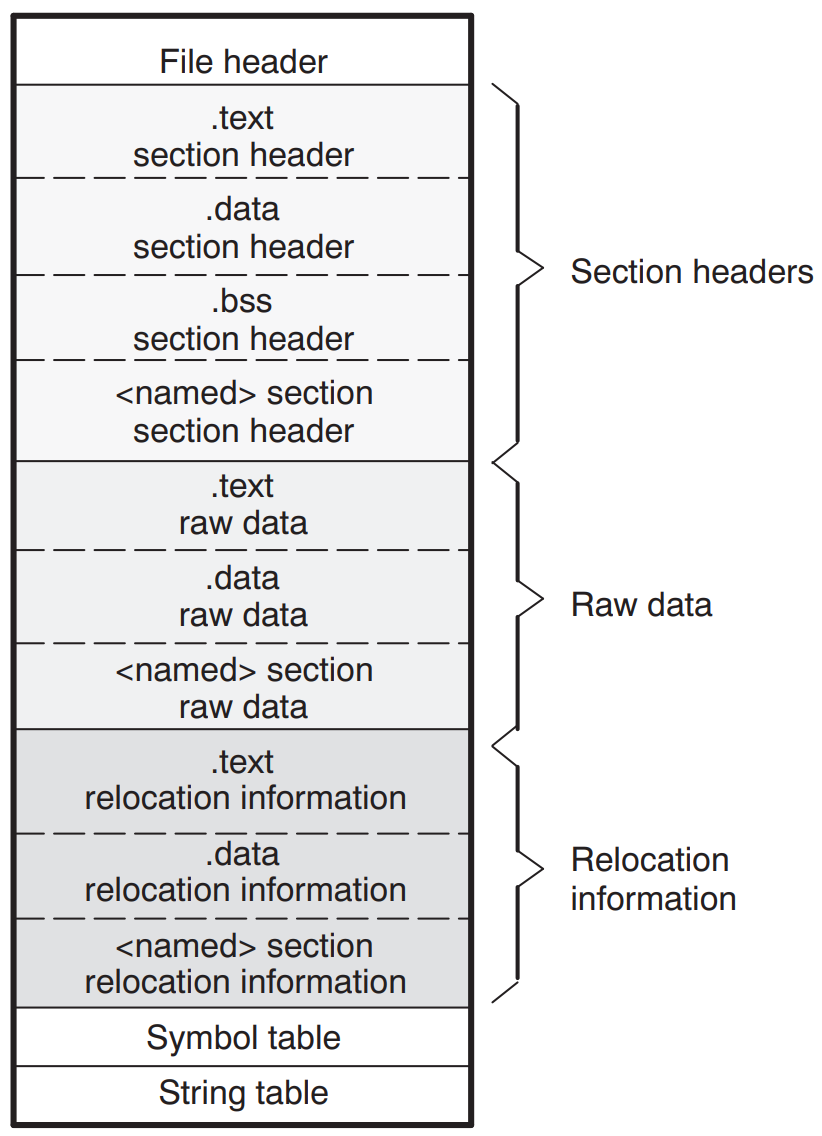
A COFF file consists of several parts, each serving a specific purpose:
File header
The file header contains general information about the file. Most importantly, this includes the number of sections as well as pointers to and sizes of the other parts of the COFF file, like the symbol table, which we will cover shortly. These pointers allow us to maneuver around every bit of the file using basic math.
Sections
The actual contents of COFF files are stored in named sections. Each section has a well-defined purpose as seen in other file formats, too: The most important section is the .text section, containing the executable machine code. There are also the .data, .bss and .rdata sections, holding static global, uninitialized and read-only variables, respectively.
Each section has a section header, all of which follow immediately after the file header in the COFF file. The section headers contain metadata about the section’s raw data, such as its position and size, similar to the information in the file header. However, the most important information here is the “Pointer to Relocations” field. It marks the memory position to the relocation information section where unresolved symbols are listed. Symbols are used to abstractly denote variables, functions, but also cross-referencing data such as string constants. Since the linker has not yet been applied to the file, these symbols have not been set correctly. In a normal scenario, they are only resolved once the final memory layout is known.
Symbol table
The symbol table provides metadata for symbols used in the file. For example, if the function int add(int a, int b) is defined in this file, it is represented as the symbol add in this table. The table itself can have any number of entries and therefore has an indefinite size. However, the entries themselves are always 18 bytes in size. The most important fields in such an entry are:
- Name of the symbol (or pointer to the name)
- Address of the symbol (where it is defined in the program)
- Section number (1-based, 0 if the symbol is not defined within this COFF file)
Symbols are of two types: internal and external. Internal symbols reference a symbol created within the COFF. The section number field then contains the corresponding section in which the symbol is defined. If the symbol is external (e.g. pulled in from an external library), the section number field is set to 0. This is the sign for the linker to go and find the correct implementation of that symbol somewhere else.
Also, pay attention to the symbol name field: it is implemented as a union that can take two data types at the same time. The first possible value is a char[8] and is defined to contain the name of the symbol. It can therefore only be 8 bytes long (must not be null terminated. If the symbol name happens to be longer, it is stored in the string table instead. To recognize this, the first byte of the union is set to zero. The rest of the union contains a memory offset relative to the beginning of the string table, defined as uint32_t[2]. The symbol can be retrieved at this position. External symbol names also follow a convention in which they are prefixed with a constant that is specific to the platform ‑ if marked as such by using the DECLSPEC_IMPORT attribute. These prefixes are:
- __imp_ for the x64 platform
- __imp__ for the x86 platform
The external printf function, for example, would then have the symbol name __imp_printf on the x64 platform. This is important, as it makes it possible to identify an external symbol by its name prefix only. On Linux, the symbols of a COFF file can be listed manually using the nm tool: nm -C <coff_file>:
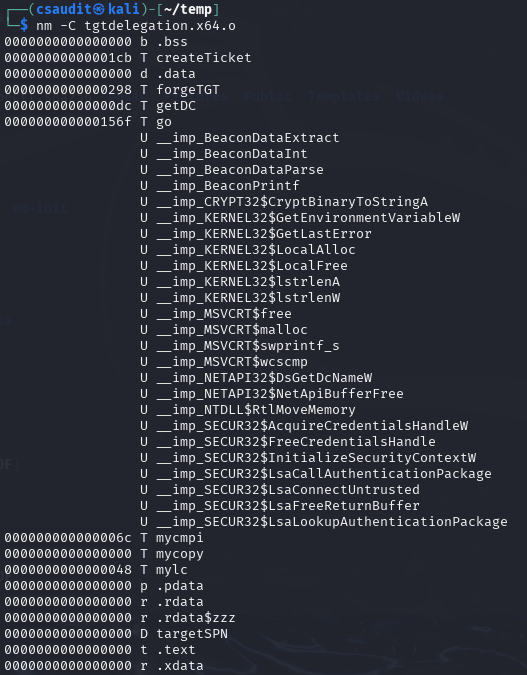
Here we can see some external functions starting with Beacon and some other strange looking functions containing a dollar sign. We will take a look at them in a bit.
Symbols are usually not accessed through the symbol table itself (e.g. by iterating over the table). They are referenced in the relocation information entries, which we will cover next.
Relocation information
A relocation in the context of object files refers to an adjustment applied to machine code or other data to correct memory addresses that cannot be determined at compile time. Specifically, relocations mark locations within a section where symbol addresses must be inserted once the final memory layout is known during linking (or in this case during manual loading). Relocation entries are very small in size, as they only contain these three fields:
- Virtual address: the address of the item to which relocation is applied (offset from the beginning of the section, plus the values of the sections RVA/Offset field)
- Symbol index: index in the symbol table for the relocation target
- Type: specifies the relocation type
Since we need to mimic a linker, these relocation entries are important to us. Luckily, doing those relocations is straightforward. The virtual address field contains the relative address where a symbol is accessed within the section (e.g. a function call). We simply extract the name and address of the symbol pointed to by the symbol index field within the symbol table and search for the symbol (e.g. the function definition). Then, we place the actual virtual address of this symbol’s location to the address pointed to by the virtual address field.
This approach, however, has two tricky obstacles. First, this “search for the symbol” procedure is not predefined, especially not for external symbols. For this, we need a separate mechanism, which we will explain later. Second, the virtual address of the symbol found cannot simply be copied to the relocation location. We must observe a few guidelines. These guidelines are specified by the Type field. Some relocations must be address offsets relative to the start of the section, others must be absolute addresses. The sizes of the addresses can also differ, even within the same processor architecture. The different types are described in the PE specification, which is why we will not go into detail here (it’s kind of boring anyways).
String table
As already described, this section holds the symbol names from the symbol table that are larger than 8 bytes. The table begins with an integer that specifies its size, following the null-terminated name strings. The index referenced in the symbol table entry can be read up to the null terminator to retrieve the full name from this table.
Summary
This is a general representation of a COFF file with the .text and .data sample sections and the individual areas:
With this information, we are now able to reproduce the linking process. In summary, this is what we need to do:
- Jump from the file header to the first section header
- From there, iterate over all section headers using the number of sections field
- For each section header, iterate over all relocation entries for this section
- For each symbol entry, check if its name is stored directly within it or retrieve it from the string table otherwise
- Check if the symbol is an external symbol
- If yes: search for the external symbol and resolve it manually
- If no: resolve the symbol manually
Now we know the most important aspects of how COFF files work. As hopefully apparent by now, our goal is to replicate the linking process from Windows’ own linker but not “ahead of execution” but rather dynamically at runtime. We will do this by copying the BOF into memory and do the relocations for it manually. Furthermore, in-memory linking is advantageous because otherwise, linking would have to take place on the file system, which could be quickly classified as suspicious by EDR software.
But there is still one thing missing from our approach so far that a standard executable EXE has. As mentioned above, we do not yet have a relocation mechanism that allows us to search for external symbols. Specifically, this means that we can only use functions that we have implemented ourselves (internal symbols). This is a huge limitation because it means that both the C standard library (malloc, free, memcpy, strcmp, etc.) and even more powerful functions such as those from the Windows API (VirtualAlloc, VirtualFree, LoadLibrary, etc.) are not available to the BOF. We can only fall back on the functionality that the compiler provides natively (so-called compiler intrinsics).
Fortunately, Cobalt Strike invented some workarounds, which are even frequently used by several BOFs. We also need to support these so that we can execute BOFs designed specifically for Cobalt Strike, which is part of our goal.
The holy quadruplicity of manual function resolution
It would be unreasonable to expect our custom linker to be familiar with every conceivable Windows function. Fortra probably thought the same thing when they decided to link only four functions to the BOF by default, namely LoadLibraryA, GetModuleHandleA, GetProcAddress and FreeLibrary. With these functions, almost the entire range of the Windows API is available with relatively little implementation effort because they can be used to resolve virtually anything at runtime. So, we are already in a relatively good position with these four functions.
Our linker must know these four functions by name and be able to link them to the BOF as soon as they are called.
Interacting with the C2 infrastructure through the Beacon APIs
One of the workarounds for providing the beacon with more functions are the so-called Beacon APIs. They are made available to the beacon developer as a C header, usually referred to as beacon.h. After including it, the contained functions can be called in the BOF like usual C/C++ functions, for example to send output to the C2 server, to persist data in the beacon’s memory or to use predefined functions for process injection.
Since these functions are to be implemented in the beacon, they are external functions from the BOF’s point of view. When a BOF calls one of these functions, the calls there are visible as external symbols and must be linked before execution. That is the job of our BOF loader: it must know the functions (more precisely, their addresses) and link them into the BOF using COFF relocations.
The Beacon API functions in beacon.h can be grouped by functionality as follows:
| Beacon API | Description |
| Data Parser API | Reads the parameters passed to the BOF at invocation |
| Format API | Utility functions to help with formatting strings |
| Output API | Sends output to the C2 controller |
| Token API | Manipulation of the beacon’s current thread token |
| Spawn+Inject API | Leverages some of the beacon’s process injection capabilities |
| Utility API | A single utility function for string encoding conversion |
| Key/Value Store API | Gives access to a minimal key/value store within the beacon’s memory |
| Data Store API | Data store with the ability to obfuscate the stored data at runtime |
| User Data API | Retrieves the Beacon User Data (BUD) buffer when using a User-Defined Reflective Loader (UDRL) |
| Syscall API | Macros that call several Syscall functions resolved by the beacon |
| Beacon Gate API | Enables/Disables Cobalt Strike’s BeaconGate feature |
Most of these groups merely contain helper functions. The others correspond to a feature of Cobalt Strike. The most important ones are the Data Parser, Format and Output API. They are the minimum requirement for operating BOFs so that they can be parameterized and communicate with the C2 controller. All other APIs are only used sporadically by most BOFs, which we will go into detail in part two of this blog post series. That is why we will only discuss the first three here.
Data Parser API
The Data Parser API is used to extract arguments given to the BOF at invocation. They are serialized (packed) into a size-prefixed binary blob by Cobalt Strike. The Data Parser API unwraps this blob into its original arguments again. The parameters can then be retrieved like this:
#include "beacon.h"
void go(char *args, int alen) {
    datap parser; // define the parser struct (defined in beacon.h)
    char *arg1;     // define arg1
    short arg2;     // define arg1
    BeaconDataParse(&parser, args, alen);       // initialize the parser struct (mandatory)
    arg1 = BeaconDataExtract(&parser, NULL); // get first arg (string)
    arg2 = BeaconDataShort(&parser)               // get second arg (short)
}
Depending on the type of data to be extracted, different functions must be used. For strings or raw data, it is BeaconDataExtract; for shorts, it is BeaconDataShort; for ints, it is BeaconDataInt, etc. They must be called in the same order as the parameters were given to the BOF.
A BOF implementation would therefore have to be able to generate precisely this size-prefixed binary blob format and pass it on to the loader to be compatible with BOFs written for Cobalt Strike. TrustedSec provides a small Python script with its own BOF loader for this purpose.
Format API
The Format API is used to build large or repeating strings. It helps with allocating memory for strings and simplifies formatting, as this is not trivial within BOFs. Syntactically, it works like the printf function from the standard library. As in the Data Parser API, there is a dedicated struct definition formatp, which is used to manage memory and to keep the state of the current allocation.
An example on how the Format API is used manually can be seen here; however, the Format API is usually invoked as part of the Output API.
Output API
The Output API returns output to the C2 controller (i.e. Cobalt Strike) through the C2 profile. This is probably the most important API because it is the only way to see any results from BOFs. It allows displaying messages as informational and as errors using the type parameters of the functions.
The Output API offers two functions: BeaconOutput to print constant strings and BeaconPrintf to print formattable strings. The latter one is usually implemented using the Format API functions itself since printf logic is already present there.
In Figure 2, we have already used BeaconOutput to print “Hello, World!”. This string is transmitted through the C2 profile to the controller.
As shown in the table above, there are several other Beacon API groups. However, many of them are simply unsuitable for use outside of Cobalt Strike, as they interact with functions that only exist or make sense within it. We have therefore focused only on the ones mentioned above.
However, there is yet another powerful way to extend the functionality of BOFs: Dynamic Function Resolution.
Extending functionality using Dynamic Function Resolution
Although we can already reload any functions manually by using LoadLibraryA and GetProcAddress, this is not particularly convenient. BOFs offer a simpler alternative: Dynamic Function Resolution (DFR). DFR is a convention for naming external functions within the BOF code so that the loader can recognize them prior to execution, which is much less error prone. These so-called DFR declarations allow the use of external Windows API functions as long as they can be found by the loader.
A DFR declaration consists of the name of the library, a $ and the name of the function. In addition, the “WINAPI” attribute must be specified, and the return type and parameters must be set correctly. For example, the DFR declarations for VirtualAlloc and DsGetDcNameA must look like this:
// VirtualAlloc from KERNEL32 |
The loader then sees the function name and recognizes it as an external symbol. Then, all it must do is load the part before the $ with LoadLibrary and the part after it with GetProcAddress, and you have the function address. Of course, there are other, quieter methods available, such as PEB walking, but for the sake of simplicity, we will stick to the “official” method for now. The function pointers can then be linked to the function call locations using COFF relocation.
TrustedSec has also taken the trouble to collect all useful functions of the Windows API and provide them as DFR declarations in a C header file called bofdefs.h. It can be obtained here. After including it, you can directly use most of the Windows API functions by their DFR signature.
Conclusion
In this first part of the BOF blog post series, we showed how BOFs and the underlying COFF file format are structured, how to build your own mini-linker and how BOF functions can be extended using the Beacon API and DFR.
In the next part, we will look at a few publicly available BOFs to see how powerful BOFs can be in practice. The third and final part goes into more technical detail and deals with the implementation of the loader/linker.
Further blog articles

The Key to COMpromise – Part 1
January 15, 2025 – In this series of blog posts, we cover how we could exploit five reputable security products to gain SYSTEM privileges with COM hijacking. If you’ve never heard of this, no worries. We introduce all relevant background information, describe our approach to reverse engineering the products’ internals, and explain how we finally exploited the vulnerabilities. We hope to shed some light on this undervalued attack surface.
Author: Alain Rödel and Kolja Grassmann